
The MiniBrew – First brewsession and review
 This is the second (and very long) post I write about the MiniBrew brew system so if you haven’t read the first one, please do so now so that you are up to speed about the basic facts before reading the hands on experience and rewview.
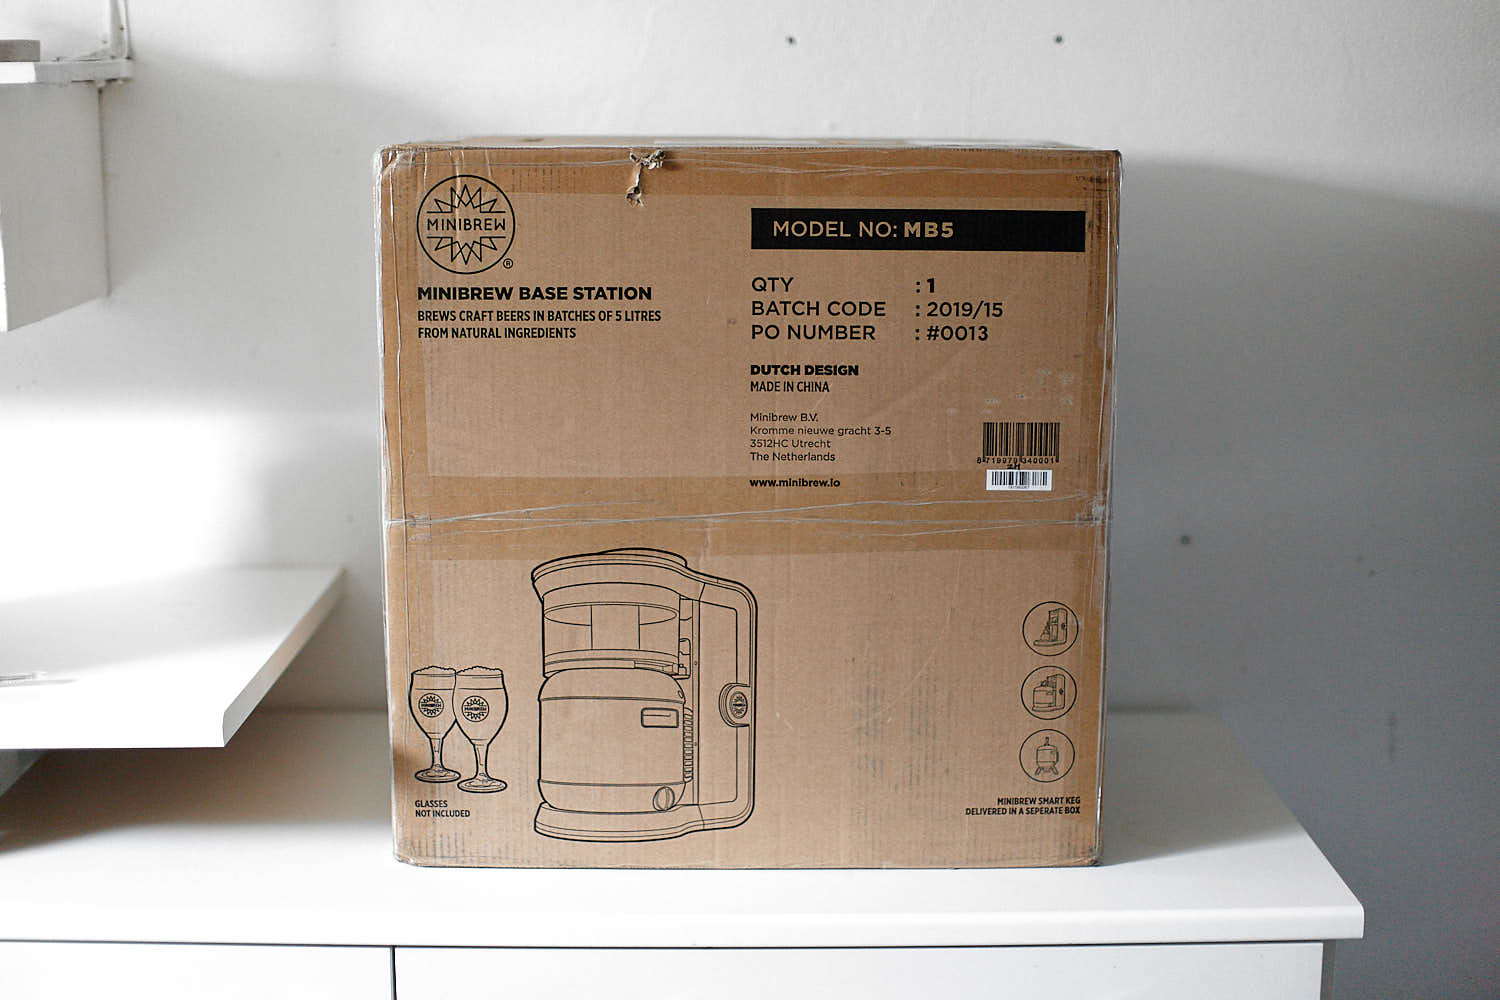
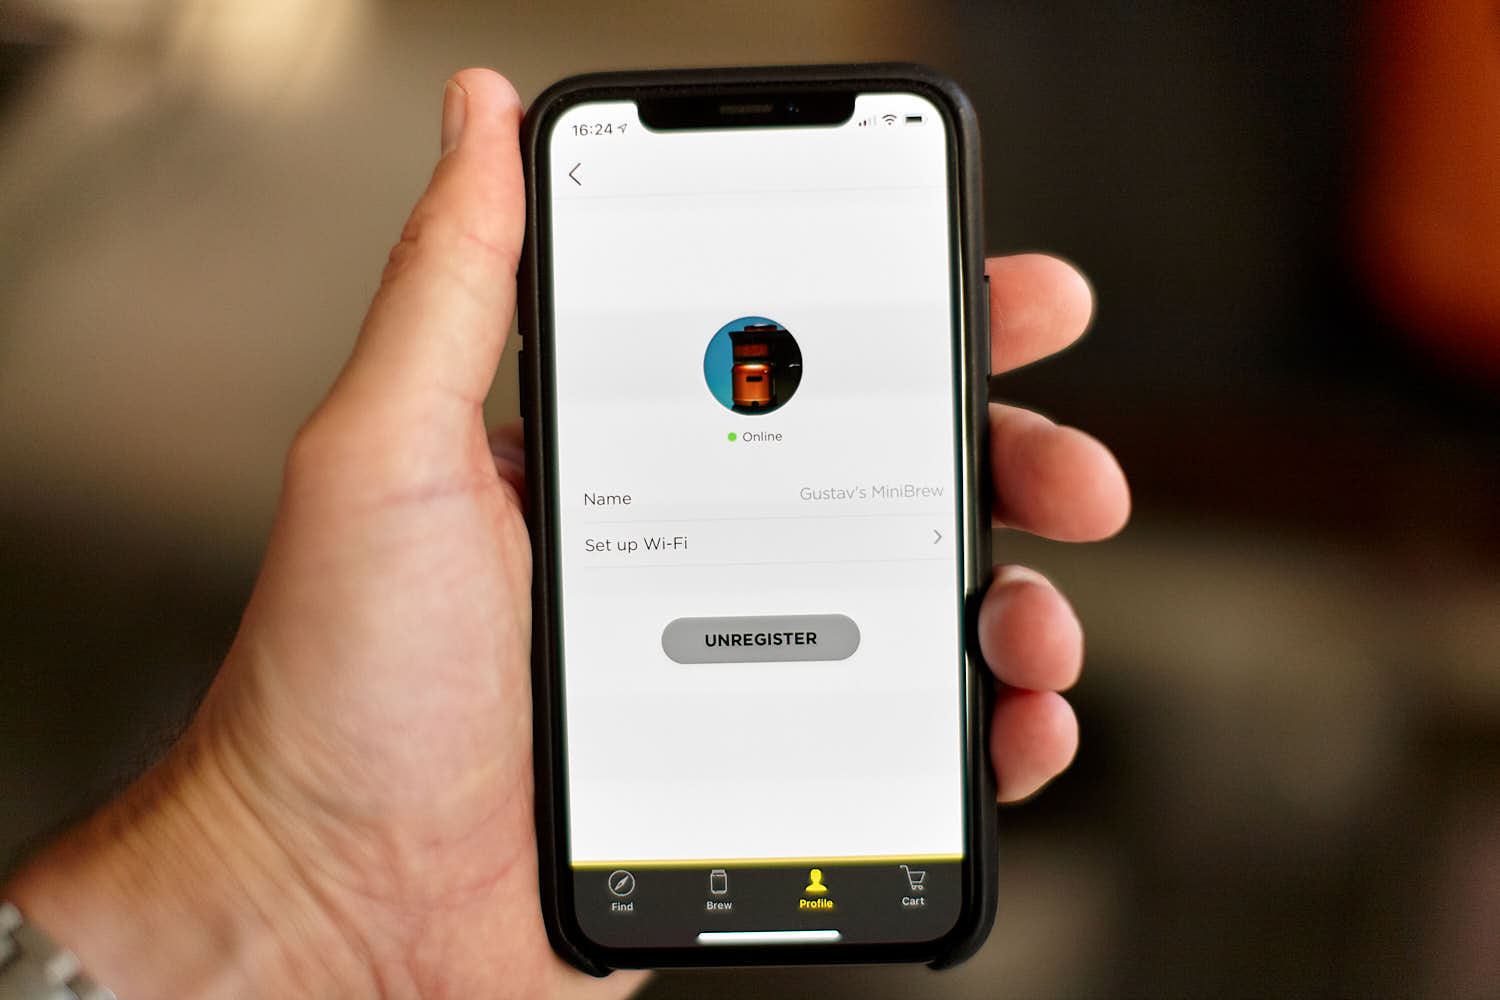
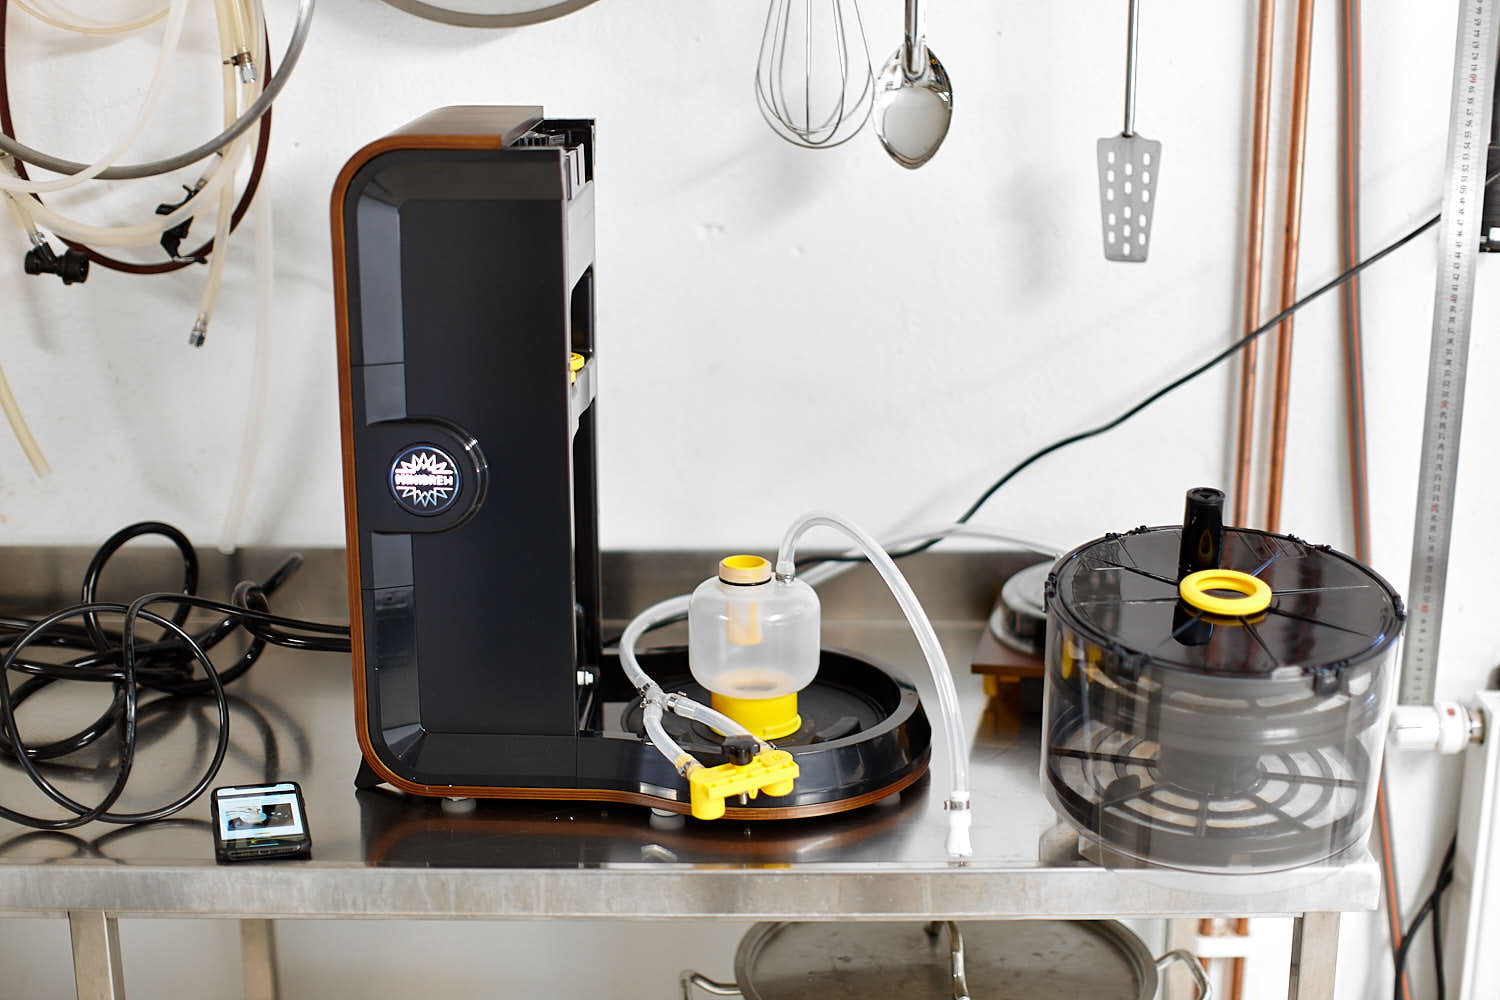
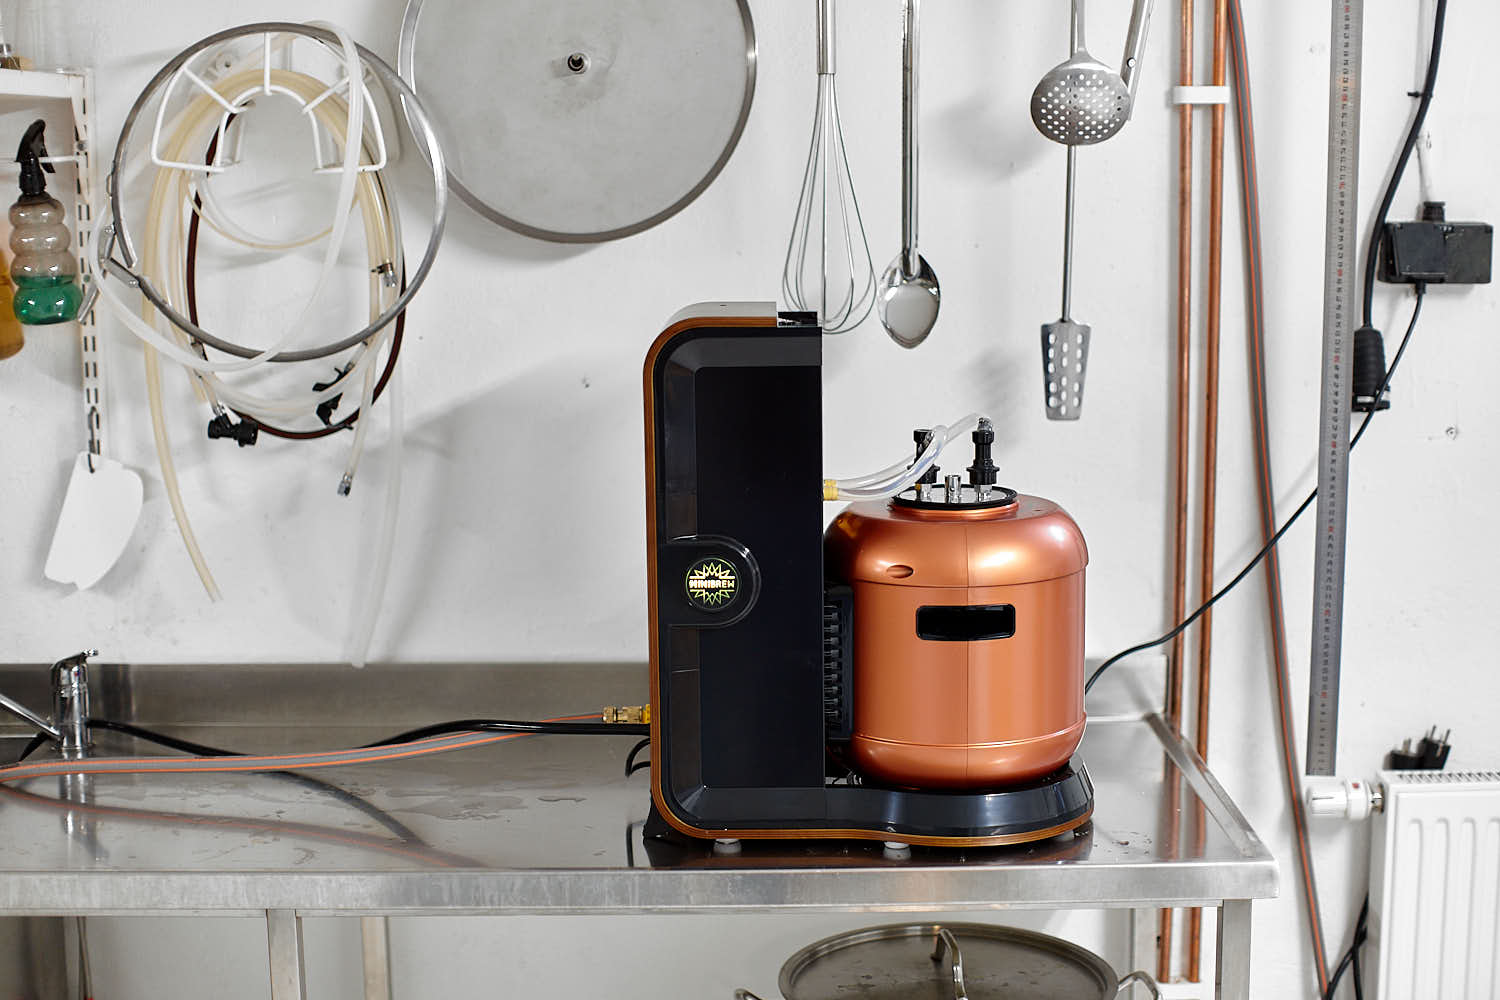
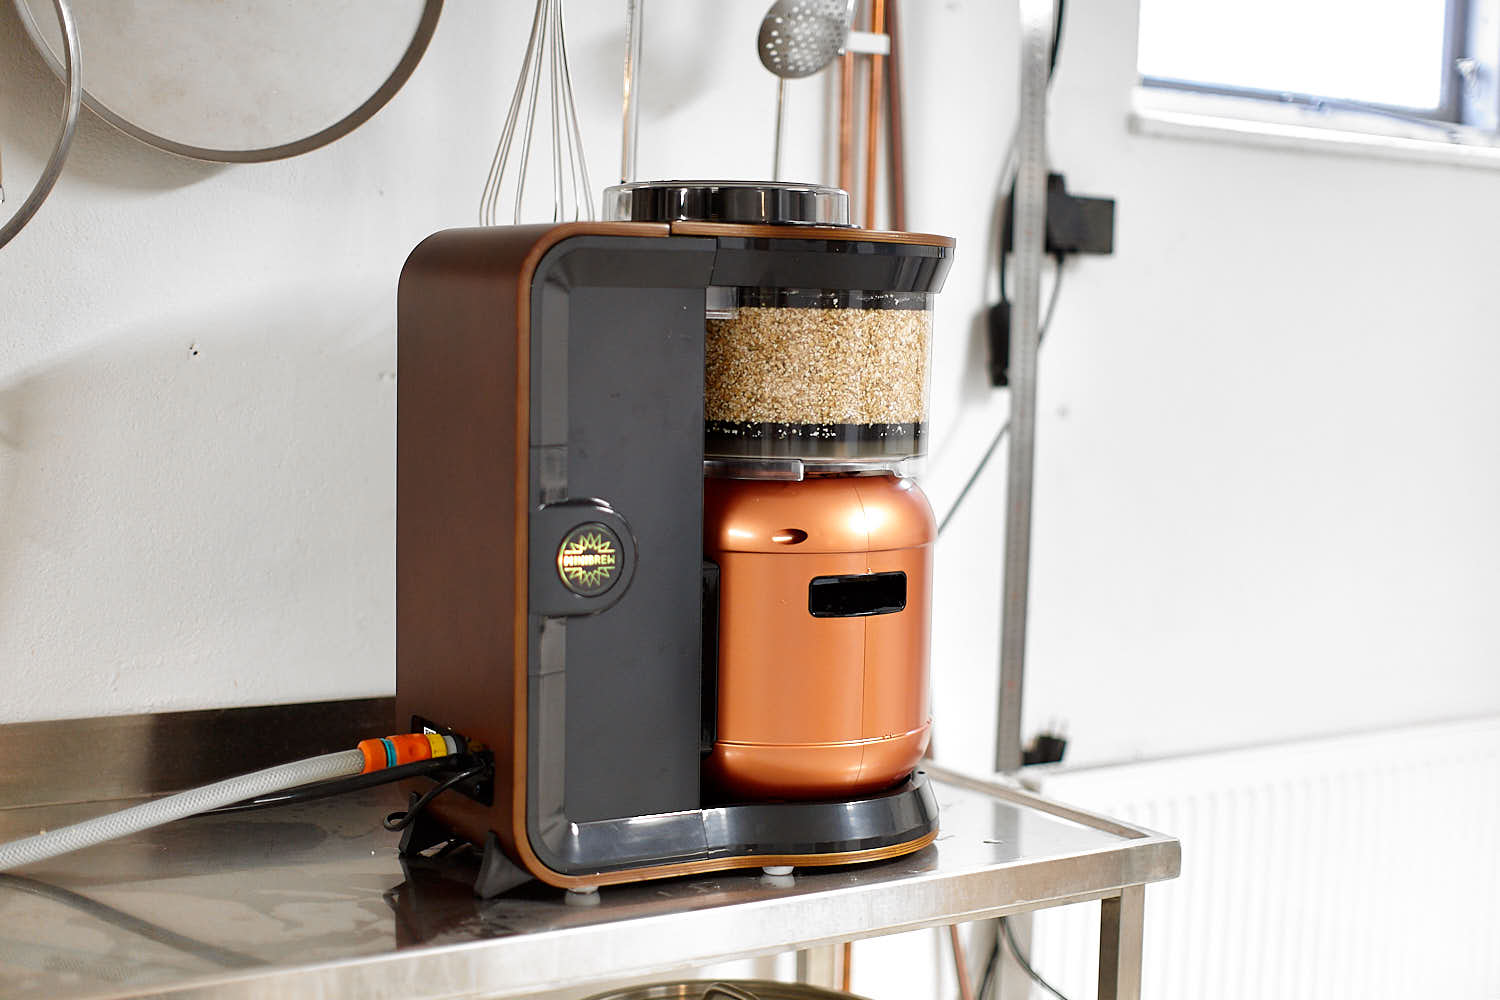
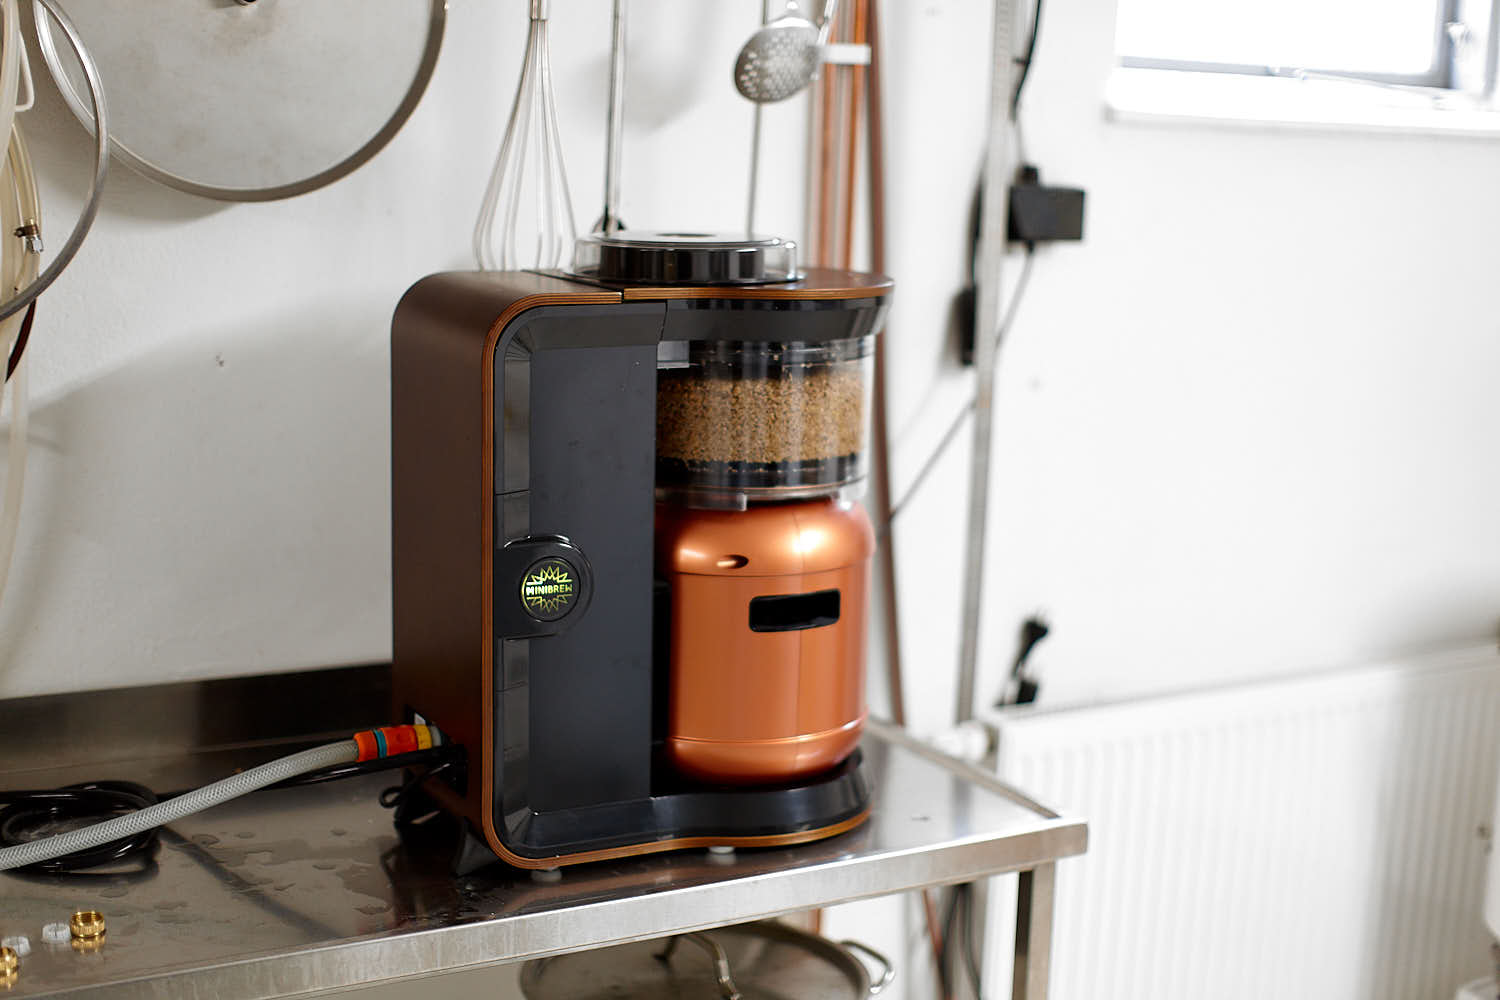
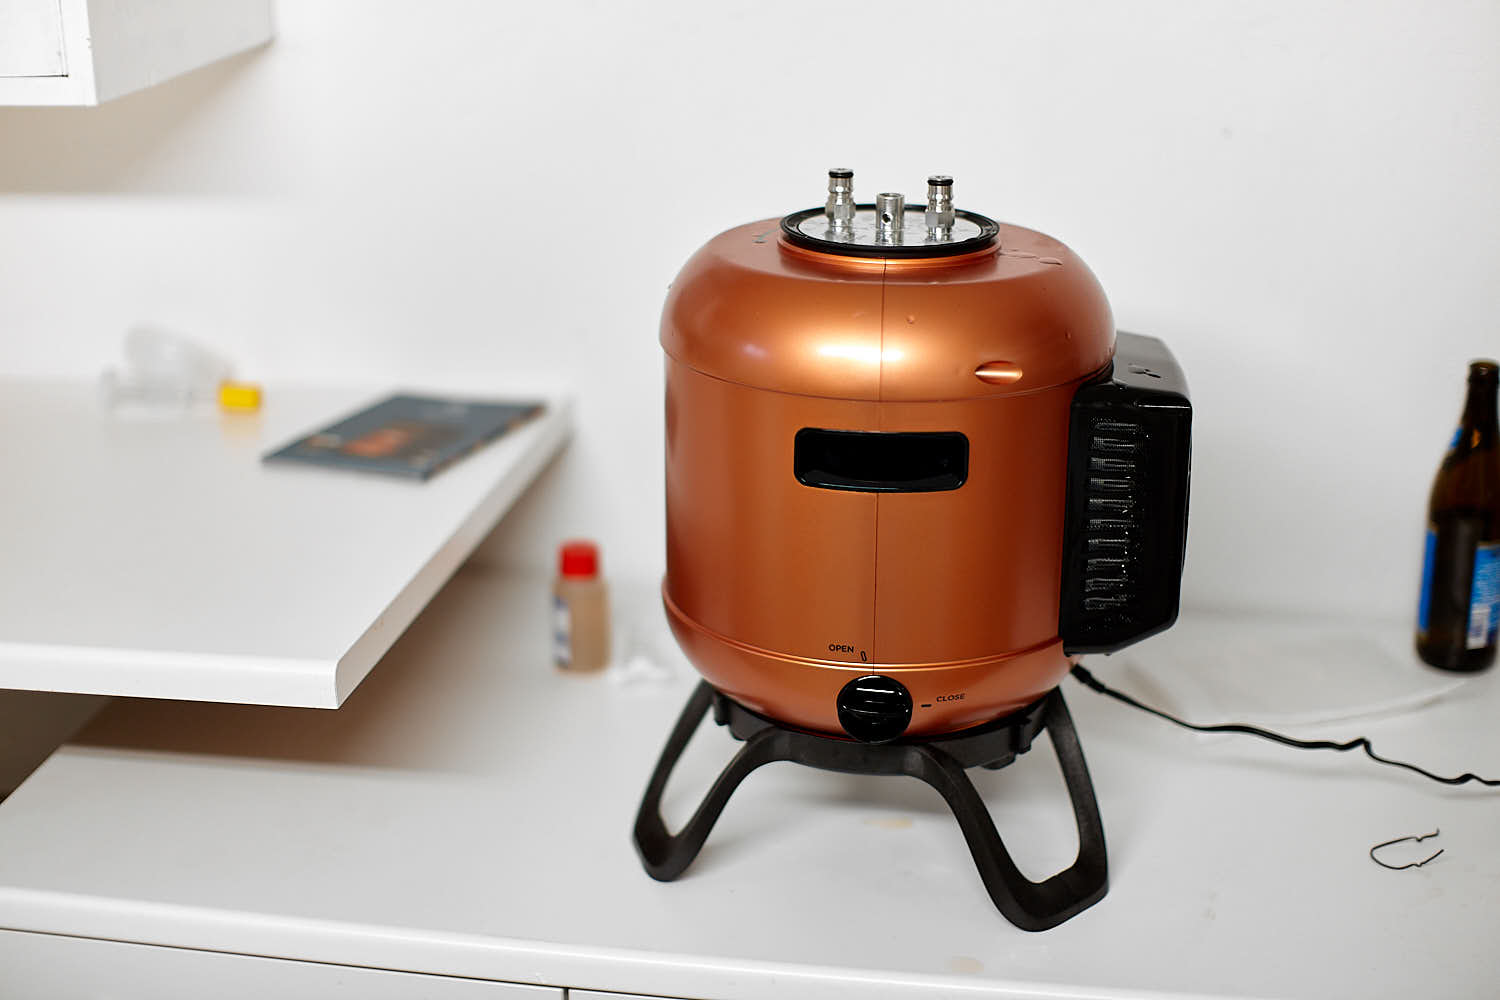
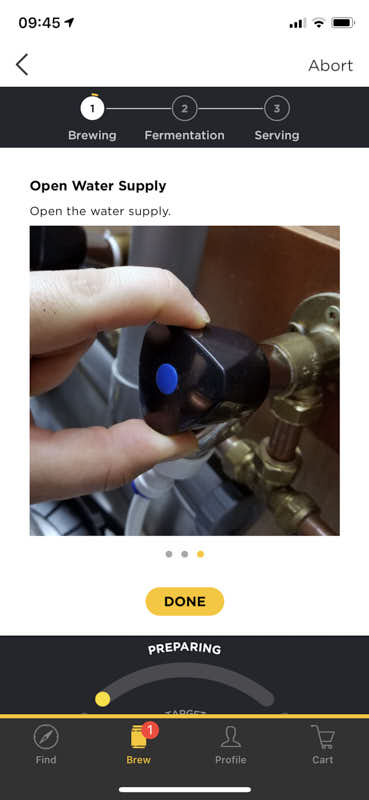
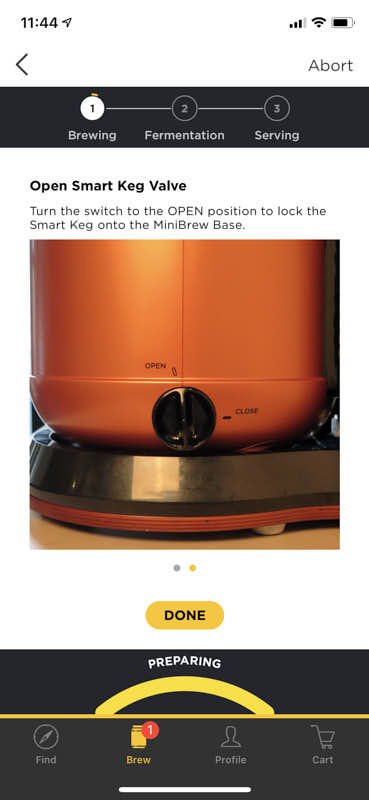
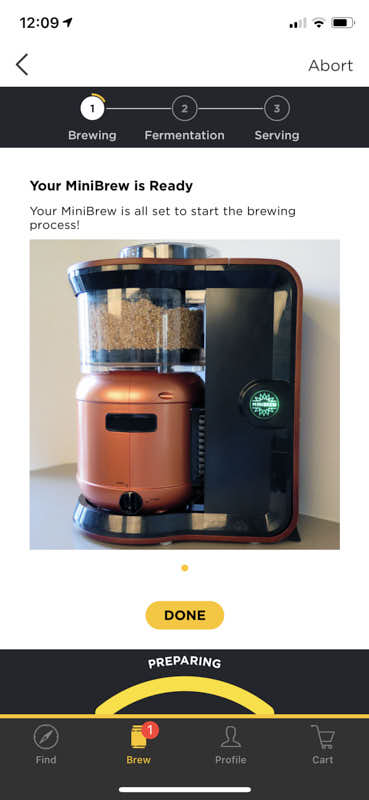
The MiniBrew is designed to be a complete brew system with everything you need to brew, ferment and even serve beer. And it really is! Except for what’s in the boxes I only needed a big bowl to mix the malt in together with water and a jug to measure the correct amount of mash water. But to quote a famous man (that sadly passed away to soon): ”…but there is one more thing…” (Steve Jobs). You also need a smartphone and at the moment, you actually must have an iPhone to be able to even start the first rinsing cycle of the MiniBrew.
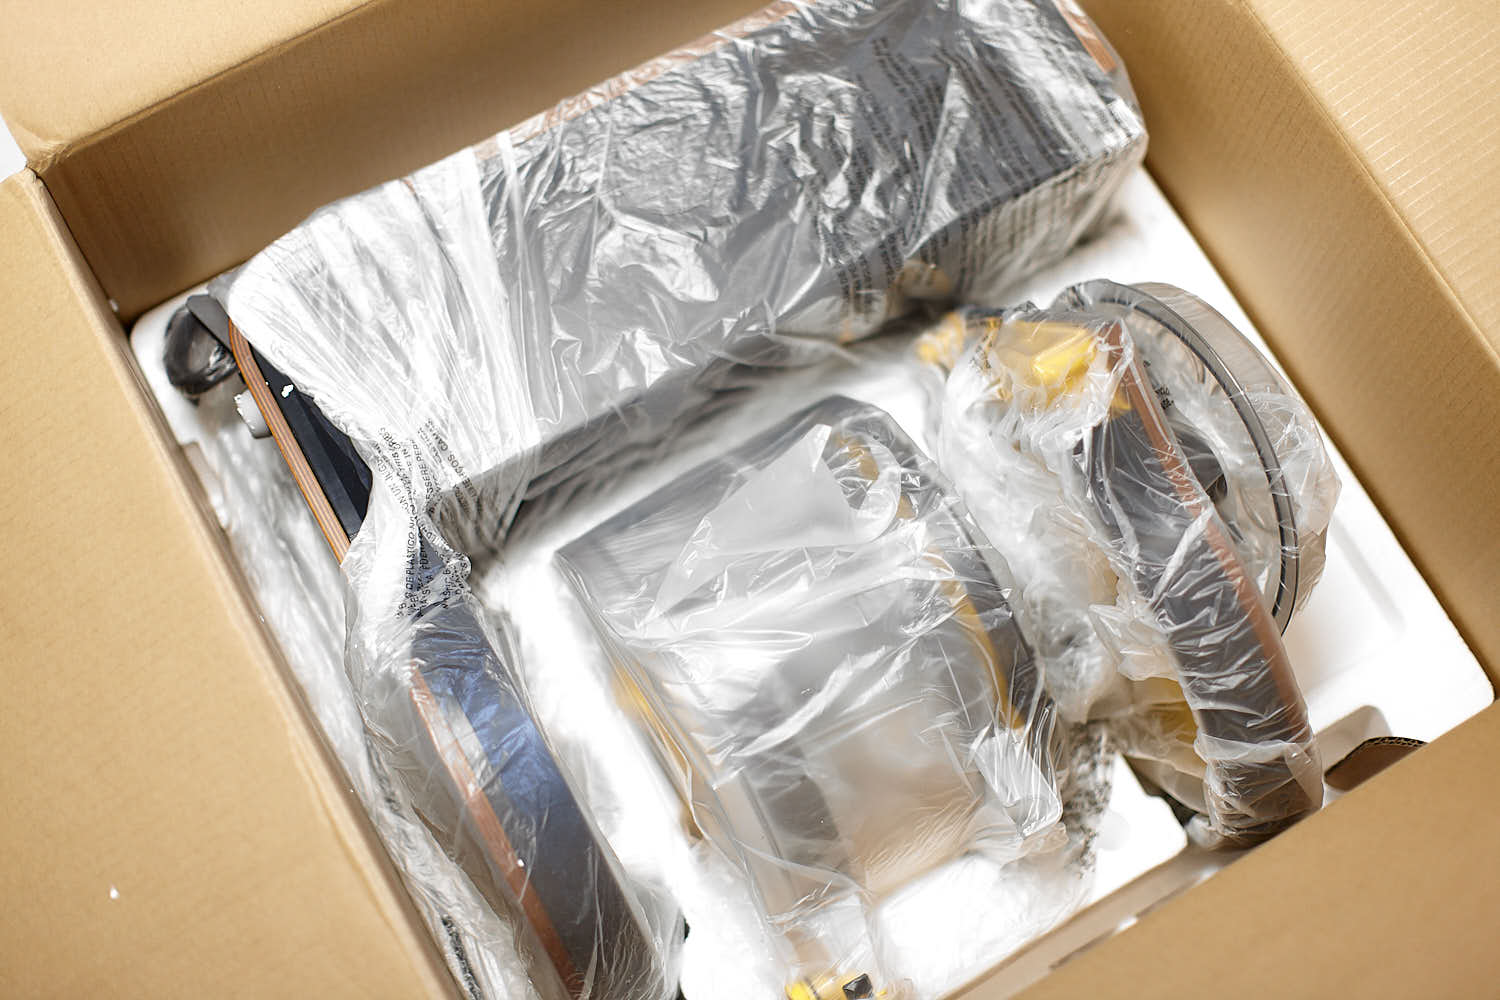
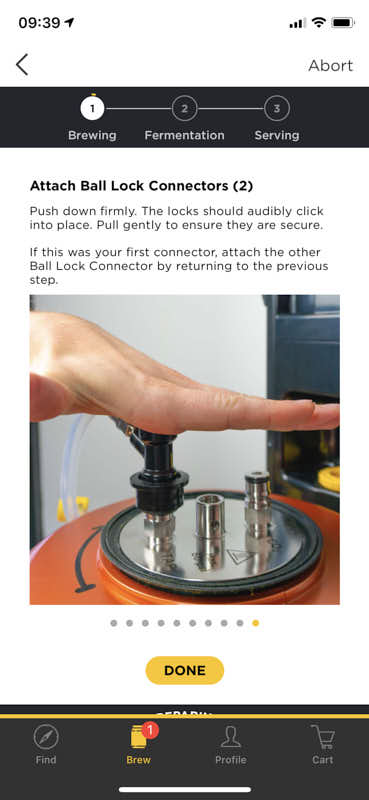
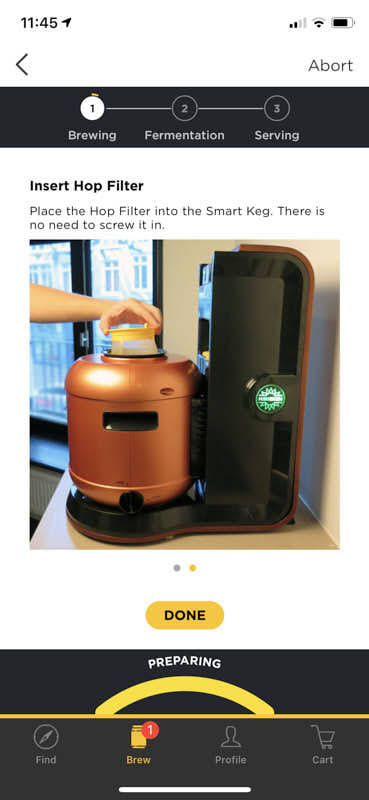
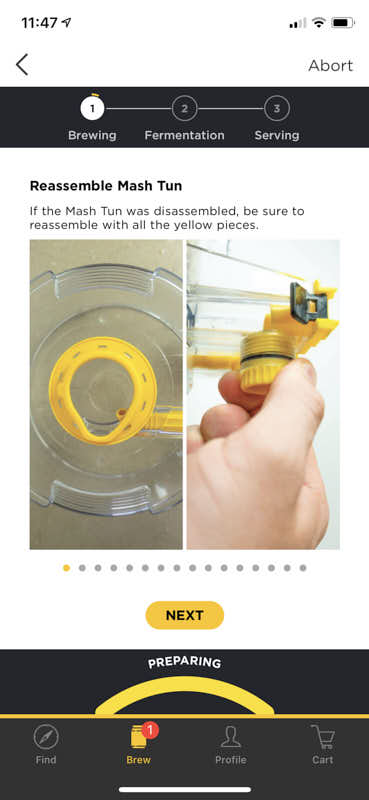
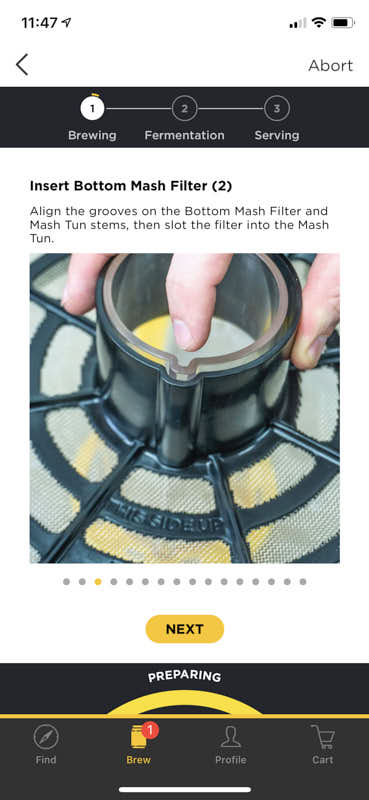
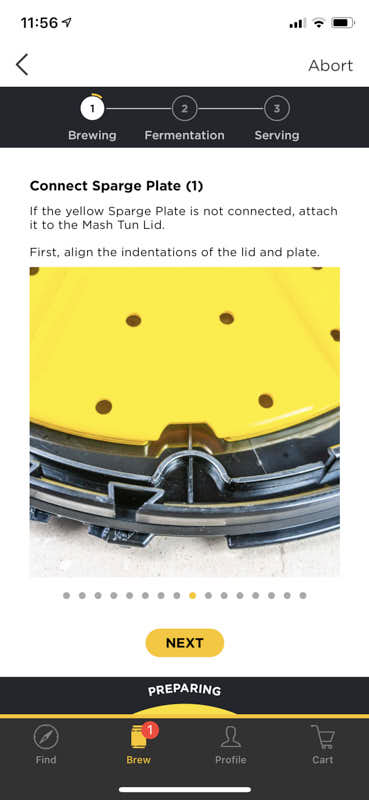
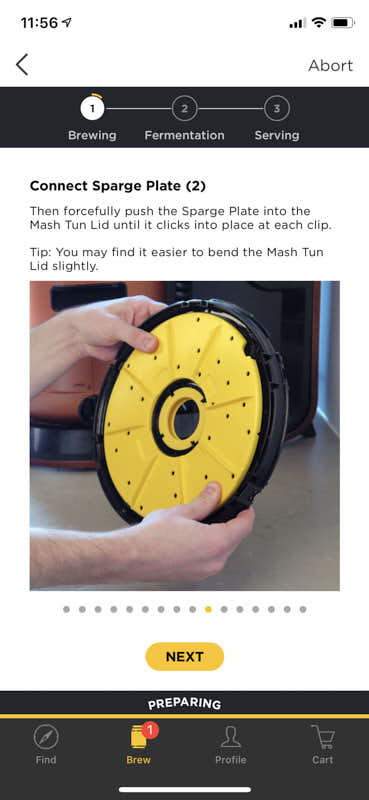
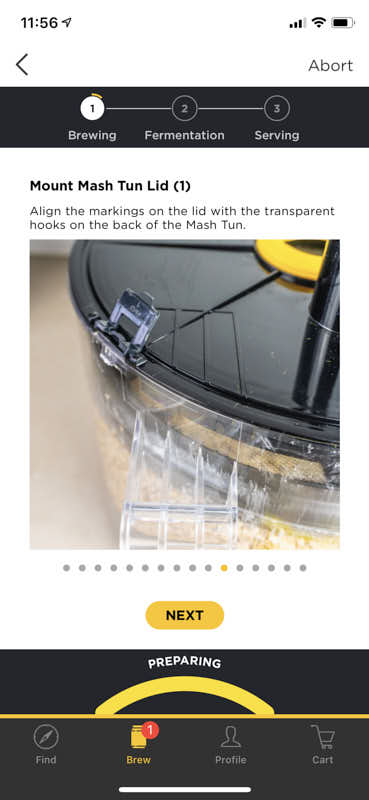
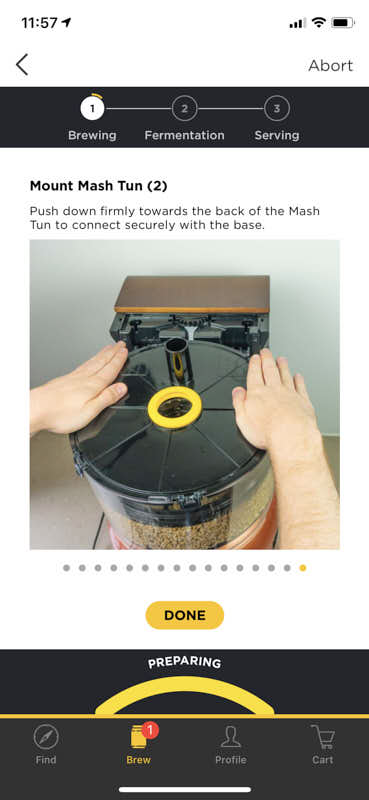
With your iPhone in hand and the unboxing done, the assemble of the system starts and there are many spare parts that need to be put together in the right order. Trub filters, gaskets, hopfilter, two mash tun filters, two lids, hopcarousel, small plastic coin-shaped things etc. The app will guide you through the process so it is not very difficult but still, I felt a bit like coming home from IKEA. The second time I put everything toghether it was easy doable even without the app so my initial fear of all the different parts was quickly erased.
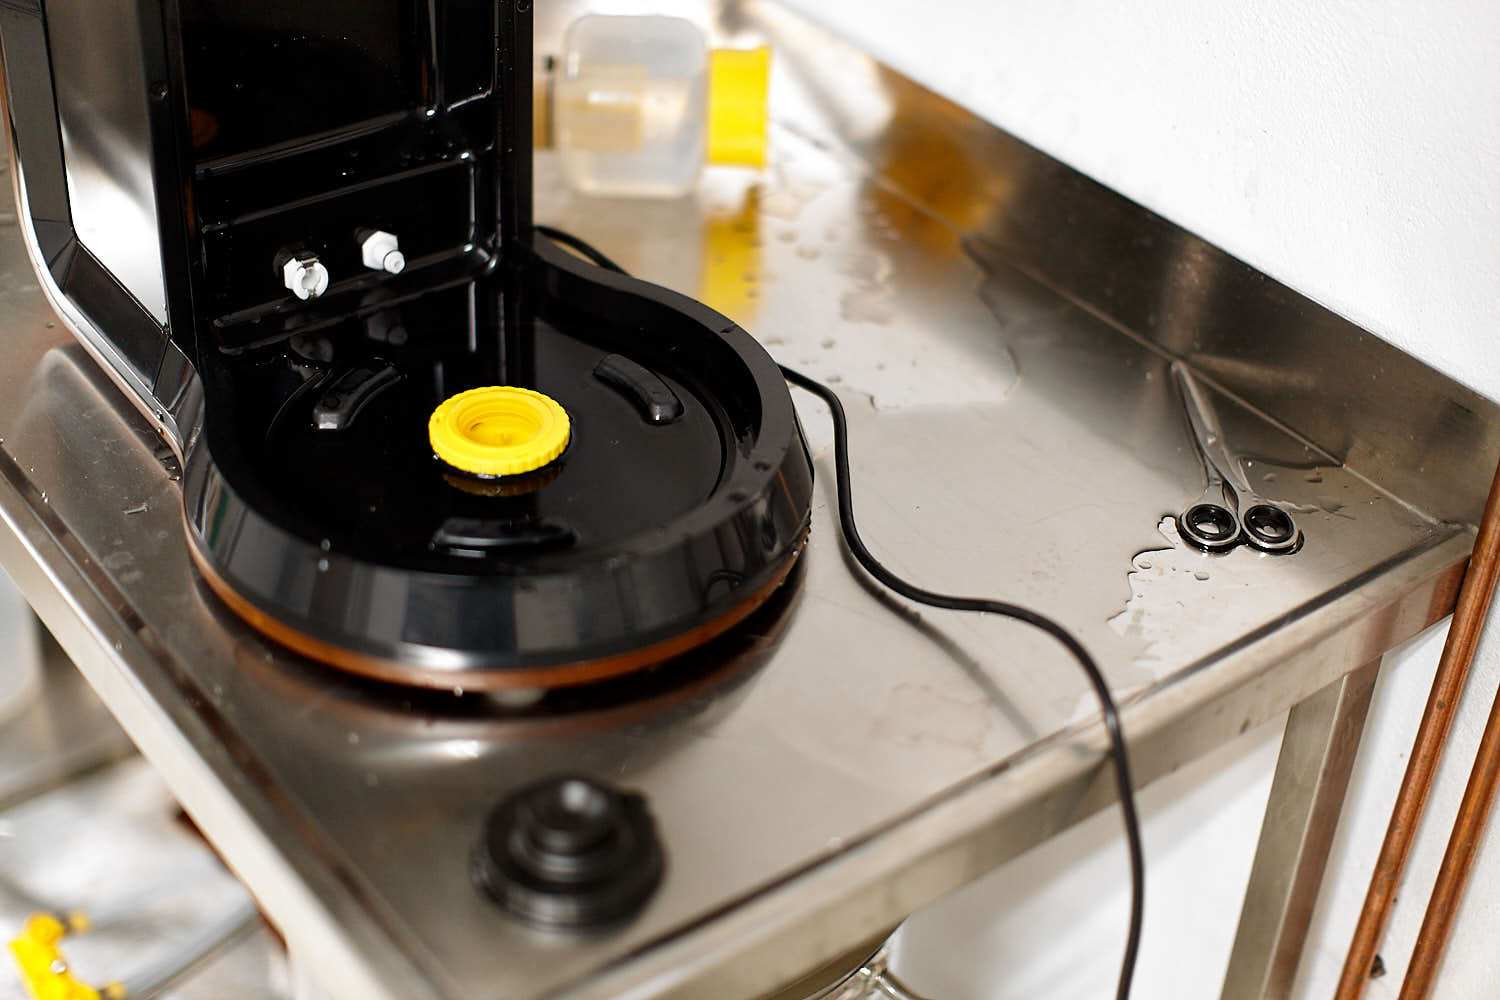
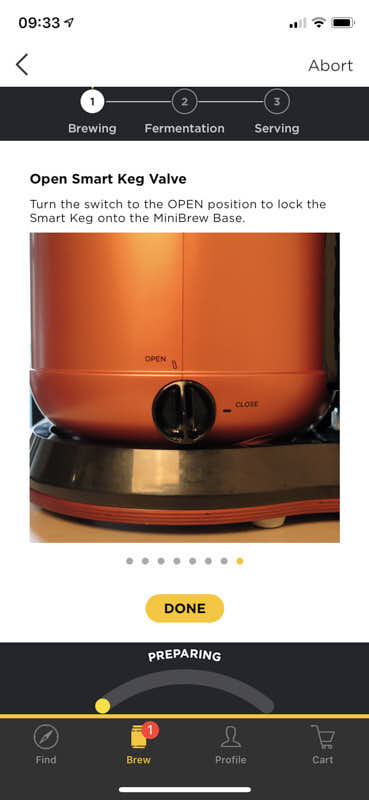
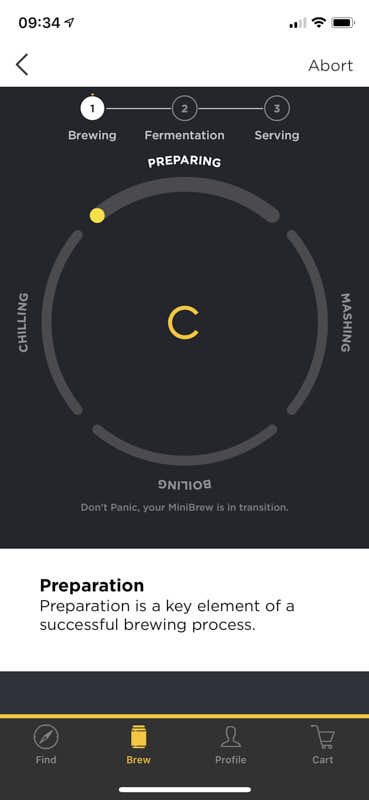
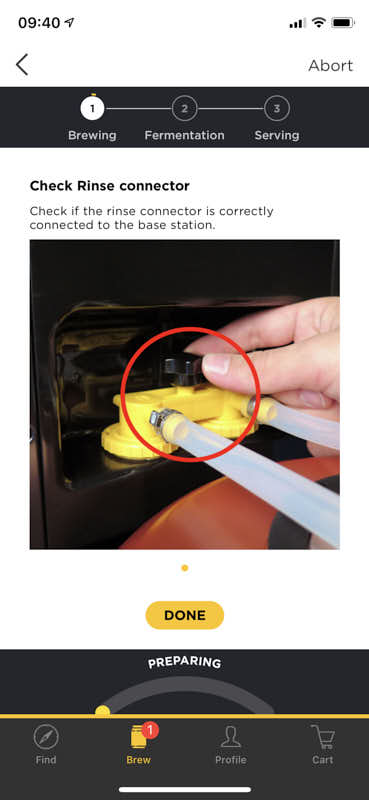
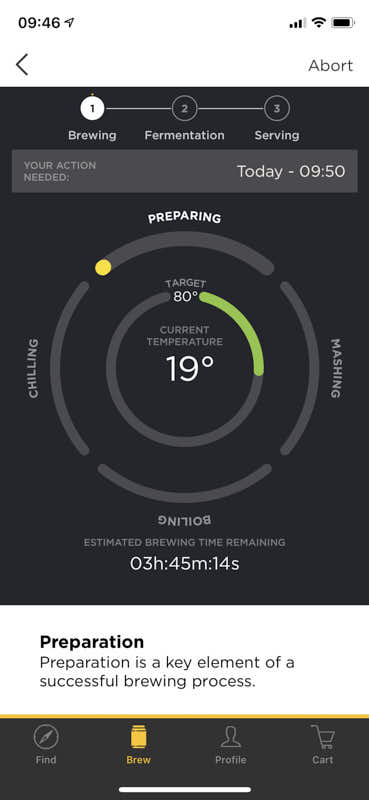
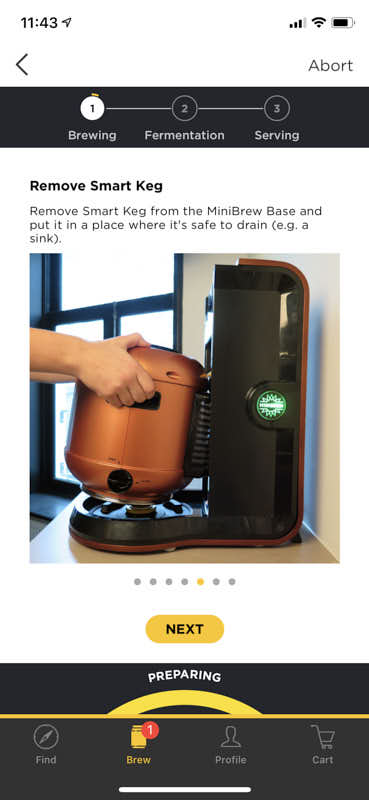
With the parts in place and the water connected the rising cycle began. It is a wash cycle that cleanes first the base station (boiler, counter flow chiller etc) and then the SmartKeg. This rinsing takes some time but can be done in advance. After the brew day there is some water left in the base station which is one of the reasons for the pre-cleaning.
Start the brew
Before you can actually start a brew, you ned to scan a QR code on the BrewPack, which is the separate box of ingredients. The QR code will load the correct beer to be brewed with all the information about ingredients, mash program, boil program, hop additions, fermentation temperature and time, all the way to serving temperature. There is no way to change any of theses parameters with a BrewPack. You only get that freedom if you make your own recipe on the website, for which you need a yearly subscription to. The QR code is found on the inside of the BrewPack box and mine had a big chunk of glue on it to hold the lid closed while shipping, so I had to carefully remove that glue with most caution not to loose any black print. The QR codes are one time use only so you can’t save the code and brew another batch with your own ingredients.
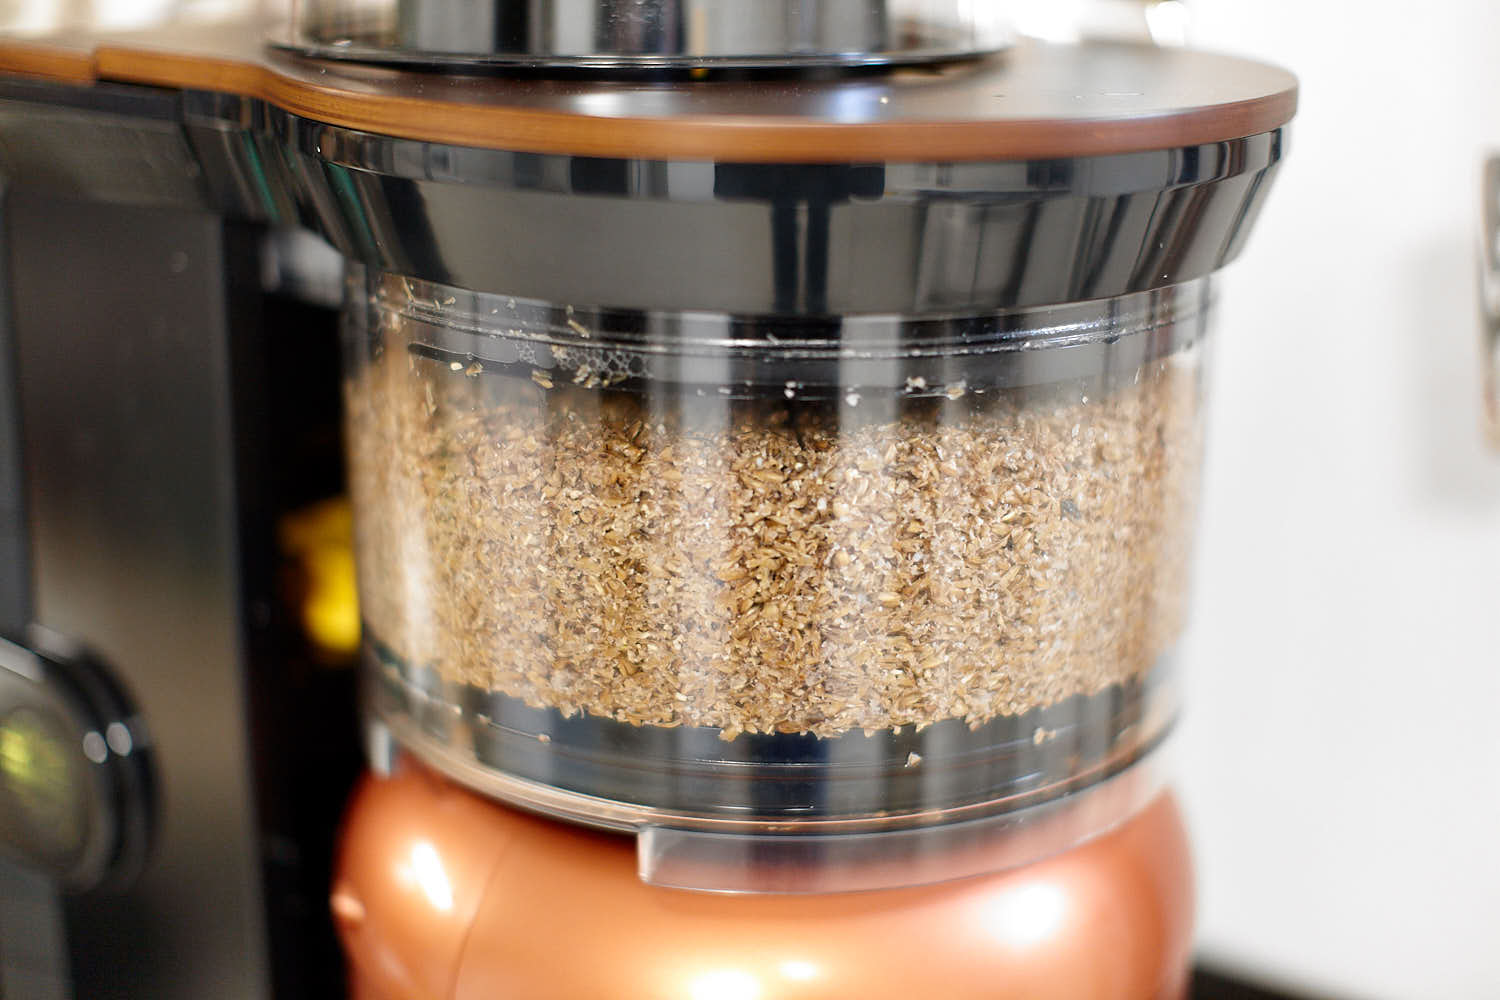
The BrewPack contained a sachet of US05, six different hopbags and the bag of malt. The malt itself wasn’t crushed with much care since it had a lot of flour in it but that didn’t affect the mash cycle from what I could see. And since the malt is already crushed and there is dry yeast in the BrewPack, you should brew with it within a week or two. For me, it’s not a good plan to buy 5 of these packs and save them for later since crushed malt is deteriorating the same was as a banana; ”once you peel it – you better eat it!”.
Mashing in
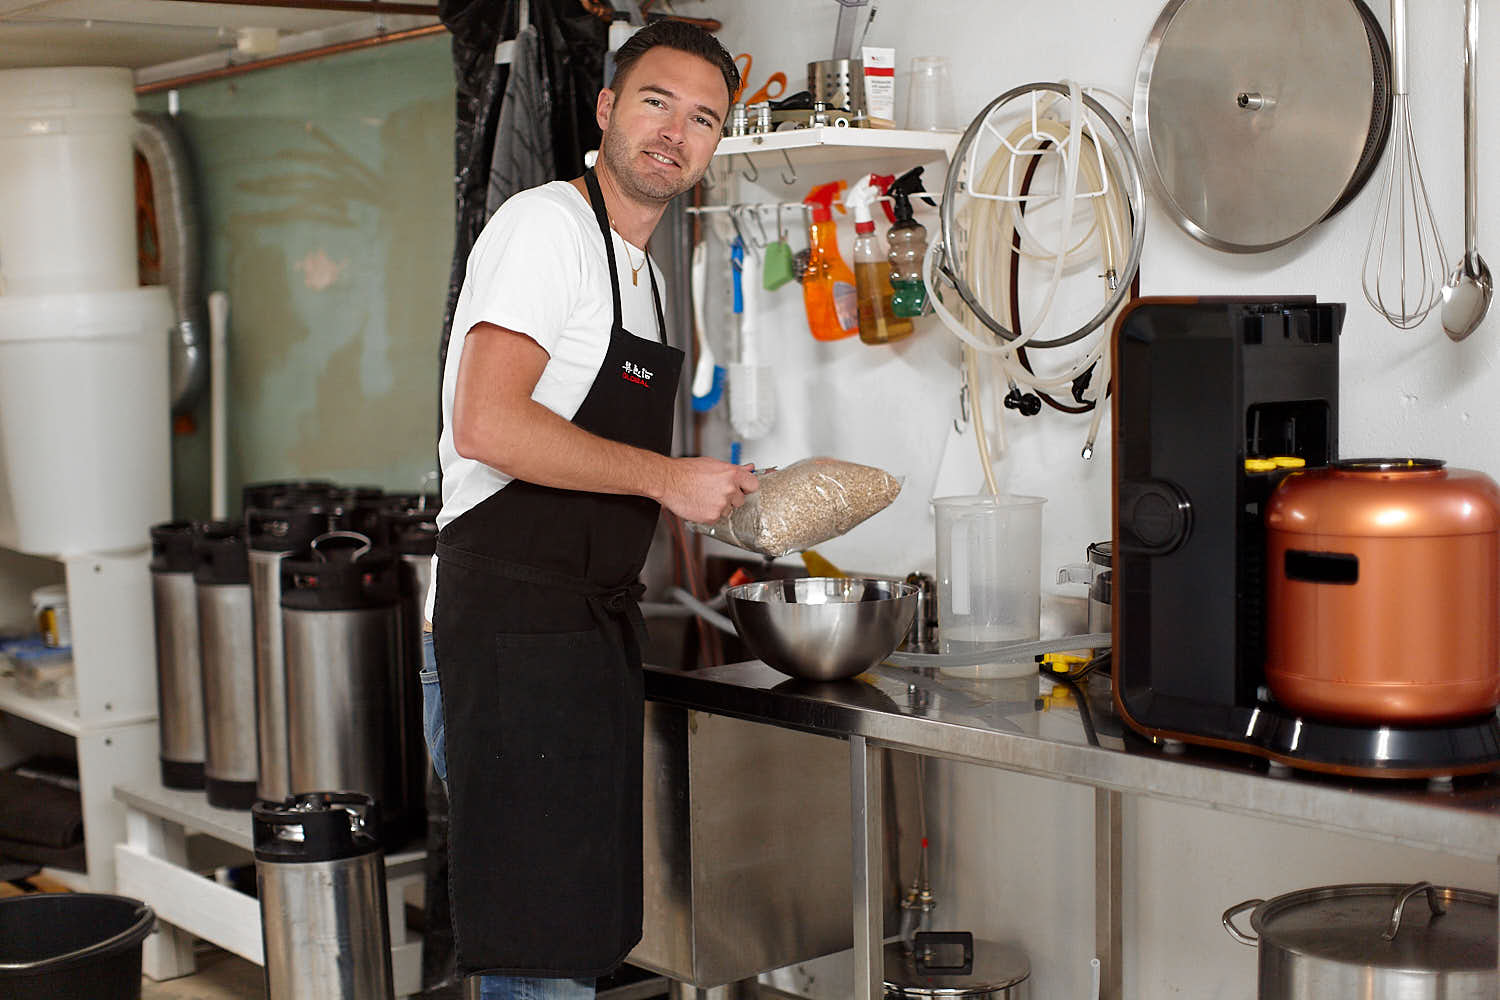
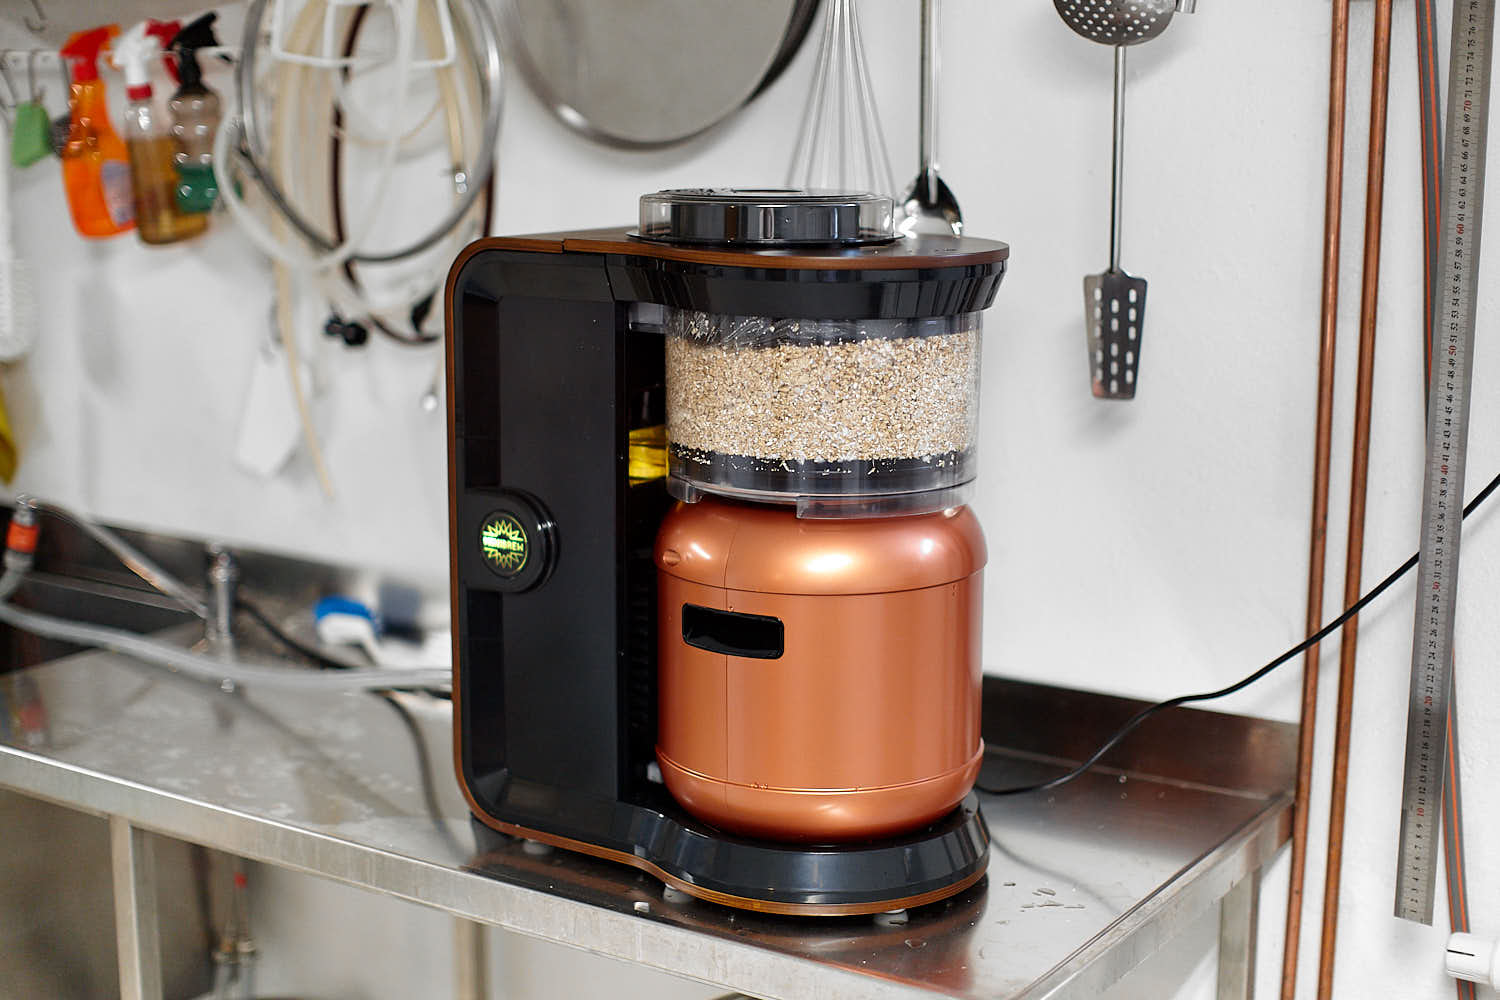
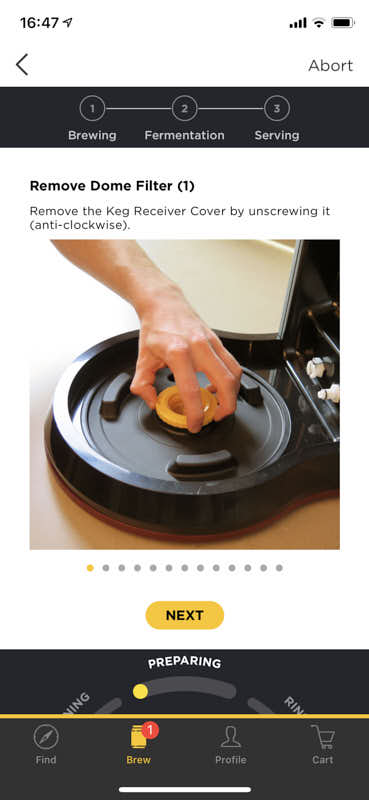
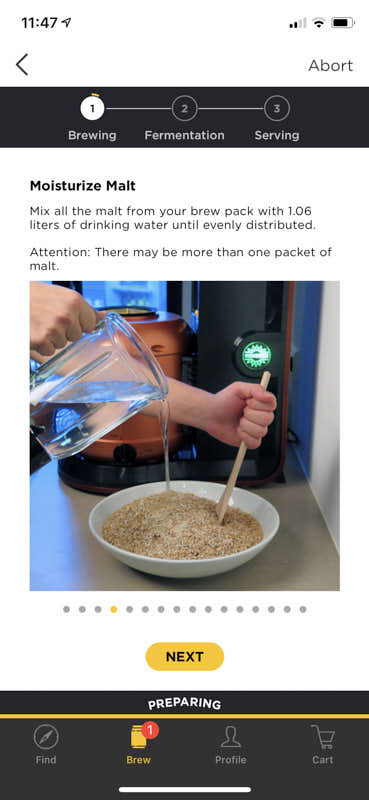
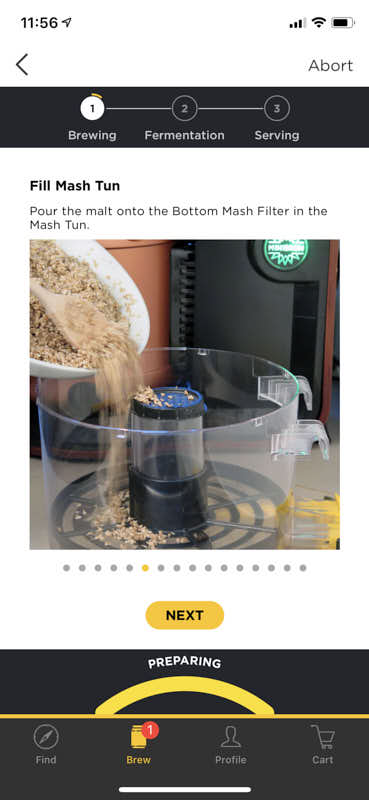
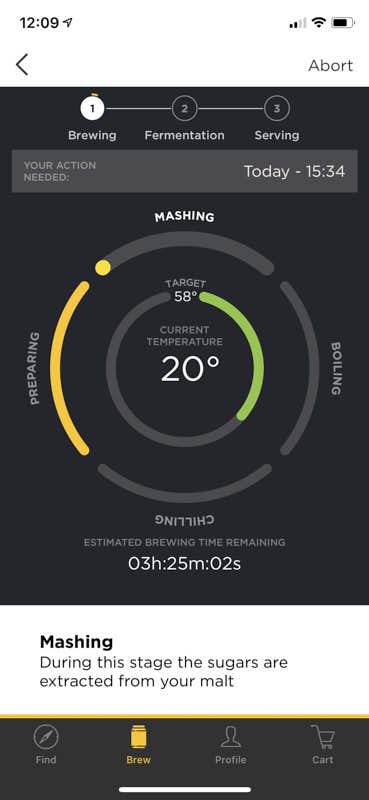
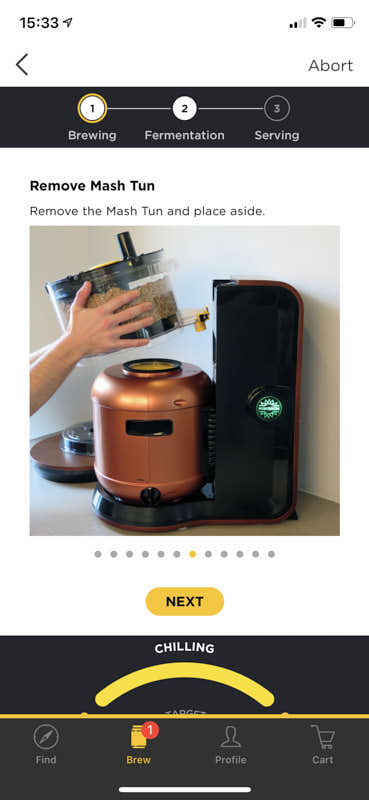
Once the QR code is scanned and the system cleaned, it is time to mash in. Place the malt in a bucket or a very large bowl. The plate shown in the manual is waaay too small! Add the small amount of water (most of the water is already in the SmartKeg/Boiler) and put your hands down there to mix it well! It will be sticky and messy but on the other hand, it is the only part of the brew day when you will feel like you are actually brewing. This process is called “pre moisten” and it is used to avoid dough balls during the mash cycle. I guess you can use a spoon och whisk for this but for my first brewsession I wanted to follow the instructions.
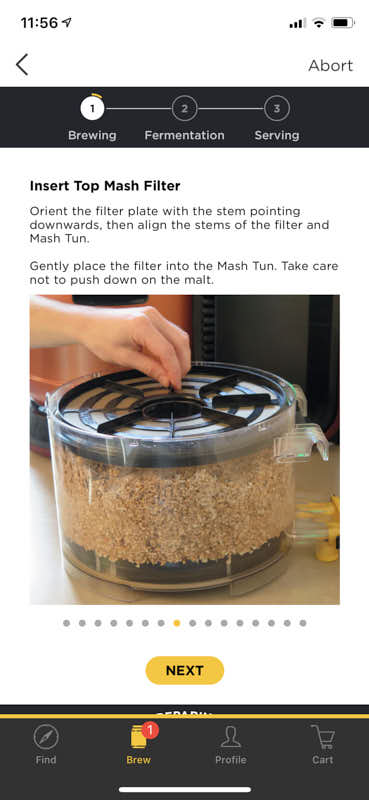
Once everything is mixed well, the sticky malt is transferred to the mash tun which is pretty small for this task so there will probably be a little bit of a mess on your table.
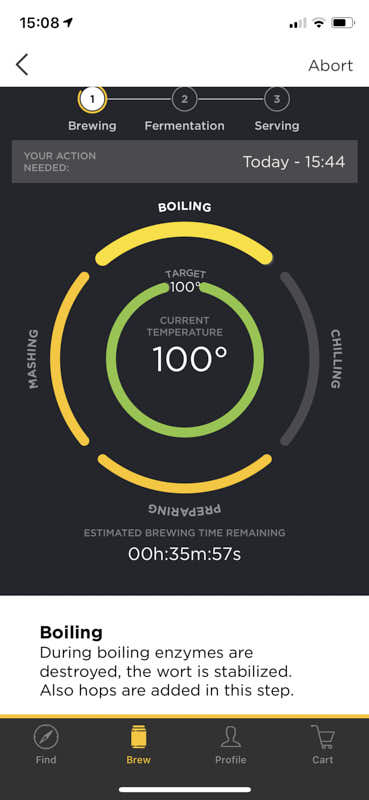
The boil
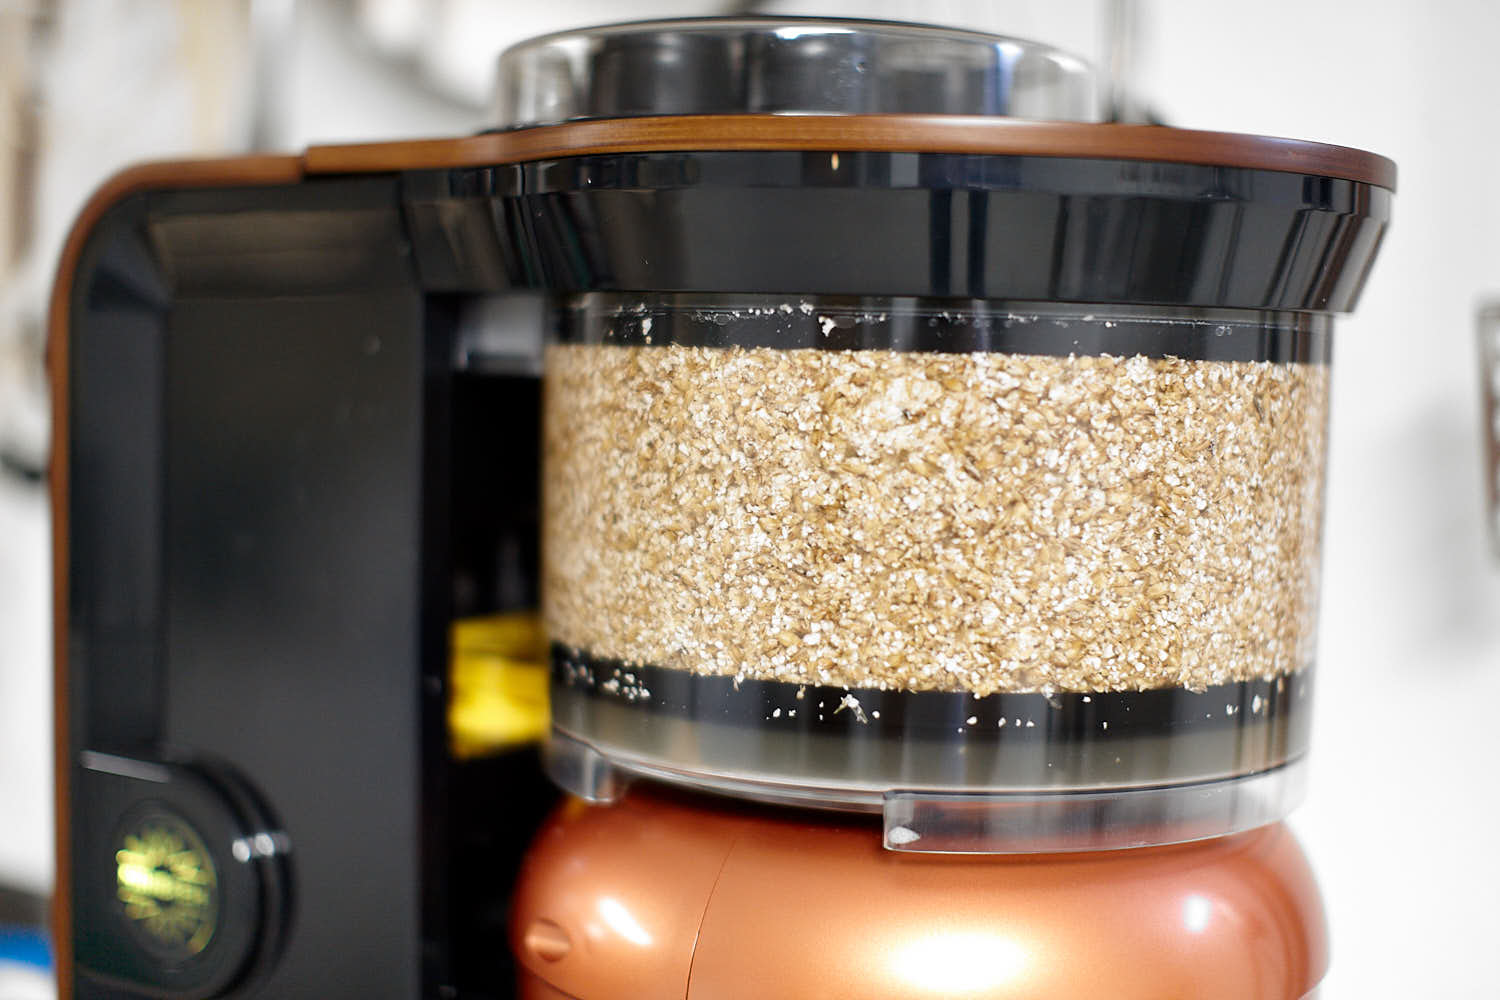
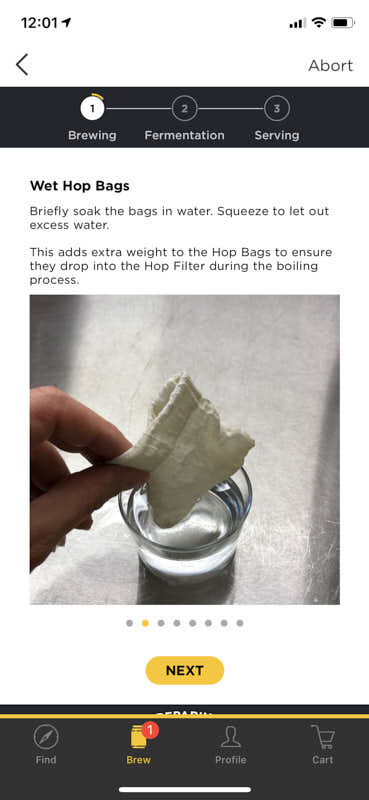
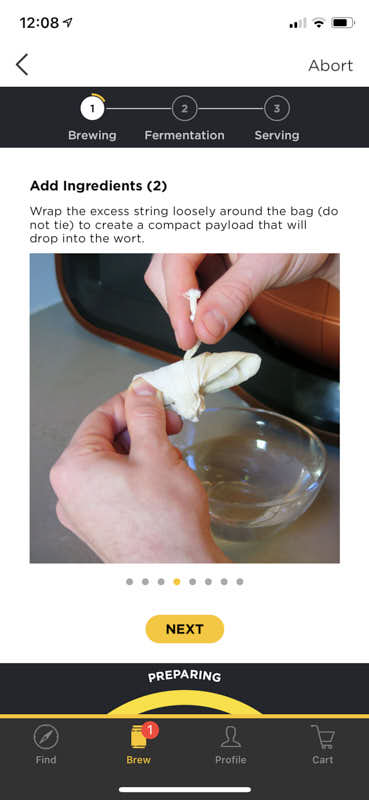
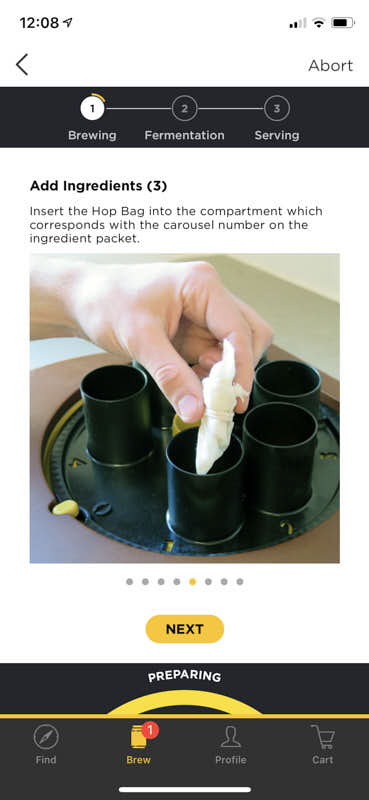
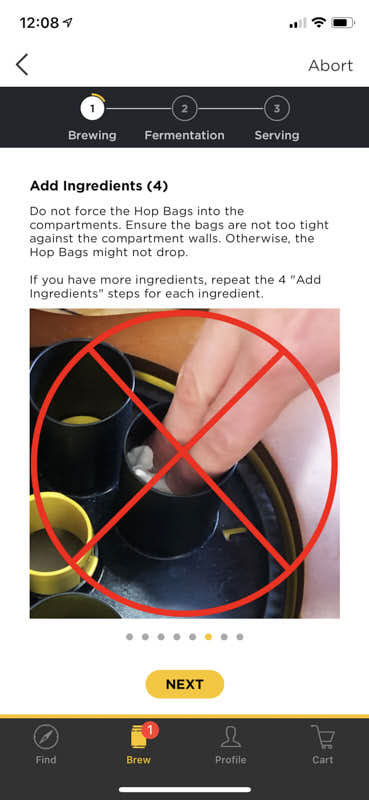
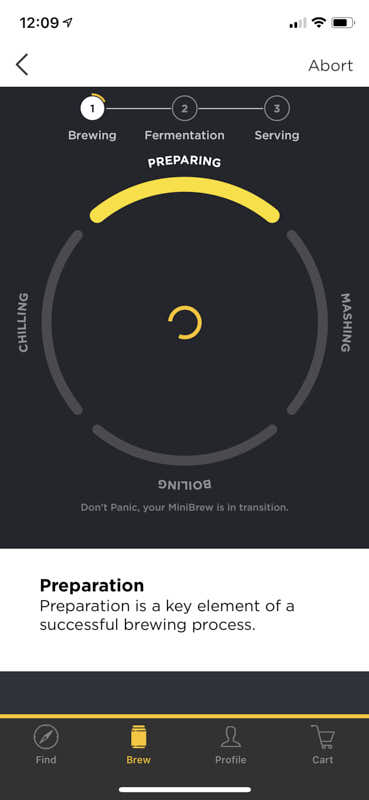
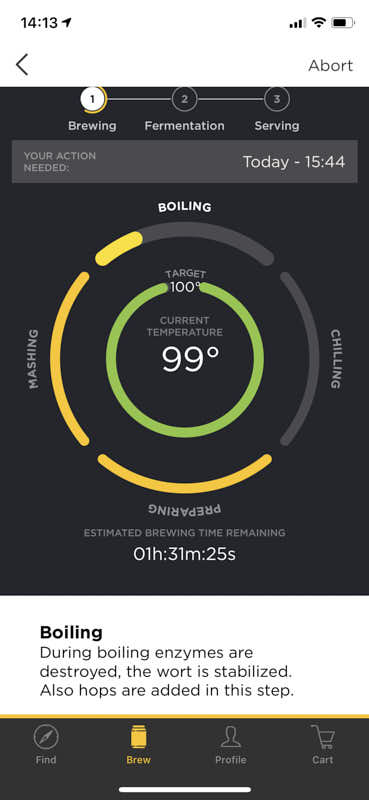
Now the easy part begins. The mash cycle is running and since the mash tun is made of see through plastic you can watch the whole process. It’s like a little brewing aquarium! You follow the process and all the temperatures with your phone and the whole process is fully automated. The boil begins (which you can’t really see) and the hop carousel is doing the 1-6 hop additions. Here I had some problems. I followed the instructions and premoistened the hopbags (to make them heavier so that they would fall into the hop boiling filter) but still there was two hop bags out of six that got stuck. I think I tied up the small string with too much loose string hanging out from the knot and that got caught in the carousel somehow. The MiniBrew team is working on a better visual instruction for this section of the app and that should resolve the issue in the future (call this a beginners misstake). The beer I brewed was a “blonde beer” called Gulden Craen and Belgian Blonde is not a very hop forward beer style. Still the hop bags were still very filled with hops and I think the utilisation of the hops was impaired by the packed amount of hops, in other words; the bags where too small for that amount of hops in my opinion.
The boil is preformed invisibly and I’m not really sure exactly where (!) since no parts are very hot and there is minimum condensation. The boil must of course be done inside the base station somehow since there is no direct heating in the SmartKeg where the wort is and the hops are added, but it is impossible to see how the wort is run through the system and there are no images on the website that explains how the system works on the inside. As I said, there is hardly any water vapour or heat exhausted during the boil so there are no real clues about how the boil is preformed and also there can’t be a big amount of boil off.
Chilling the wort
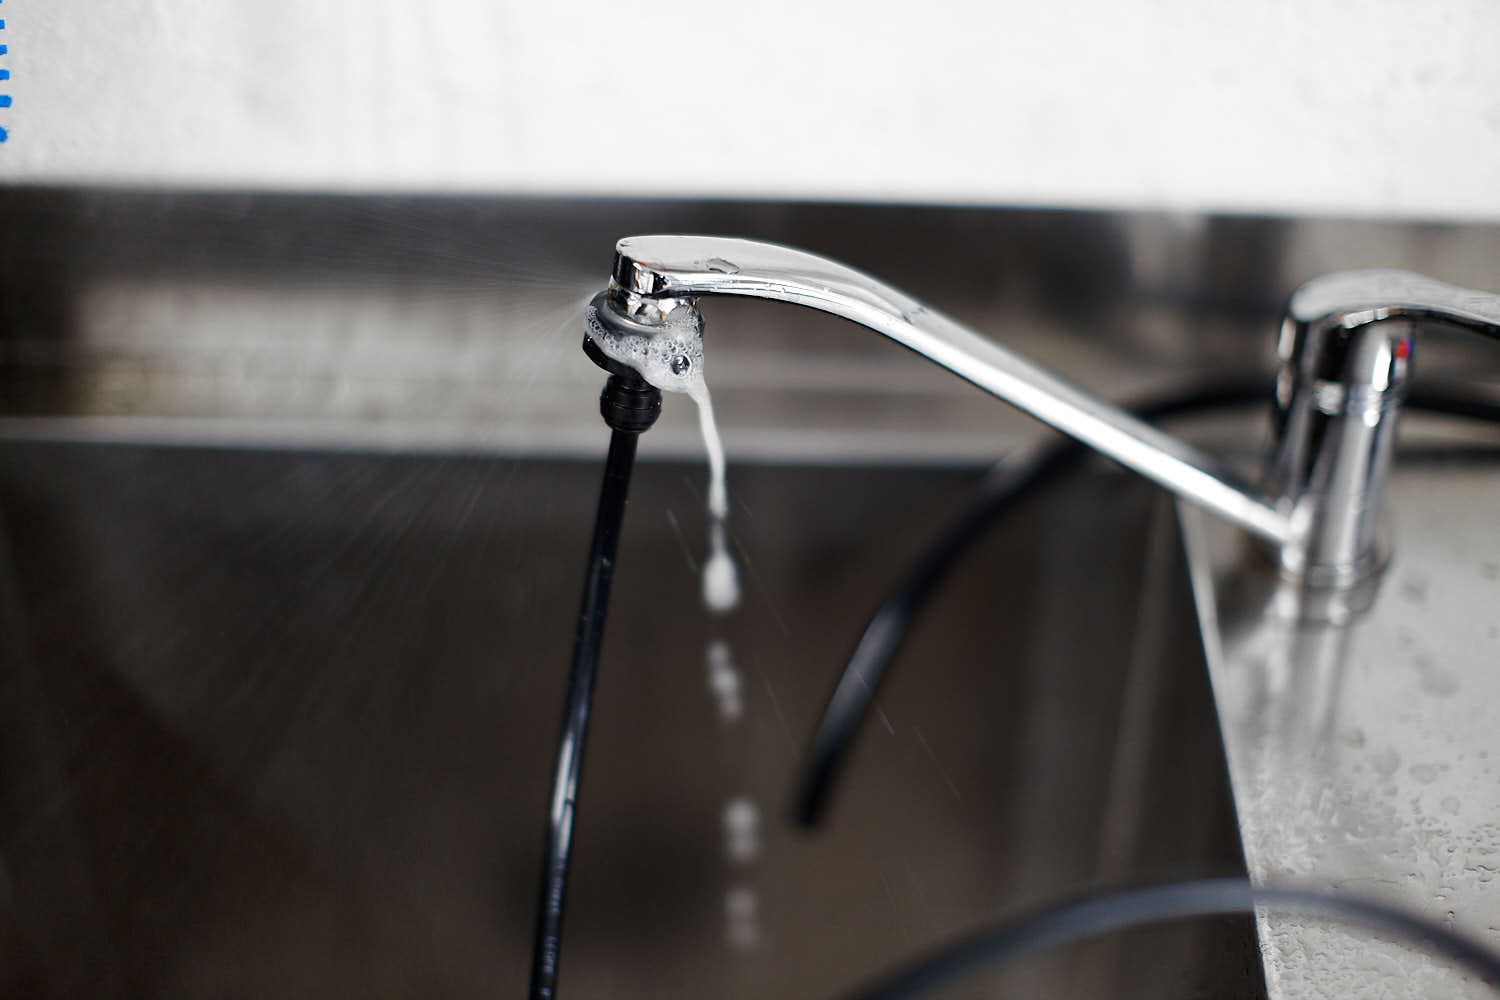
After the boil, the chilling starts automatically since the water is constantly connected to the back of the base station. I have a pretty high water pressure in my house and when the cooling started, the shock wave sent through the system and the output hose, sprayed hot water over my sink (good thing I was in my brewery and not standing near the hose). My recommendation is to lock the output house down by something initially so no one gets hurt by boiling water. The cooling took the wort down from 100°C to 25°C in exactly 22 minutes. I asked the MiniBrew team about what kind of chiller it is and got the answer that it’s a counterflow chiller of some sort. Hard to tell how big it is since it’s inside the machine but with my high water pressure, it used a lot of water for this small amount of wort. The output water got cold very quickly so I can easily reduce the flow to about 2,5-3 liters per minute instead (according to the manufacturer). At 25°C, the app cancels the cooling so there is no way for me (at this time) to know if it is possible to chill down to 10°C for a cold pitch for a lager fermentation or if the modus operandi is to pitch at 25°C pitch for all yeasts. The SmartKeg takes over the chilling of the wort from 25°C down to the specified fermentation temperature of the recipe (22°C in this case for a US05) so the temperature is fully regulated through out the process but still I think it is a bit too high and for me, this time the water consumption was way too big…
The manufacturer is working on some sort of device that can recirculate ice water and get the water consumption down to 1.6:1 which would mean less than 10 liters of water (8-9,6 depending on post boil volume) for a normal batch.
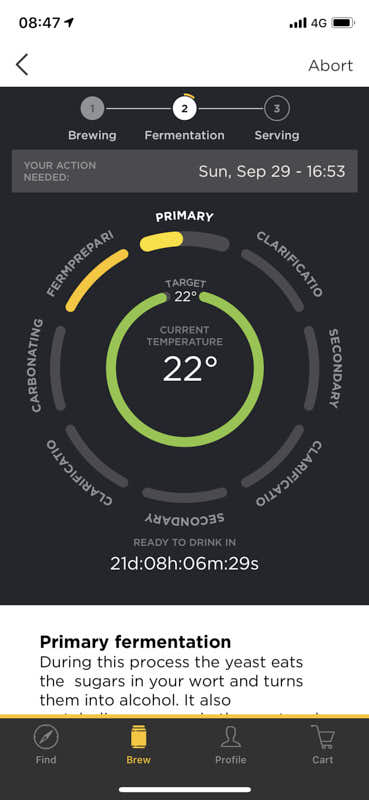
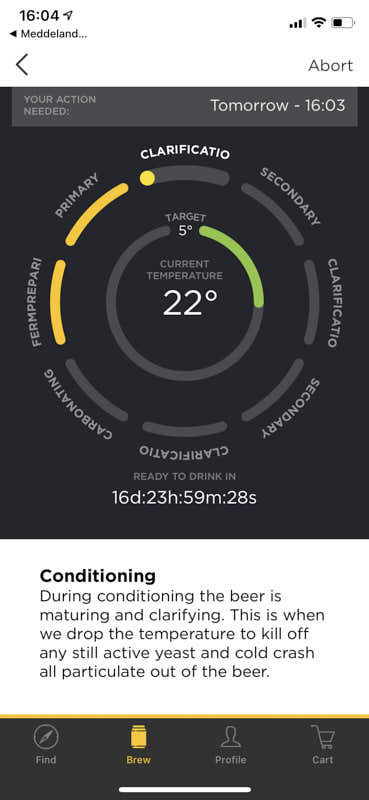
Fermentation
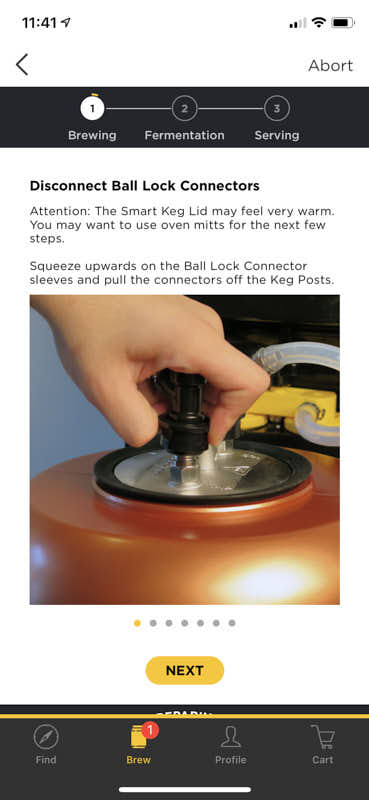
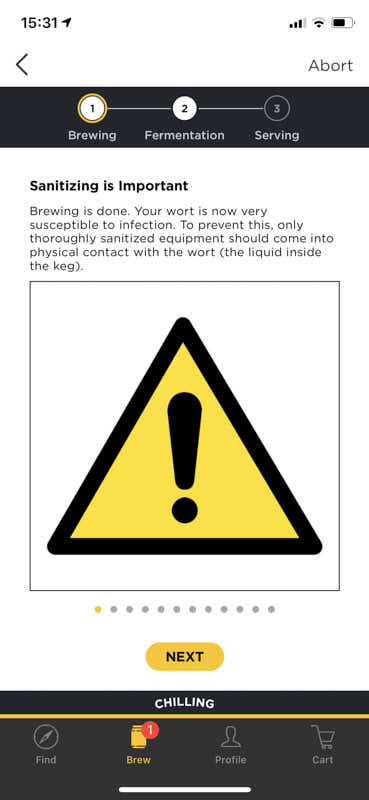
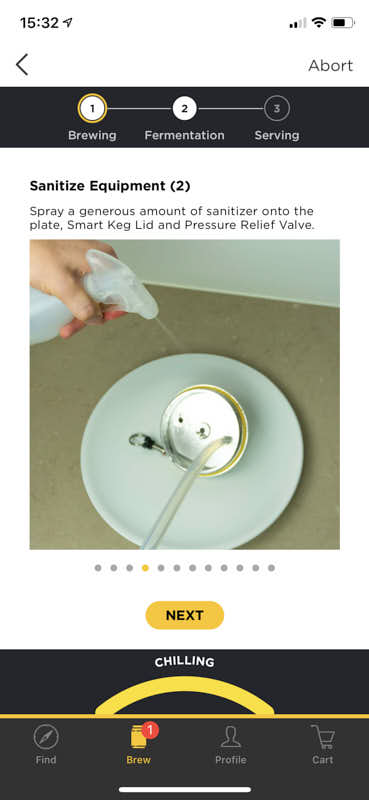
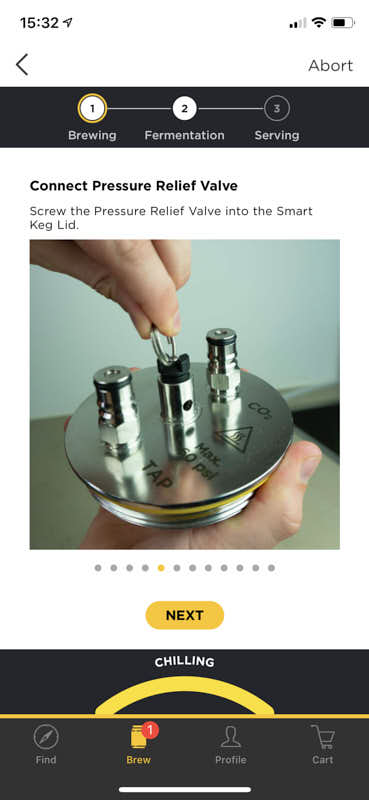
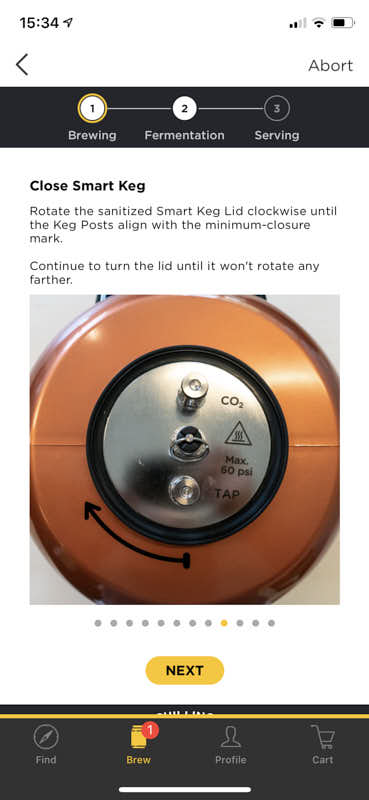
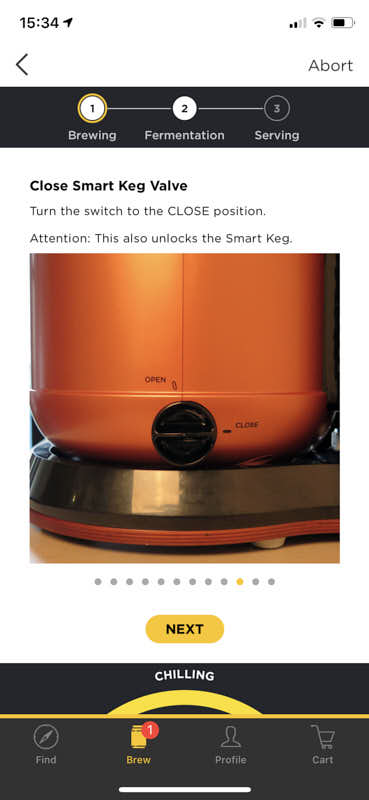
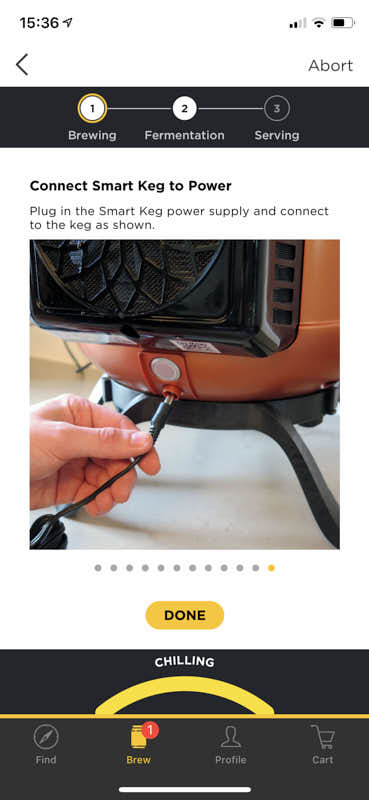
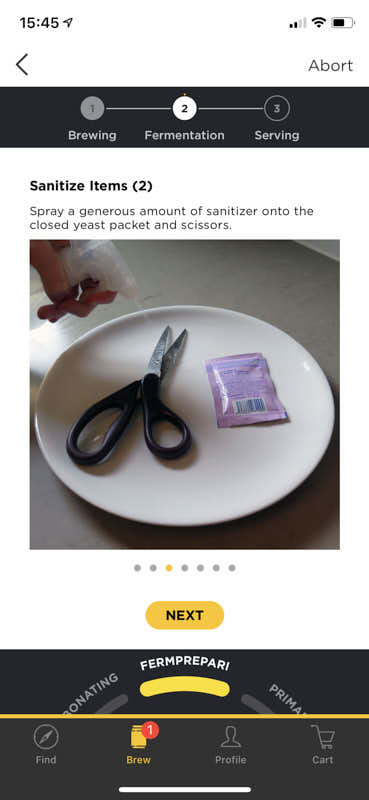
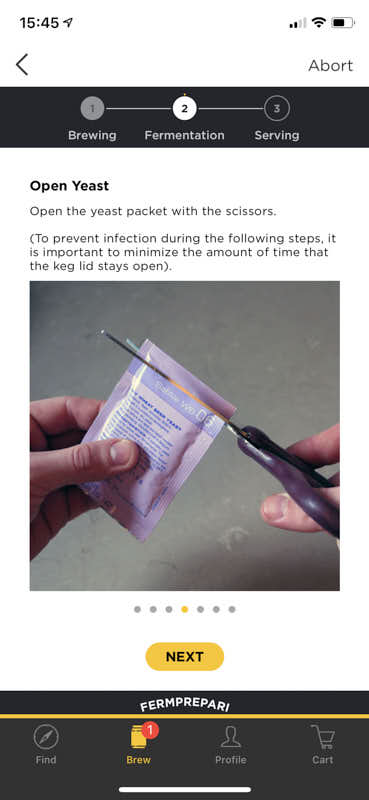
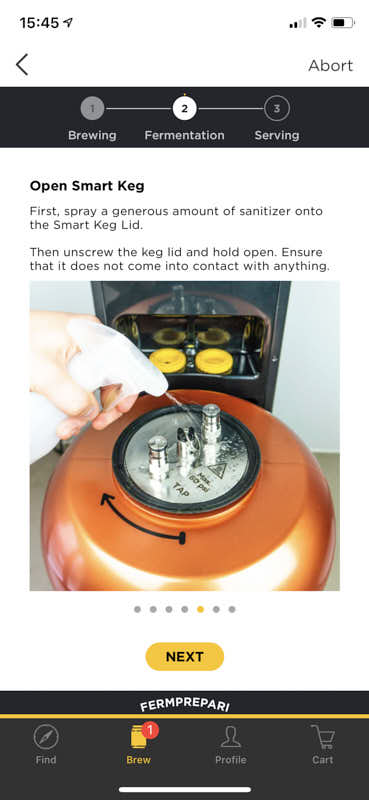
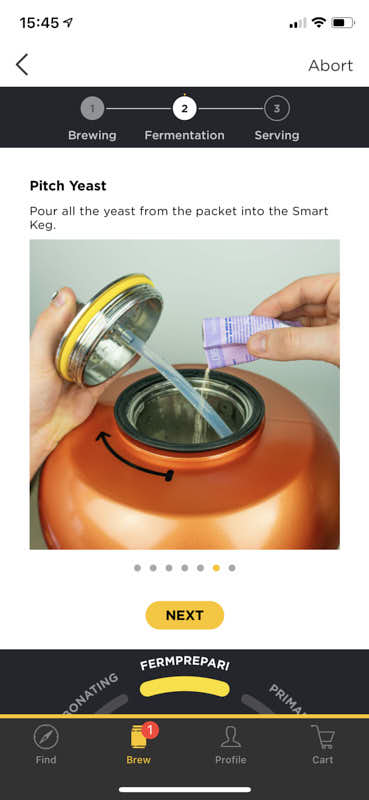
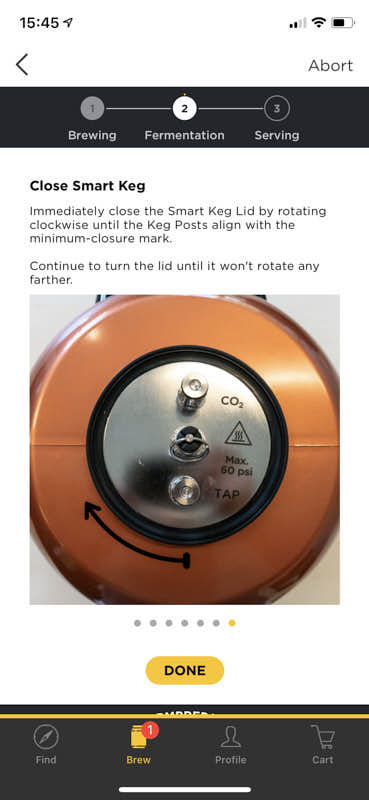
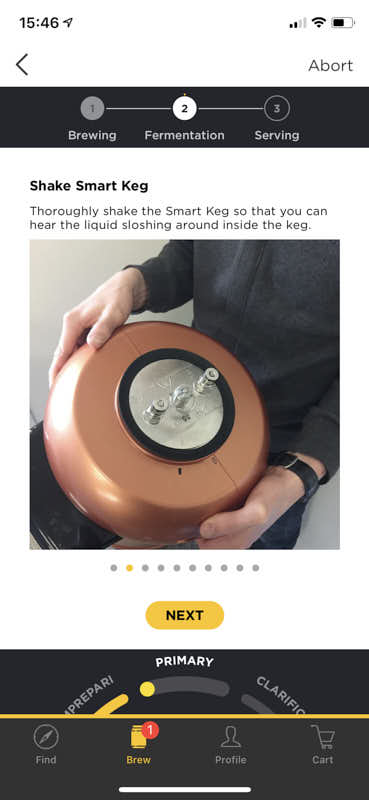
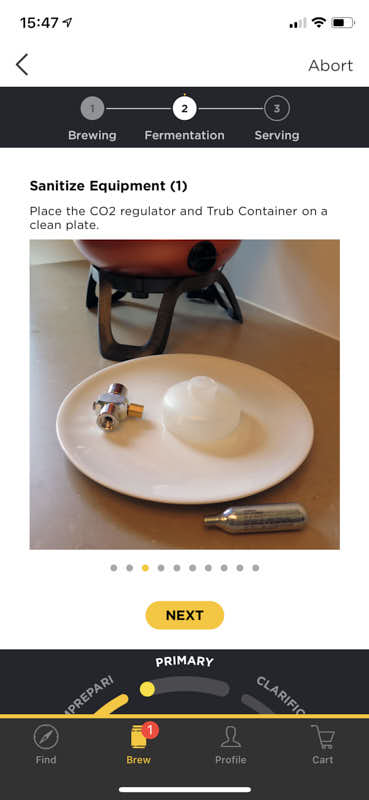
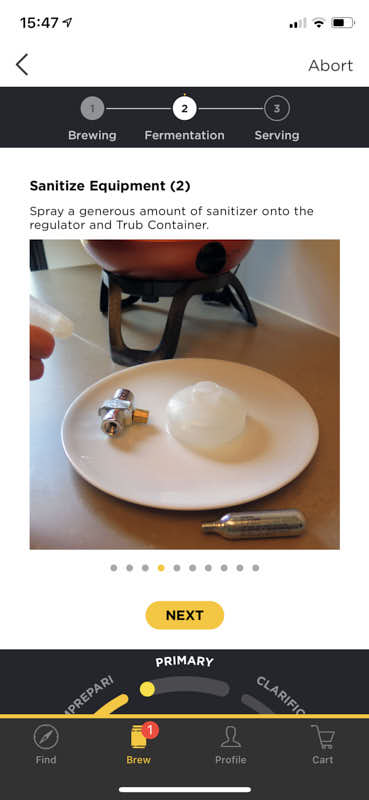
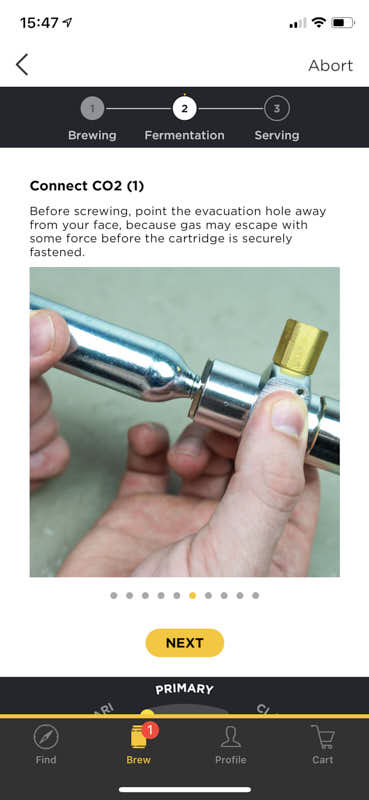
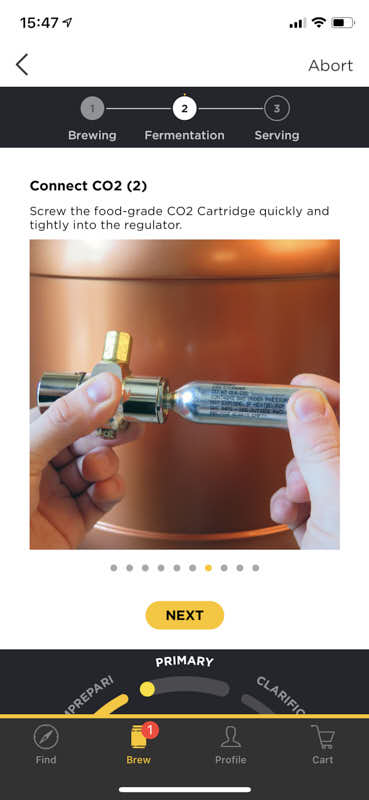
Since there is warm or boiling wort in the SmartKeg, there is no need to sanitise the inside. Some other parts are sanitised with the supplied liquid and spray bottle. Then the dry yeast is added to the keg and after some shaking for oxygenating, the lid is placed on the keg together with an airlock instead of the regular pressure release valve between the keg ports. The app guides you through everything of course and it communicates with the SmartKeg individually without the basestaion. The fan on the backside of the SmartKeg makes a noise like an old 486 computer (remember those?) playing Quake so you don’t want to have this near your bedroom. It’s not loud but it is a somewhat irritating computerfan-like sound.
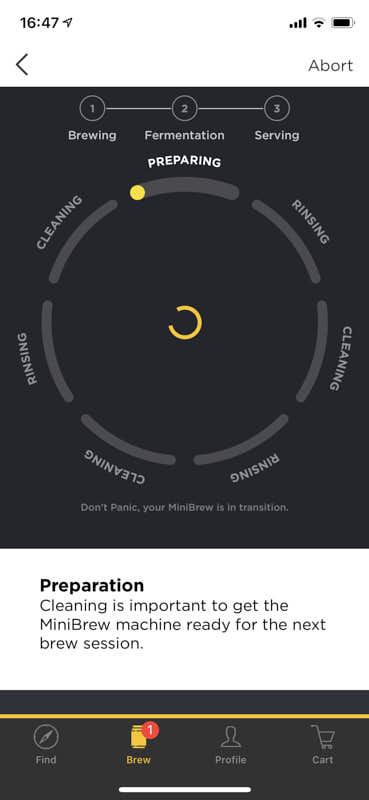
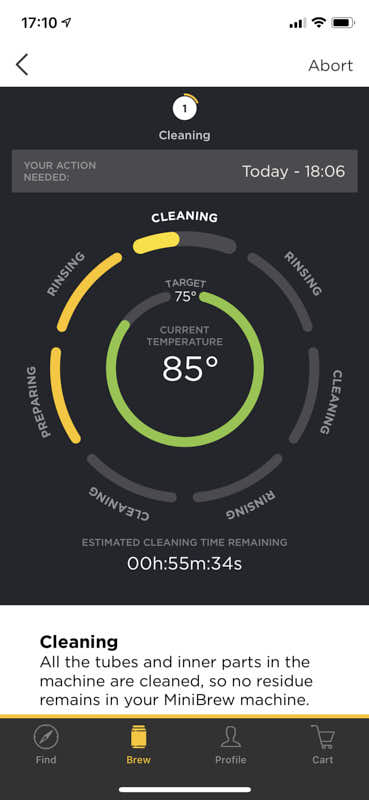
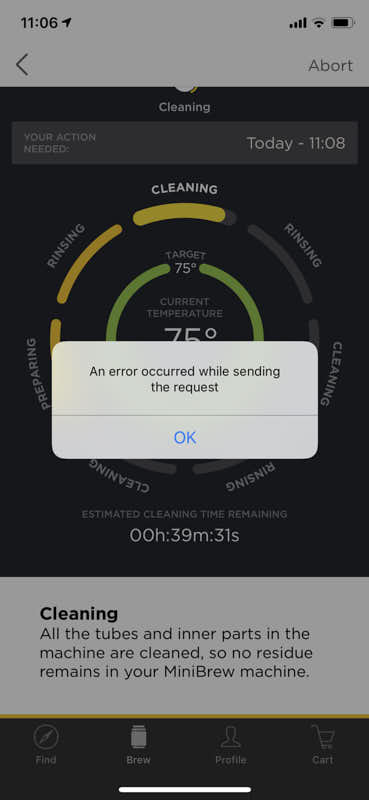
Cleaning
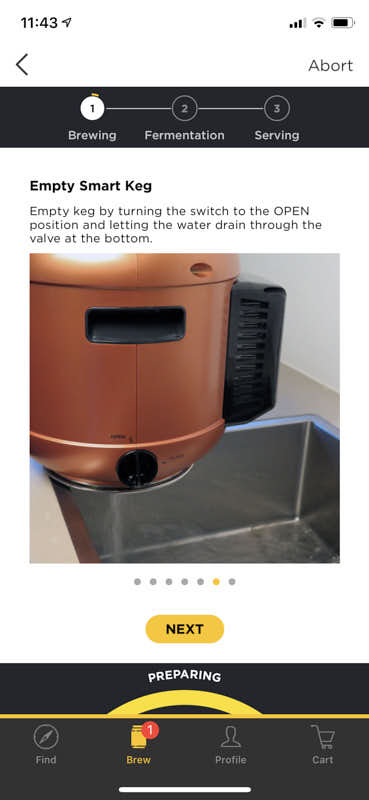
The brewday is about to end and all you have to do now is to throw away the malt in the recycling bin/compost, put all smaller parts in your dish washer and wash out the hop bags (they can also be washed in a laundry machine but avoid detergent and softeners). The bas station is cleaned by connecting the CIP kit together with a dish washer tablet (without the shiner fluid). The machine will clean and rinse everything for you so all that is left is to let everything dry. There is some water left in the machine so a small lid is placed on the connecting parts on the bottom of the base station where the SmartKeg/boiler is connected. This automated cleaning is very simple but I think that a CIP cycle of 60 minutes is a bit overkill for a small machine like this but I guess there have been lots of testing that came up with this amount of time. And since it’s automated, it doesn’t really matter that much (unless you or your kinds are eager to go to bed).
Fermentation
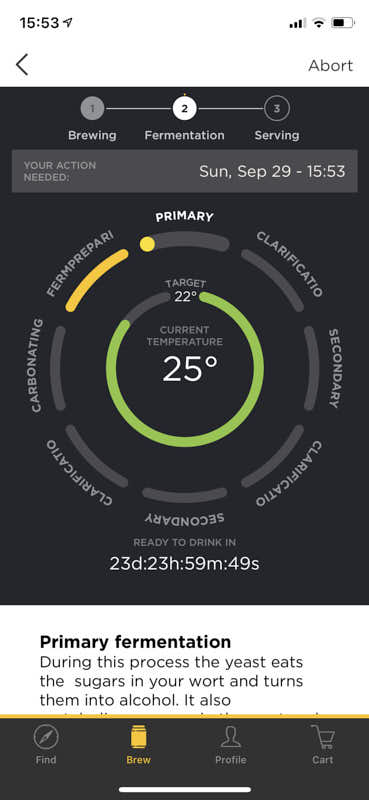
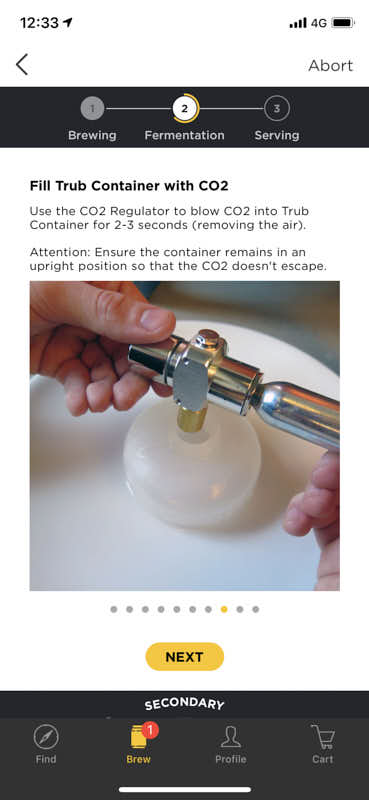
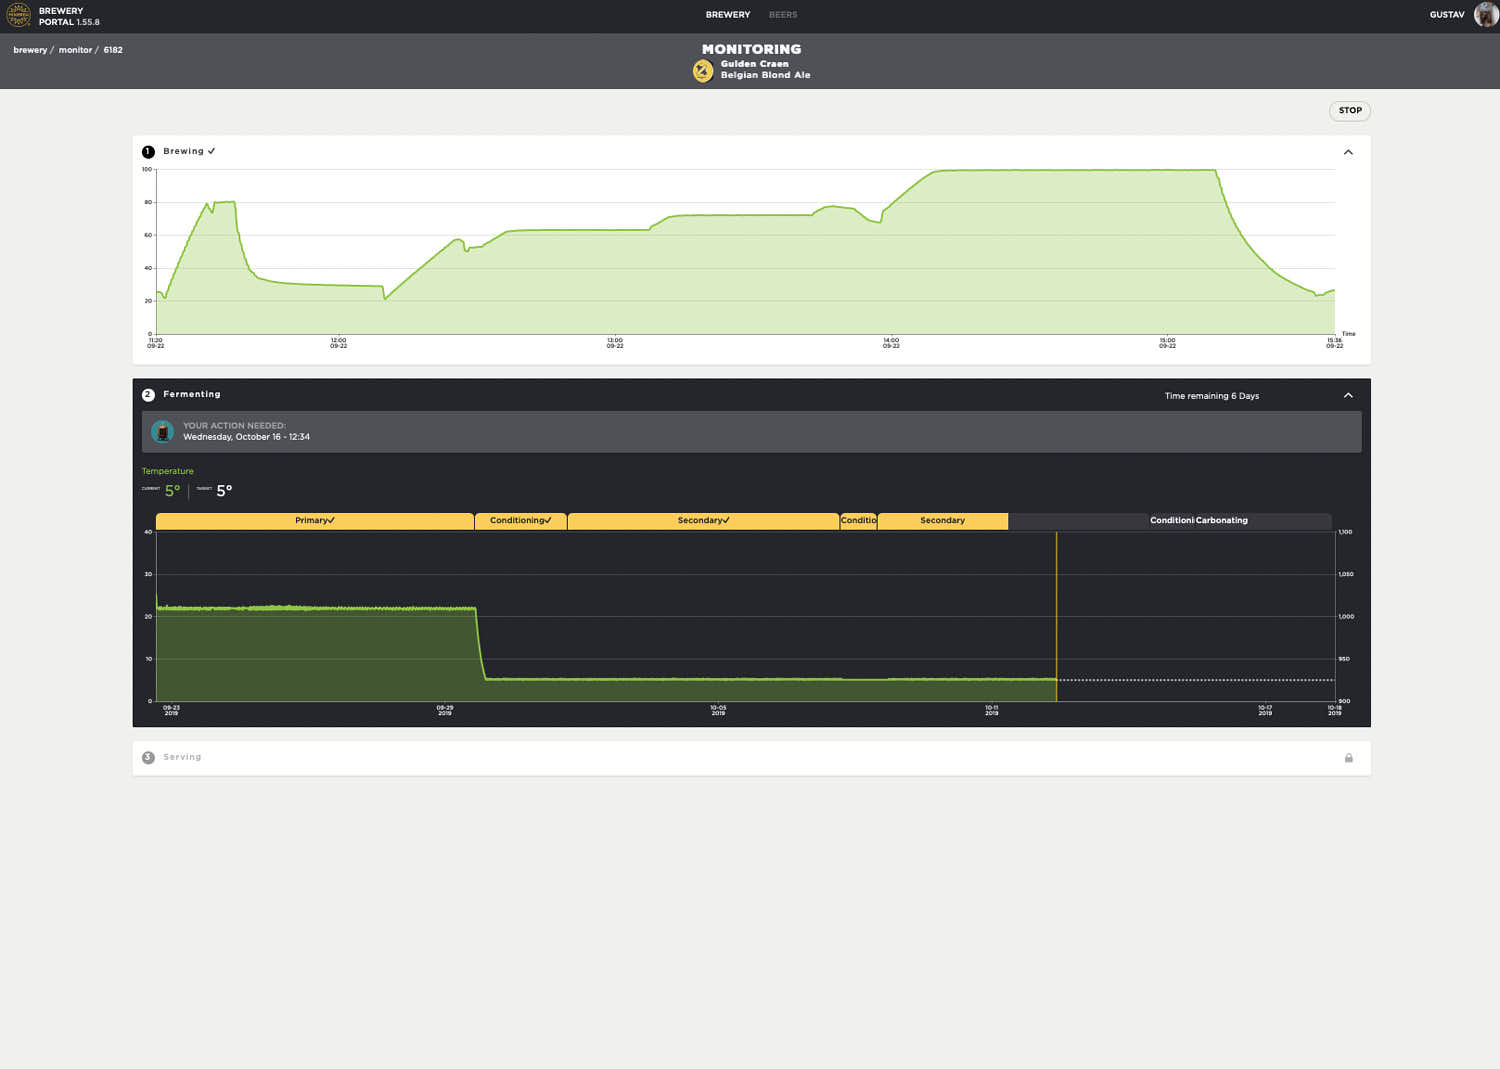
The fermentation, cold crash and lagering is all automated and you follow the process in the app. The only steps required from you along the way is to remove the airlock and replacing it with the safety pressure release valve, and removing/emptying the trub container a few times (they are flushed with CO2 every time to reduce oxidation). Different brews needs different amount of lagering/conditioning times so I can’t really tell you how long this process will take, it is decided in the recipe from the BrewPack. For my Belgian Blonde, it was about four weeks of total fermentation and conditioning. The review and tasting of the beer itself will come in a separate blog post in a few weeks time.
My thoughts, pros and cons
This review is based on my first brewday since I know you guys are very eager to hear my thoughts about it. Most of the issued I had during the brewday where user errors that I will avoid the next brewday. Some came from an unclear instruction from the app and some from me, missunderstanding some detail. The overall brewsession went well and I now feel like I don’t need to read all details in the app next brewsession. I would have liked to read all steps before actually performing them but there is no manual supplied with the machine and there is no one to be downloaded since the manufacturer is still updating the steps with the feedback from the users. I did however get a PDF after the brewday and that is the manuscript for the app. I would have liked to read that before the brewday but you guys have this review to familiarise yourselves with the brewing steps.
What I liked with the machine and the whole brewsystem
Complete package
The MiniBrew really is a complete package and not like any other system out there. Everything you need to brew, ferment and serve your beer is supplied! All you need is a measuring jug, a big bowl or bucket and your favourite beer glass! For beginners, I think the biggest improvement in their beers is controlled fermentation. Both the temperature itself but also having a stable temperature without fluctuations makes a huge impact on the final result.
Easy brewday
The machine and maybe even more so, the app, makes brewing beer very easy, even for the absolute beginner. I would have liked a little (i)-icon in some of the instructions for the beginner who wants to know why certain steps are performed but all in all it’s a very detailed guide and no one should have any fear of brewing with this system. It is very easy to follow the instructions and they will be even better when they add video to certain steps.
Excellent repetition
The MiniBrew makes repetitive brewing easy. Since every parameter is decided in the recipe and the process always looks the same, you can really fine tune your recipes like with no other system. Brewing free hand, or even with a machine like the Grainfather or Braumeister, will always add variabels that will change from brewsession to brewsession. All recipes are stored on the web page so you can easily brew the exact same beer infinite amount of times or just tweak it a little bit here and there.
Automated brewing
Sometimes, you are your own worst enemy. It is easy to screw up a brewday by forgetting things, miscalculate ingredients or boil offs. The MiniBrew takes you out of the ekvation pretty much and if you can follow the easy instructions, your brewday will be successful.
Nice appearance
The machine looks very nice and I wouldn’t mind having it out in the kitchen. It is fairly small but then again, I have a pretty large kitchen. It is very quiet during the brewday so that shouldn’t disturb anyone.
The app tells you exactly what time your next action is needed which makes planing of your day very easy. It only consumes 1 kw of power and doesn’t need a well ventilated place to brew at, so as long as you have a water supply and a a drain, you can brew anywhere. A brewsession can be done under 4 hours and 8% beers are possible to brew so there is some flexibility there.
Portable
Want to brew outside? Want to bring the system to a friend for a brewsession? The system might not fit in a backpack but it is portable enough to place where ever you want to brew and when it’s time for storage it will fit in a closet.
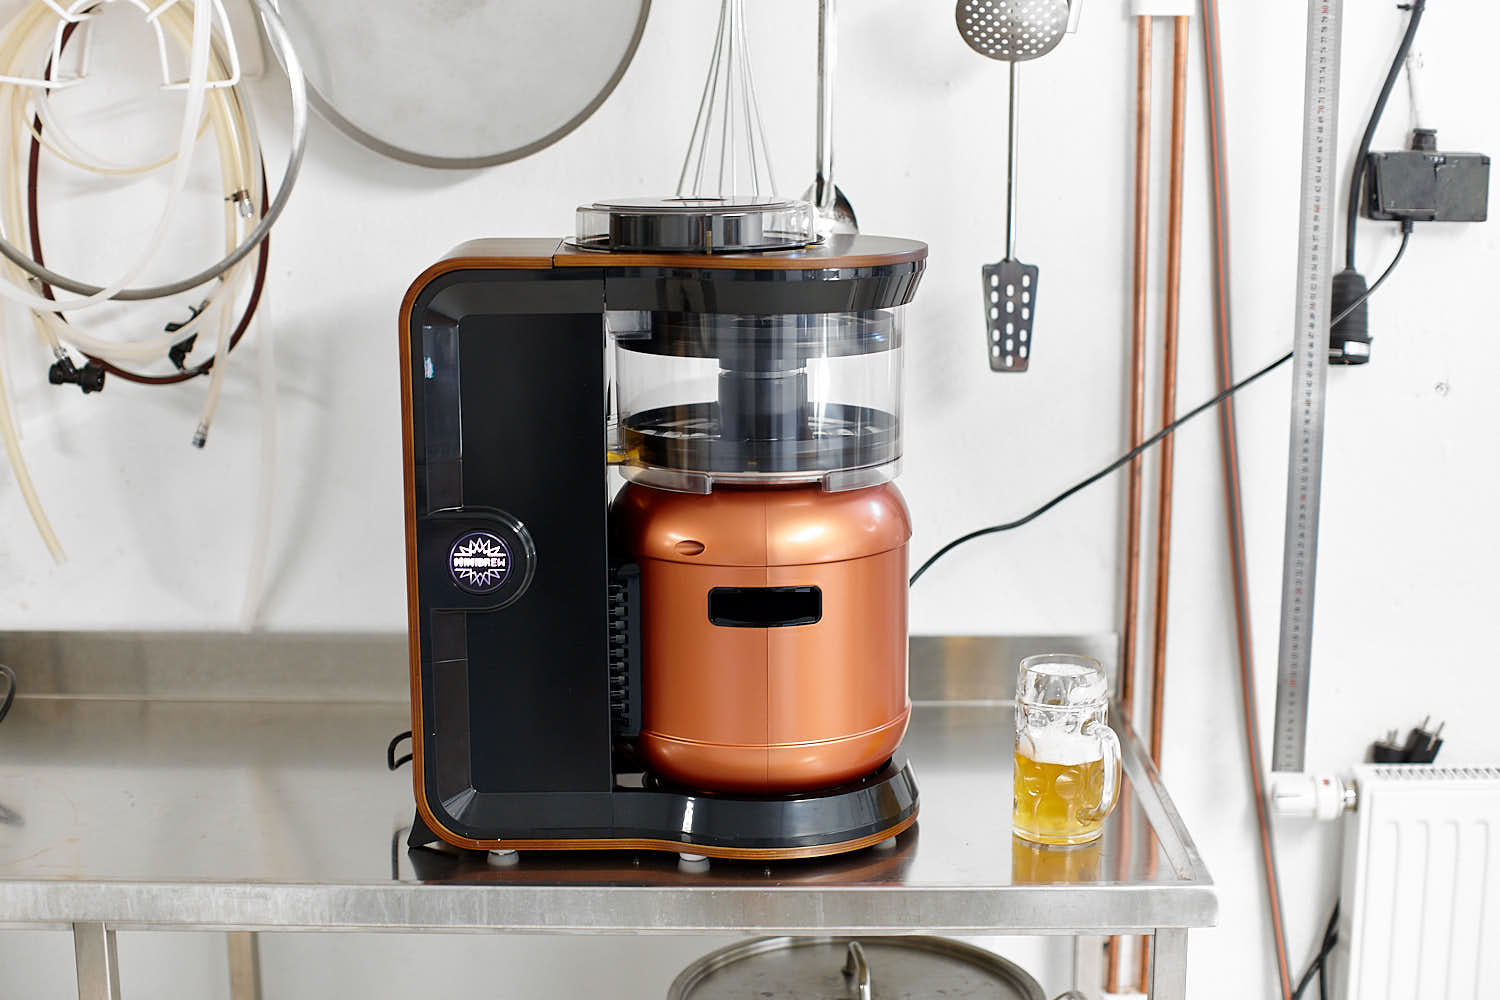
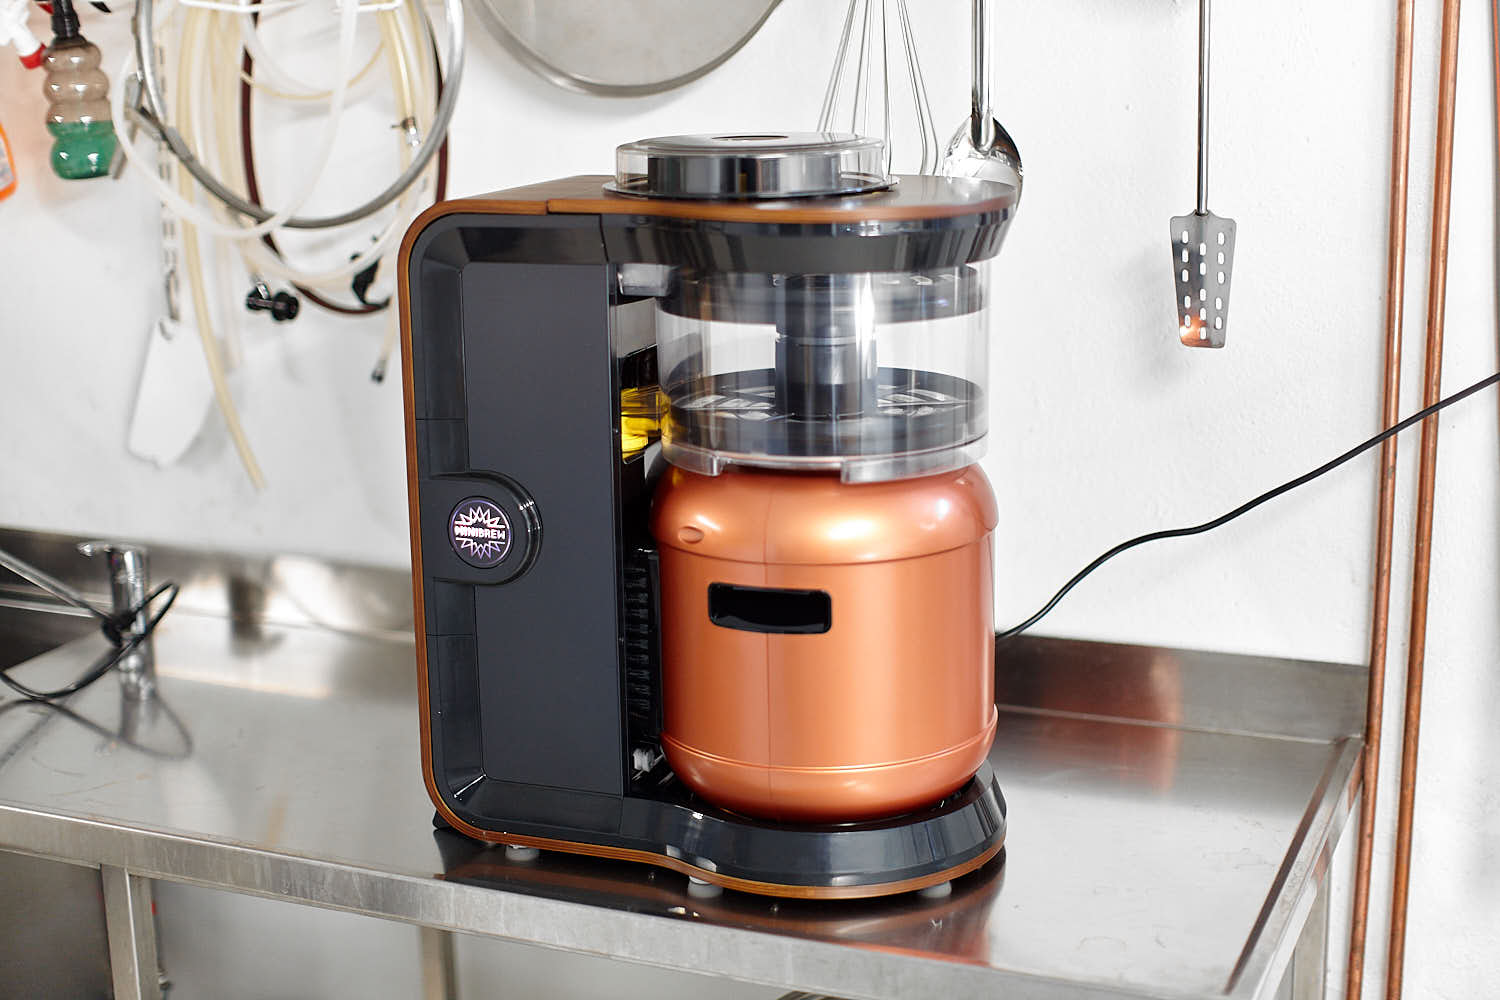
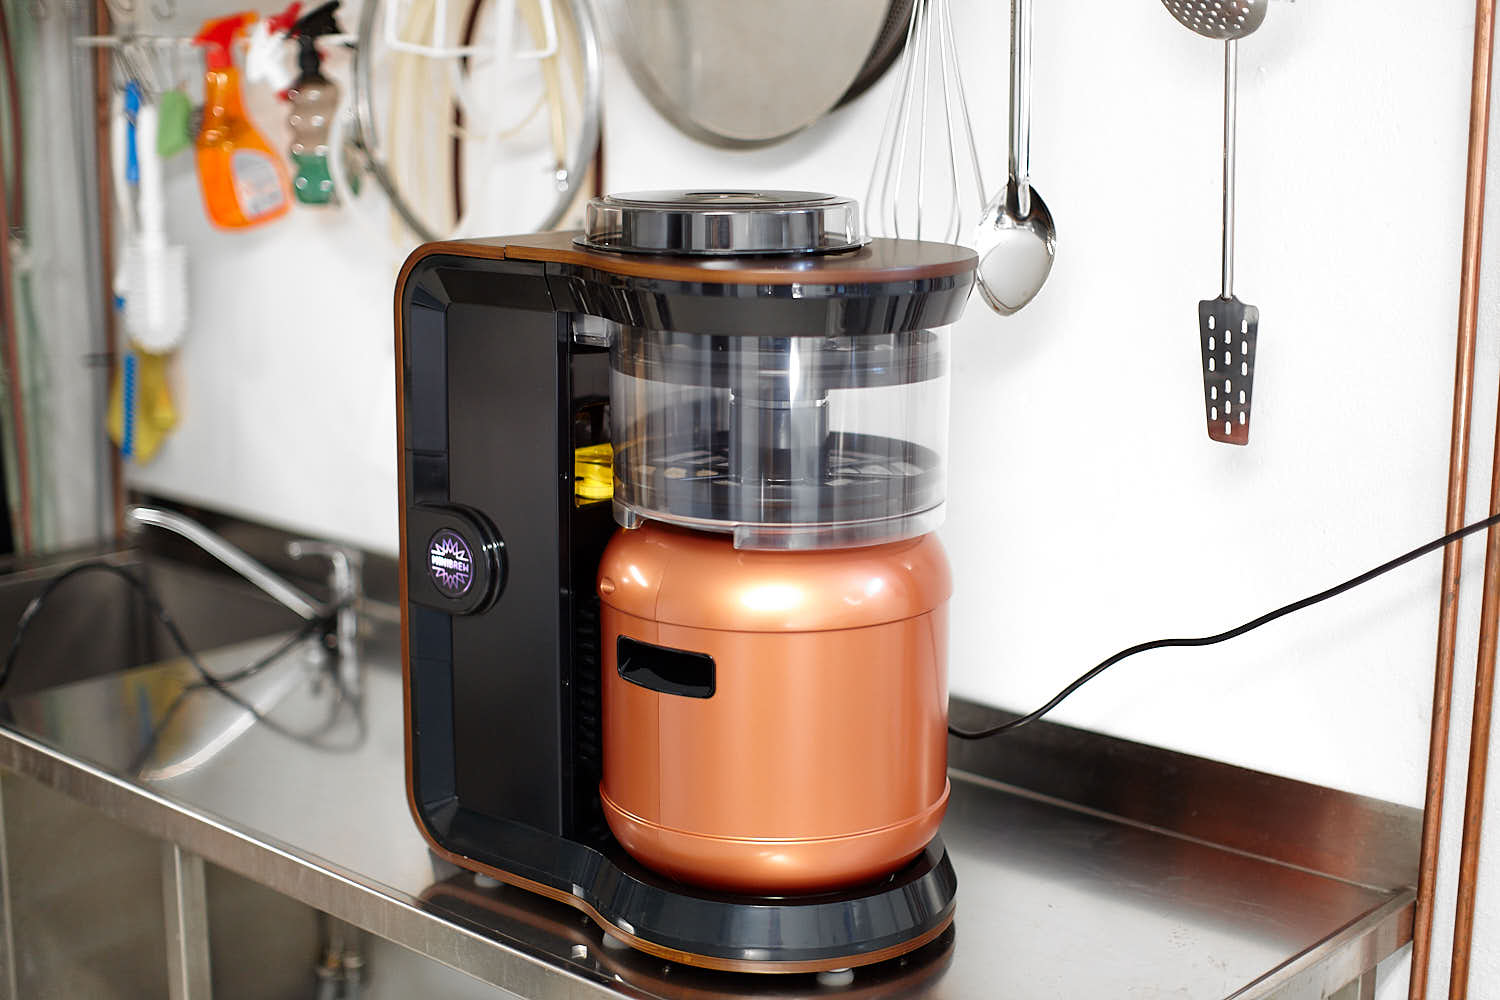
The smart SmartKeg
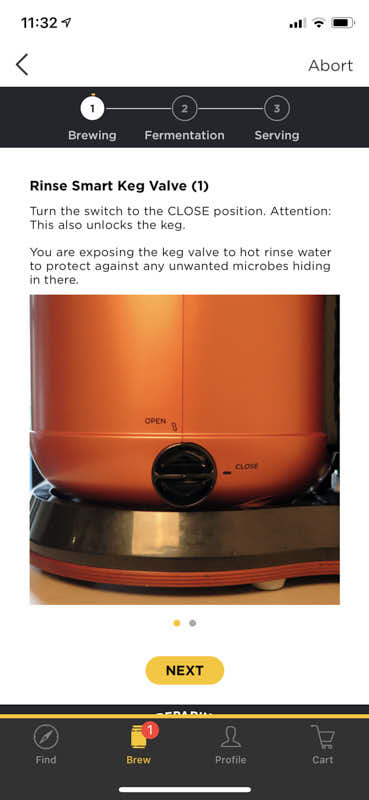
The SmartKeg really is an improvement to your average Cornelius keg. Built in cooling and heating, all controllable by wifi is neat. It is also insulated but I do not know with what (vacuum?). There is also the bottom valve that you can use for removing trub and also helps a lot with cleaning. Serving directly from the fermenter reduces oxidation but also eliminates the transferring step and the cleaning.
What I don’t like with the machine and the whole brewsystem
There are three main things i disliked with the MiniBrew:
Price
There’s no point in avoiding the elephant in the room. This is a system that will cost you a big chunk of money to get you started. If that means that it is expensive or not is up to you but I really think you need to consider that it is a complete brewery package that is very hightech with the app and all wifi connections. The MiniBrew system is a brewing software, a guiding brewer hanging over your shoulder (the app) a mashtun, an automated boiler, a counterflow wort chiller, a fermentation vessel, a fermentation fridge, a keg, a portable kegerator, a CO2 regulator and so on. The price needs to be compared to a whole home brewery and not just a mash/wort-machine. But then again, it is a lot of money and if you are a beginner who doesn’t really know if this hobby is for you, the price tag will scare some people. Here in Sweden, the currency Krona is very weak at the moment which doesn’t help either.
The BrewPacks on the other hand are expensive. Yes they are prepackaged with all ingredients you need and the recipe to execute the brewday and fermentation but the price of cheapest packs at 18 € (without shipping!) for roughly 5 liters of beer which equals out to 3,6€ per liter. If I scale that up to my regular batchsizes (we’re only talking ingredients here, not water/electricity/labour etc) that would cost me more that 200€ per brewday. On the other hand 3,6€ for two large (0,5l) premium craft beers is cheap compared to your local hipster bar but this is homebrewed beer from a machine that wasn’t cheap to begin with. The BrewPacks are great for the beginners but I think many people want to start using their own ingredients pretty soon, purely out of cost perspective. To be able to brew your own beers you need to pay a subscription fee to access the MiniBrew software on the website. It is not possible to make a recipe with the app, that can only be done on the website. I can’t find the subscription fee on the MiniBrew webshop but on my LHBS Humlegården, it costs the equivalent to 90€ per year which I think should be a one time fee.
Locked system that is also dependable on the manufacturer staying in business
The MiniBrew system is like an iPhone; it’s tech savy, well designed in both user experience and physical design but the management of the system is locked away from the user. If you buy the subscription to the website you can tweak some software parameters but you’re pretty much stucked with the hardware part.
If you are like me, a little pessimistic about the future, you might wonder what will happen to your MiniBrew if the manufacturer goes out of business or get bought up etc, in other words, how the machine will work without the active running servers of the MiniBrew team. Quick answer: “it won’t!”. There is no way to even start a cleaning cycle without the MiniBrew servers for the time being so I really hope that the company will still support this system in 10-15 years from now. Otherwise the machine would be completely useless. I hope there will be a standalone app for wither phone or computer in there future so that the system is “future proof” even though it goes against the main idea about the whole system being integrated with the guide and webshop. The same thought applies to third party brewpacks, they will not work unless you treat them like your own recipe on the MiniBrew website (which yet again, requires the subscription).
Batchsize
The 5 liter size of the batches are too small for me but also for many brewers out there. Bring a friend or two and you will easily be able to finish a whole batch in one evening. I would have preferred at least 10 liters of beer for the time spent brewing and cleaning all parts.
Smaller things I dislike:
Water
The MiniBrew base station is supposed to be connected to a water tap throuhout the whole brewday which for many brewers mean that they can’t use their kitchen while brewing. I’m sure you could disconnect the waterhose from the start of the mash until the end of the boil but it is not something the app tells you.
Cooling down the wort in 22 minutes is ok at best. Cooling down 5 liters of wort in 22 minutes to 25°C is very slow. I will measure again when my tap water is colder and see if I can do this step faster and with less water.
Efficiency
I calculated the efficiency with 1728 gram of malt at OG 1.056 for 5,5 liters to 58% and to 5 liters to 53% (since there is no way to measure the batchsize). Either case the 53-58% range is very low. The website says the process of mashing from below and up gives you high efficiency but that was not the case for me this time. I can’t review the efficiency of the machine based of just one brewsession, more datapoints need to be gathered.
According to the MiniBrew team, it should be possible to complete a brewsession in 4 hours but for me this particular day, it took over 7 hours. They say that it depends on both recipe and water temperature and of course I need more data points to draw any conclusion in this matter.
Hop bags
I’m not very fond of the small hop bags that, in my opinion, are too small for the amount of hop that you add and they are “fiddly” (“pilliga” in Swedish) to load. I would have perferred loose hops instead, which I saw the inventor use with a prototype machine on Youtube. So this might be an option but I haven’t inquired about that yet.
Cleaning
I don’t like that there is water left in the machine after a brew session. This water will be rinsed before next brew but I don’t think it’s good for the machine in the long run (thinking of rust and scale build up). Two dish washer tablets per brew and one for cleaning the keg when it’s done is a lot of detergent for 5-6 liters of beer.
Small parts
The system contains and depends on many small parts (mostly filters and gaskets) that can brake or get lost. There’s no way to brew if you’re missing just one little piece and if something break on a brewday, you won’t be able to buy a replacement part on your local hardware store in a rush. These components are especially designed for the machine and must be purchased from the manufacturer.
The app and the guide
The machine is very dependent on the app. Several times I had a problem with my wifi since I brew in my basement and network connection is less than perfect. Still my Braumeisters wifi works fine and we’re watching Netflix in the room next to the brewery every night without a problem. The text ”Loading brewing data” in 10 second segments happened 4-5 times during the day. The images in the app are a bit small even with my large iPhone and there is no dedicated iPad app so there is no way to view the images larger. The video guides that will be available in the future will be a great addition to the guide.
Summary and comments
I think there will definitely be a big customer base loving this machine and the beers from it. Having a modern, constantly refined and updated guide that helps you with your brewday and the whole fermentation really is great. The fermentation control is great and I think most brewers will crank out good to great beer from day one with this device. Being able to repeatedly brew the same recipe over and over, with or without fine tuning the recipe, will appeal many experienced brewers who are already confident in their process and just want to experiment with recipes and new ingredients. Or people who just wants a big variety of craft beers at home (or at the office).
Development of a whole system like this, both hardware and software, is difficult and costly which is reflected in the price tag just like you can get 54 (!) Nokia 105 phones for the price of just one highend iPhone 11. The Nokia even has a standby time of 25 days and you will be able to make a call with both phones but that’s where the comparison ends if you get my analogy; modern technology costs money.
For me, it is too early to say if my conclusion is that I like the system and/or will use it in the long run. I simply need to brew with it more times before I can make a conclusion like that. The small batchsizes of the MiniBrew means I need another system due to pure beer consumption in our household since both me, may family and friends are quite thirsty. I enjoyed brewing with the system even though I had some minor issues during my first brewday. I hope that my review can provide you with enough facts about the MiniBrew system to help you make your own decision whether it fits you or not. I will document more brewsession with it in the future and also review the beers from it but that will take some more time of course.


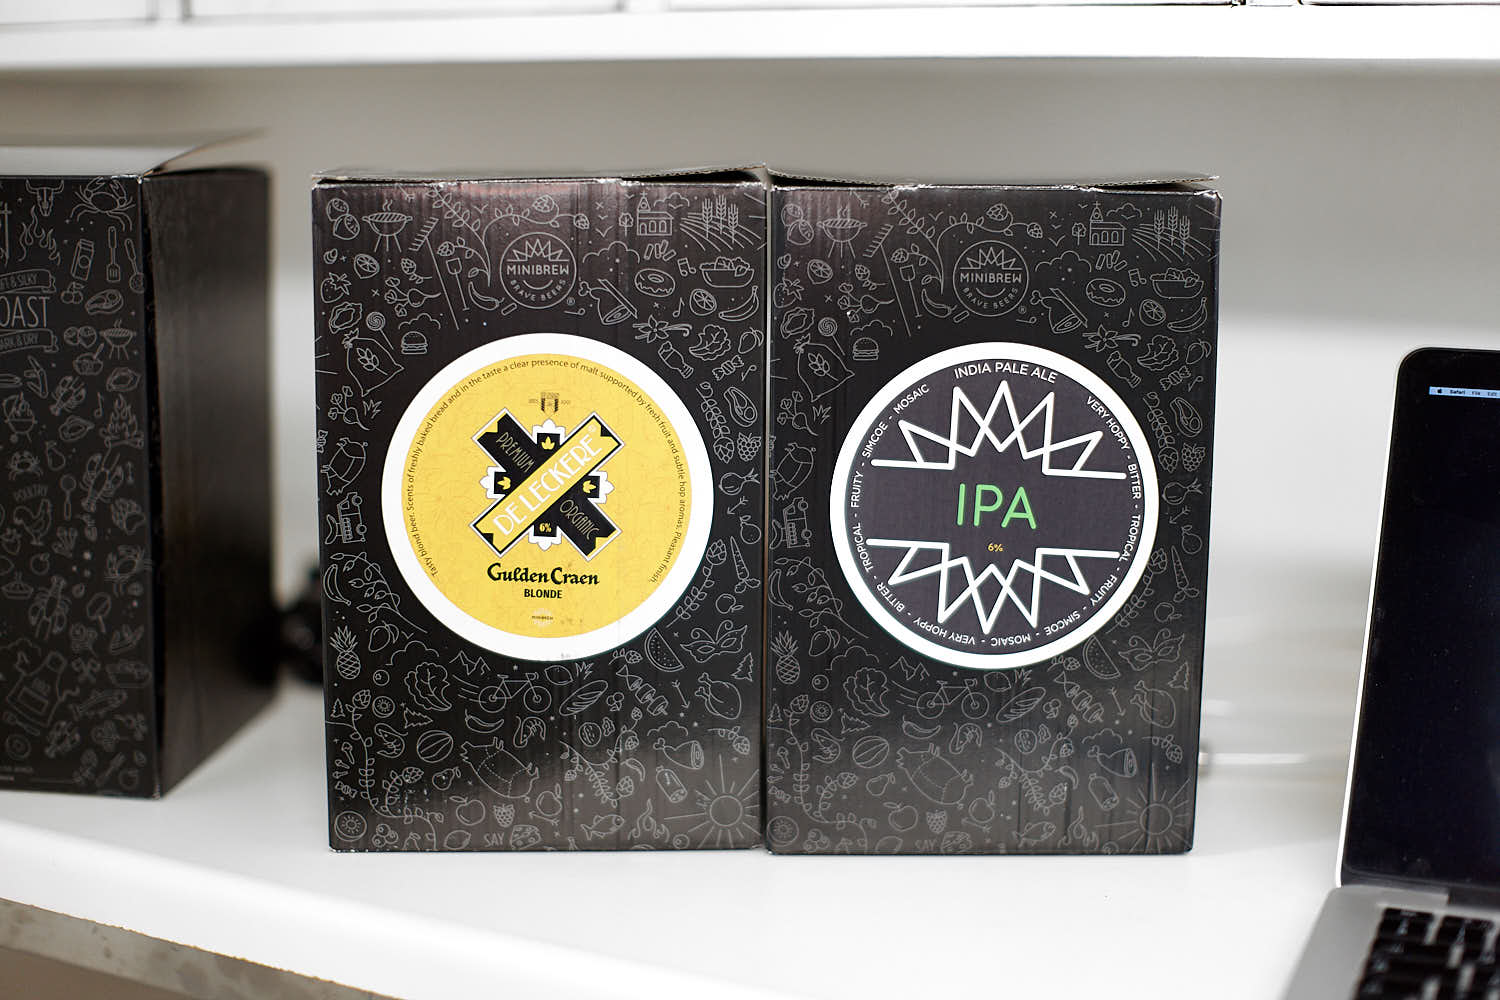 The two beers I will try first with the MiniBrew, a Belgian Blond and an IPA.
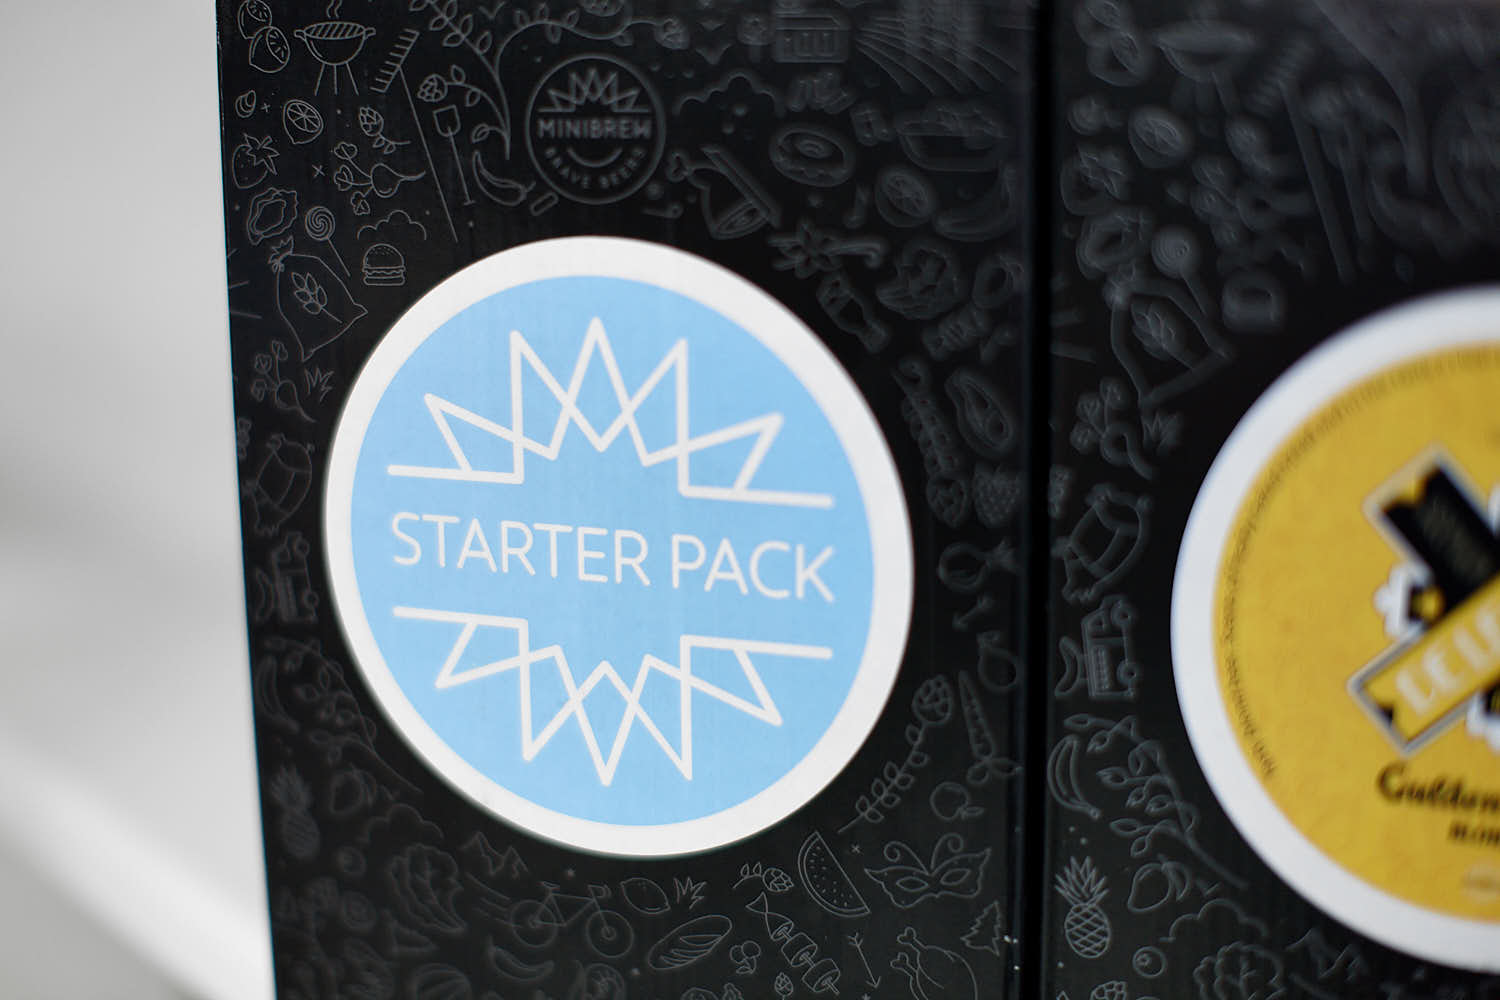 The starter pack contains CO2-canisters and some other small parts needed like sanitation liquid.
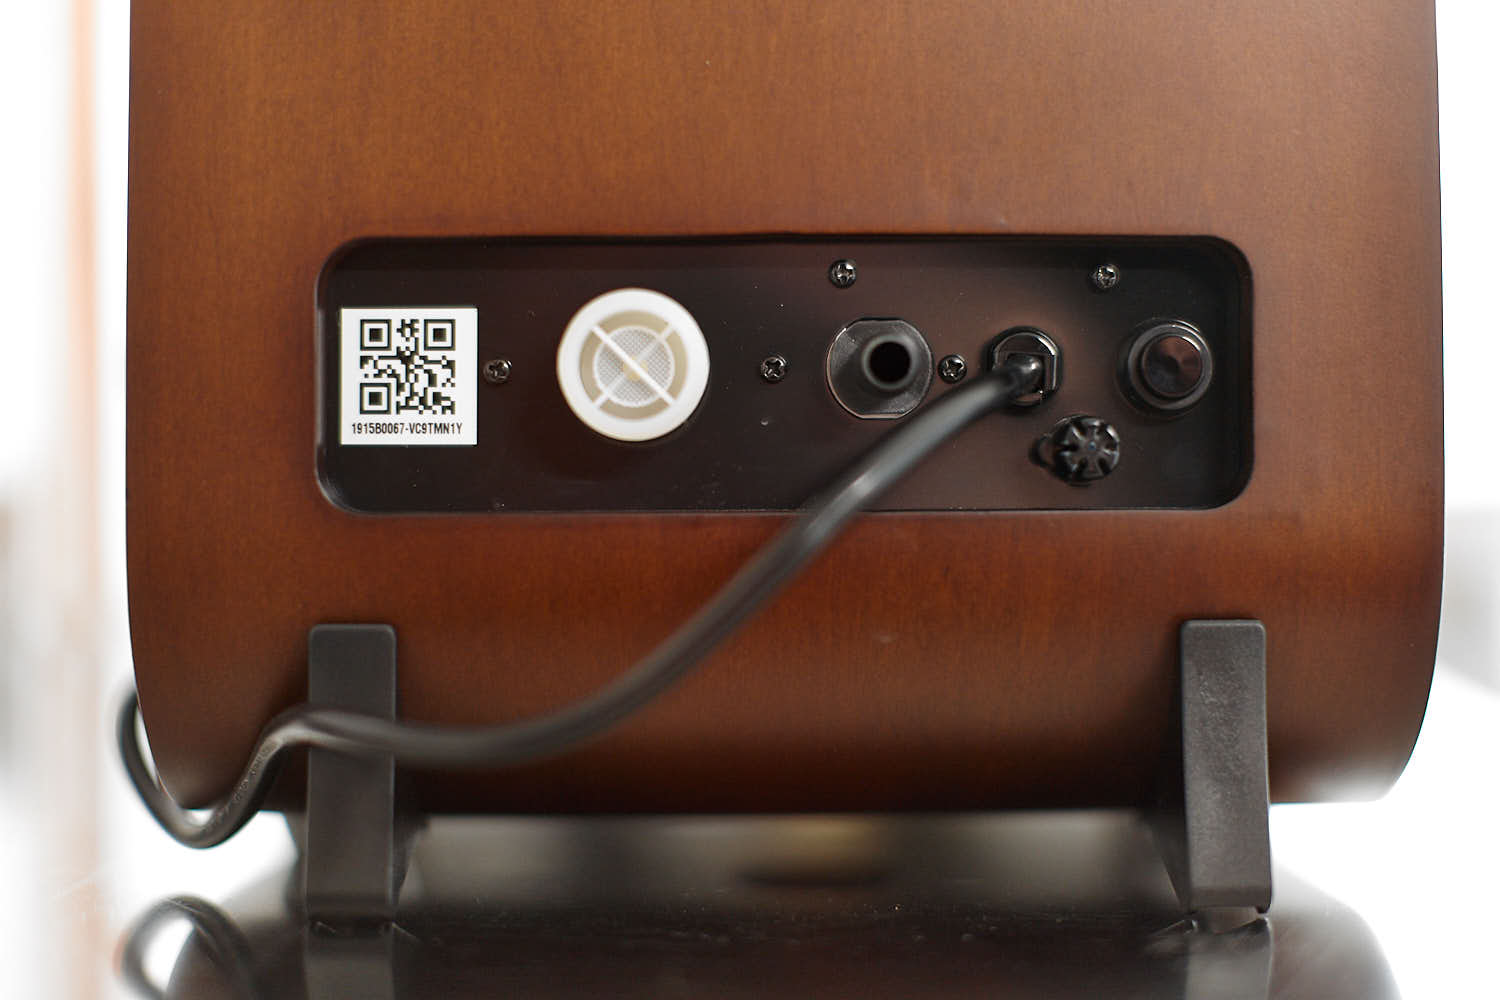
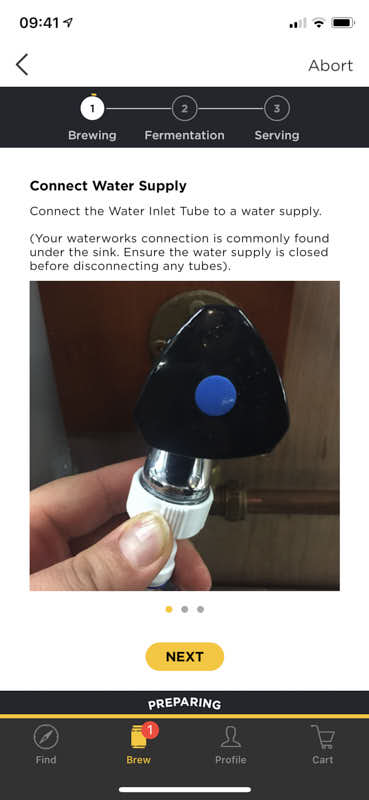
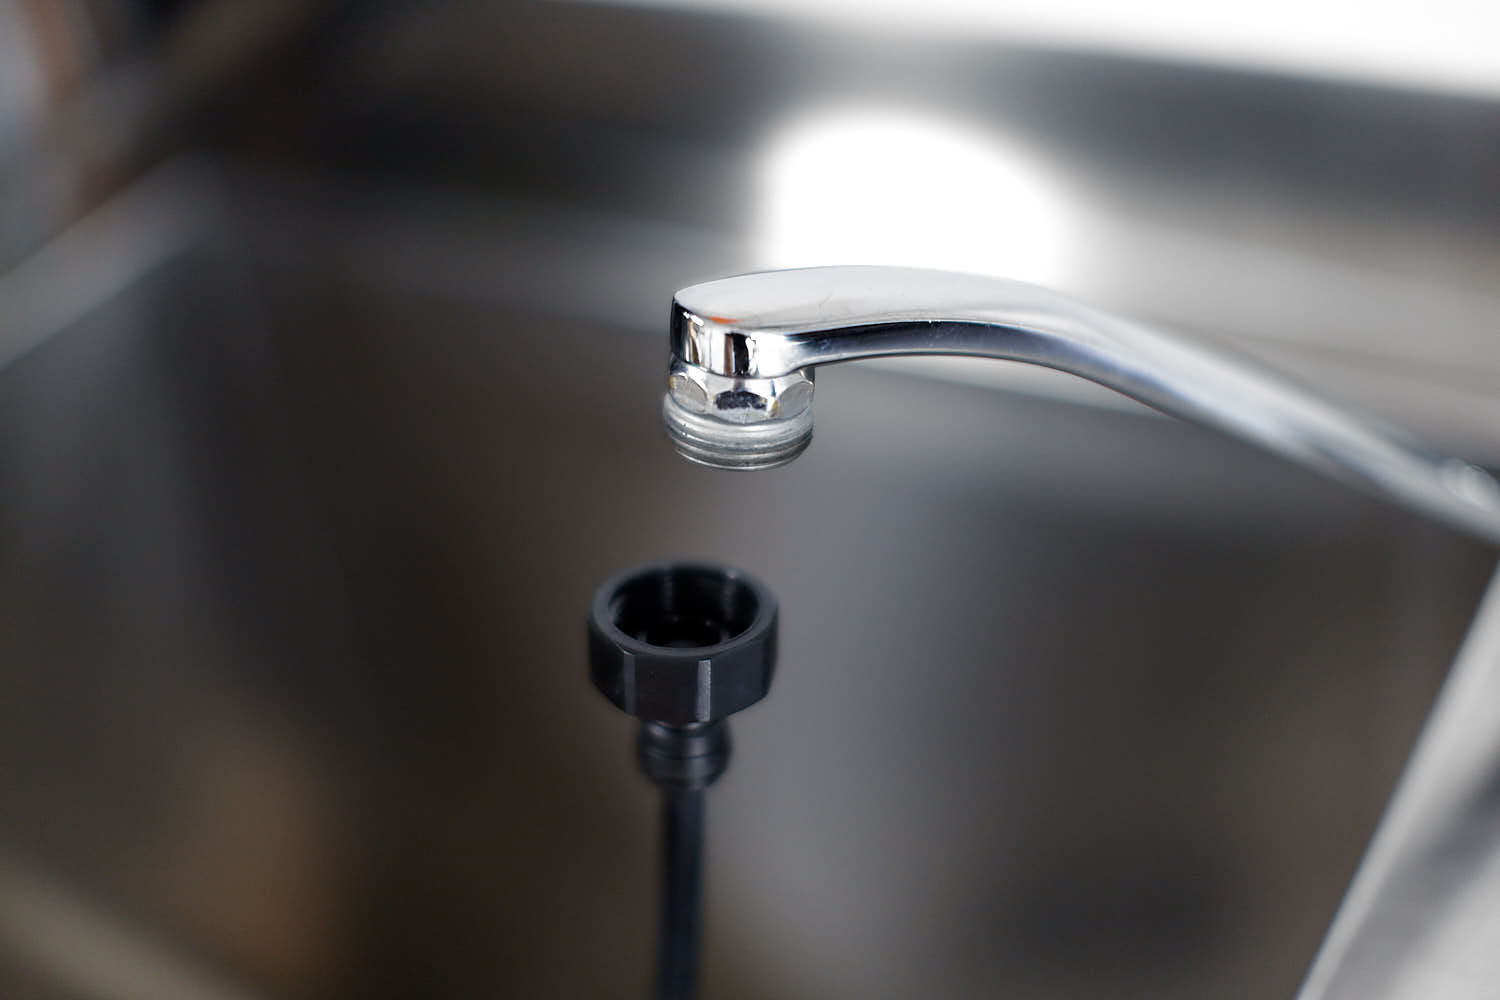 Water connection is a regular ”Gardena type” that is commonly available in your local hardware store.
 Sadly this happened a few times during the brewday.
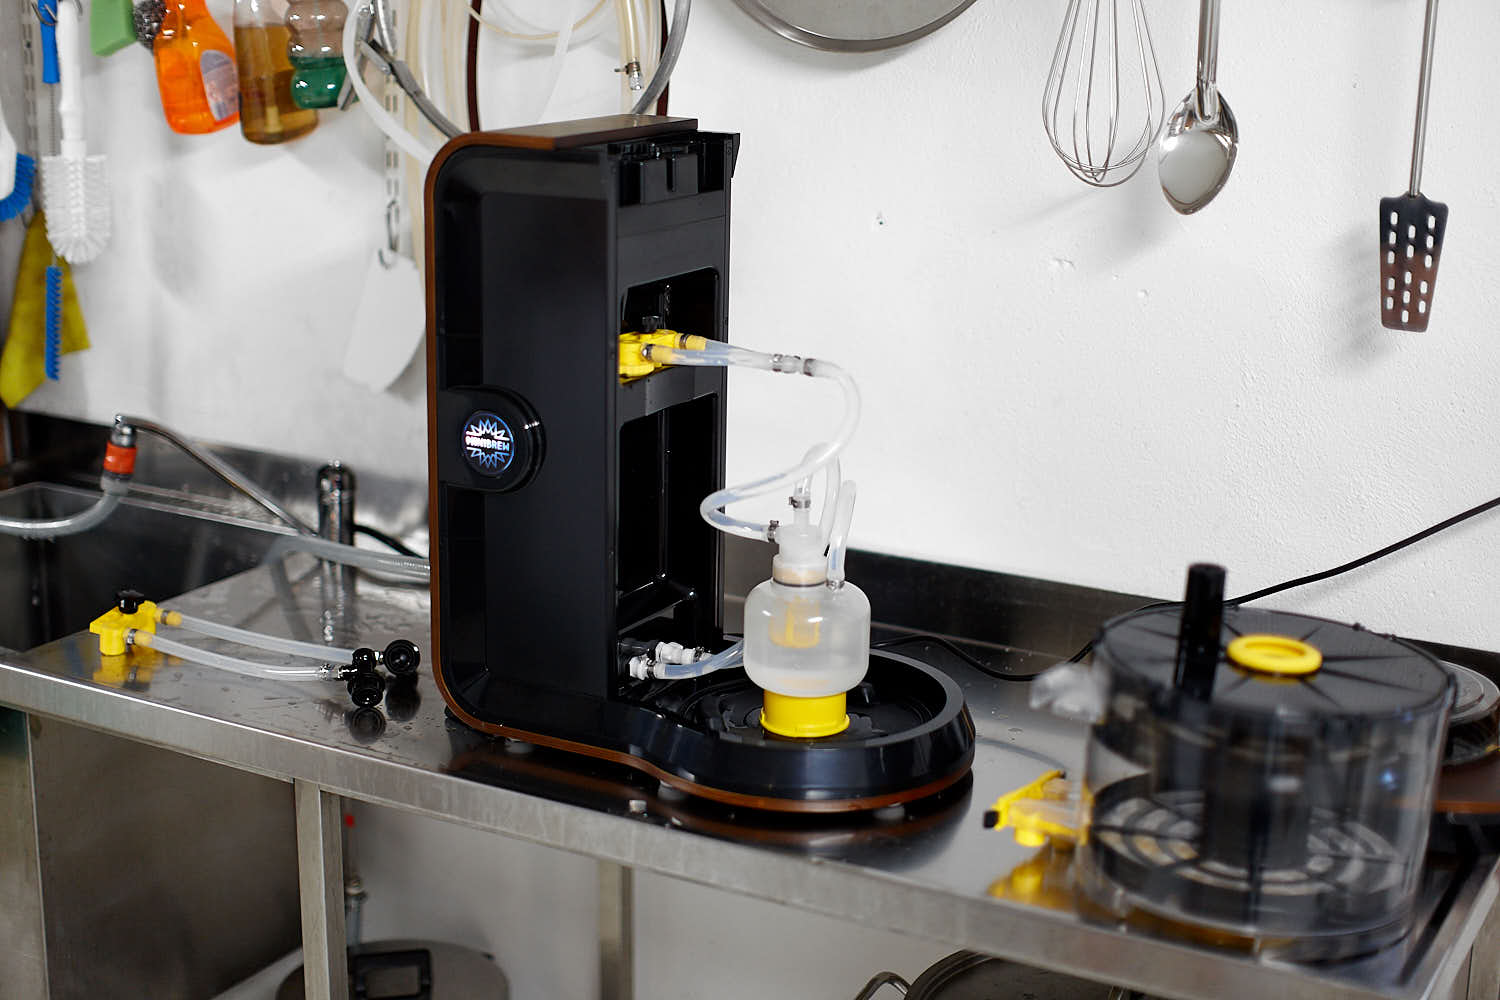
 This is both the rinsing- and CIP-device. You put a dish washing tablet inside and connect the two hoses. The machine does the rest.
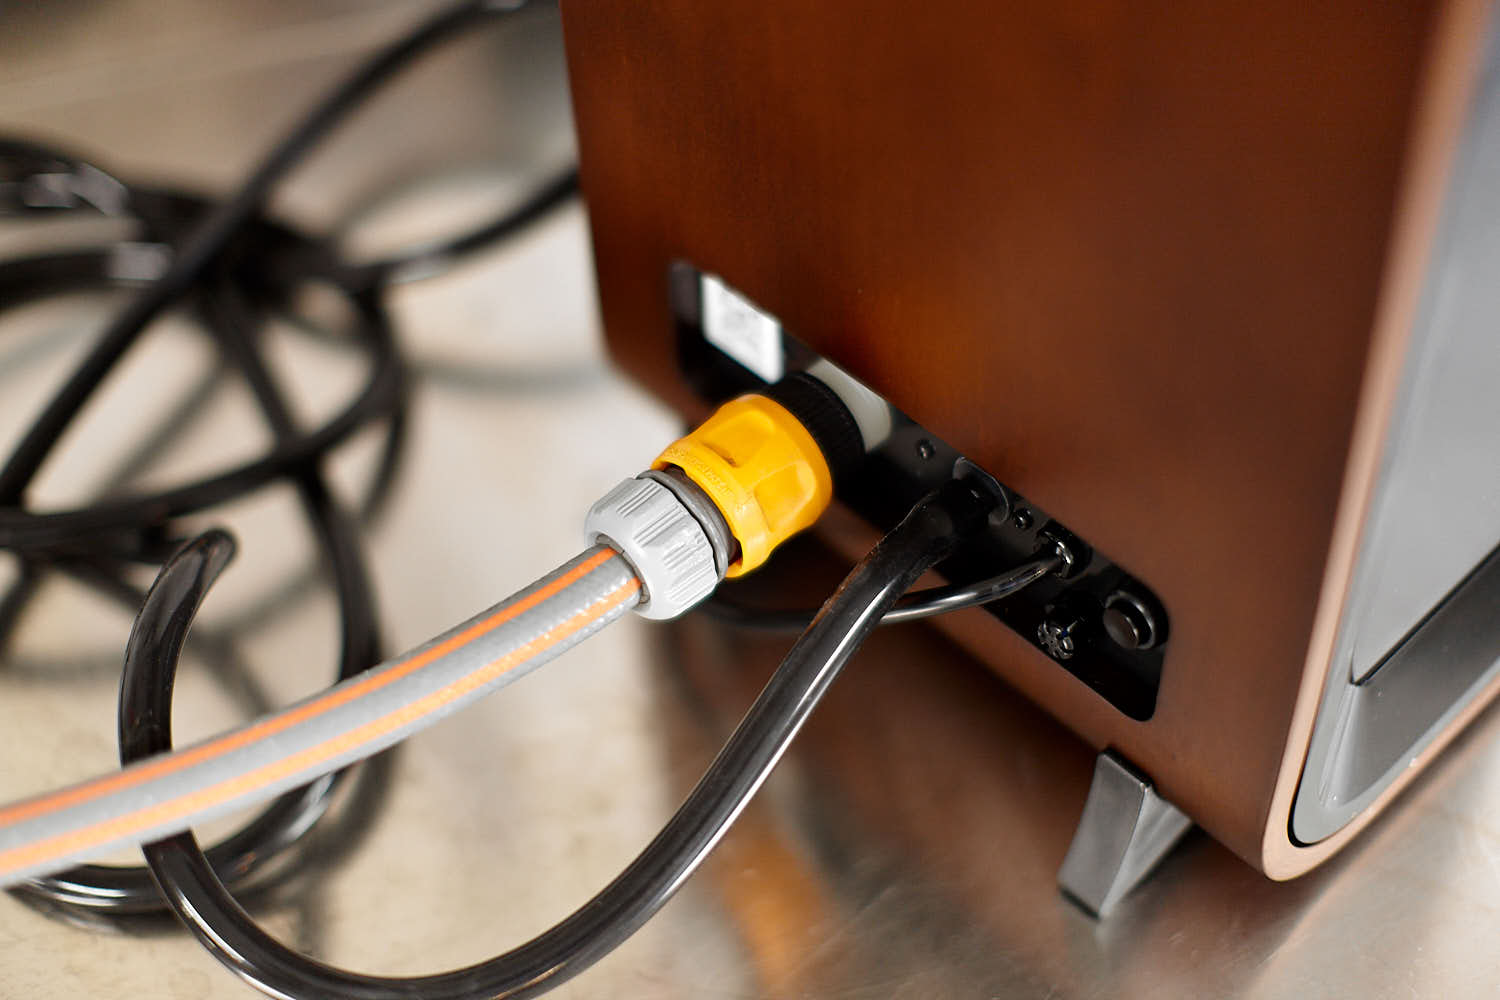
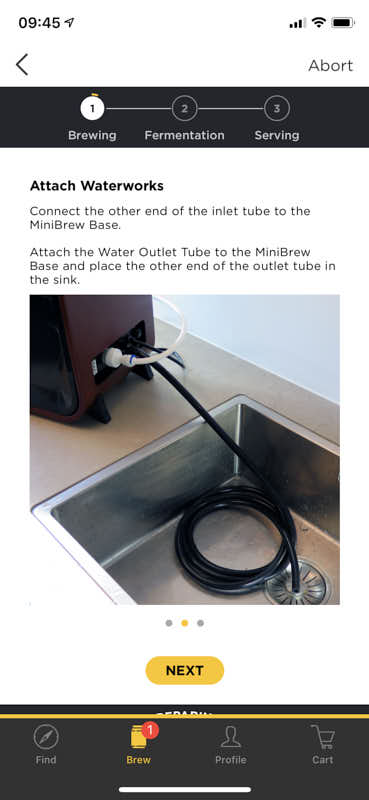
 I had some leakage from my tap so I switched the hose to my regular gardena garden hose instead. This error was due to my old tap.
 Rinsing cycle is on its way. I had some smaller leakage from the yellow connector and it was a manufacturing error so I got a new one from the MiniBrew team.
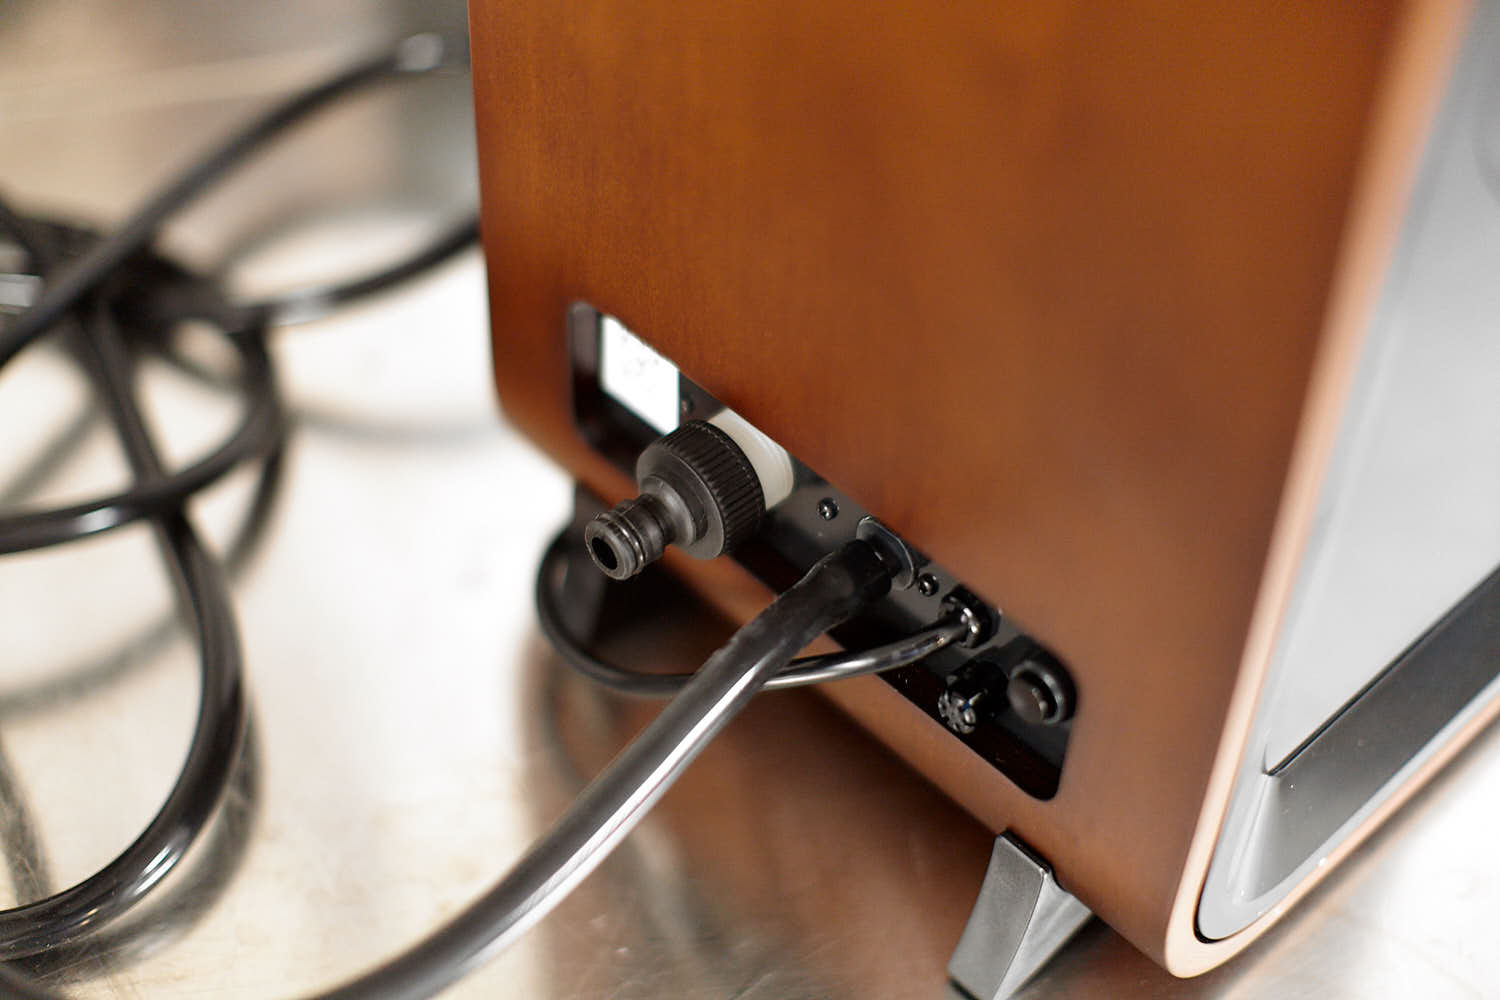 Here I connected a standard Gardena barb to the machine.
 This is the base og the machine and the ”trub filter” for the boil later on.
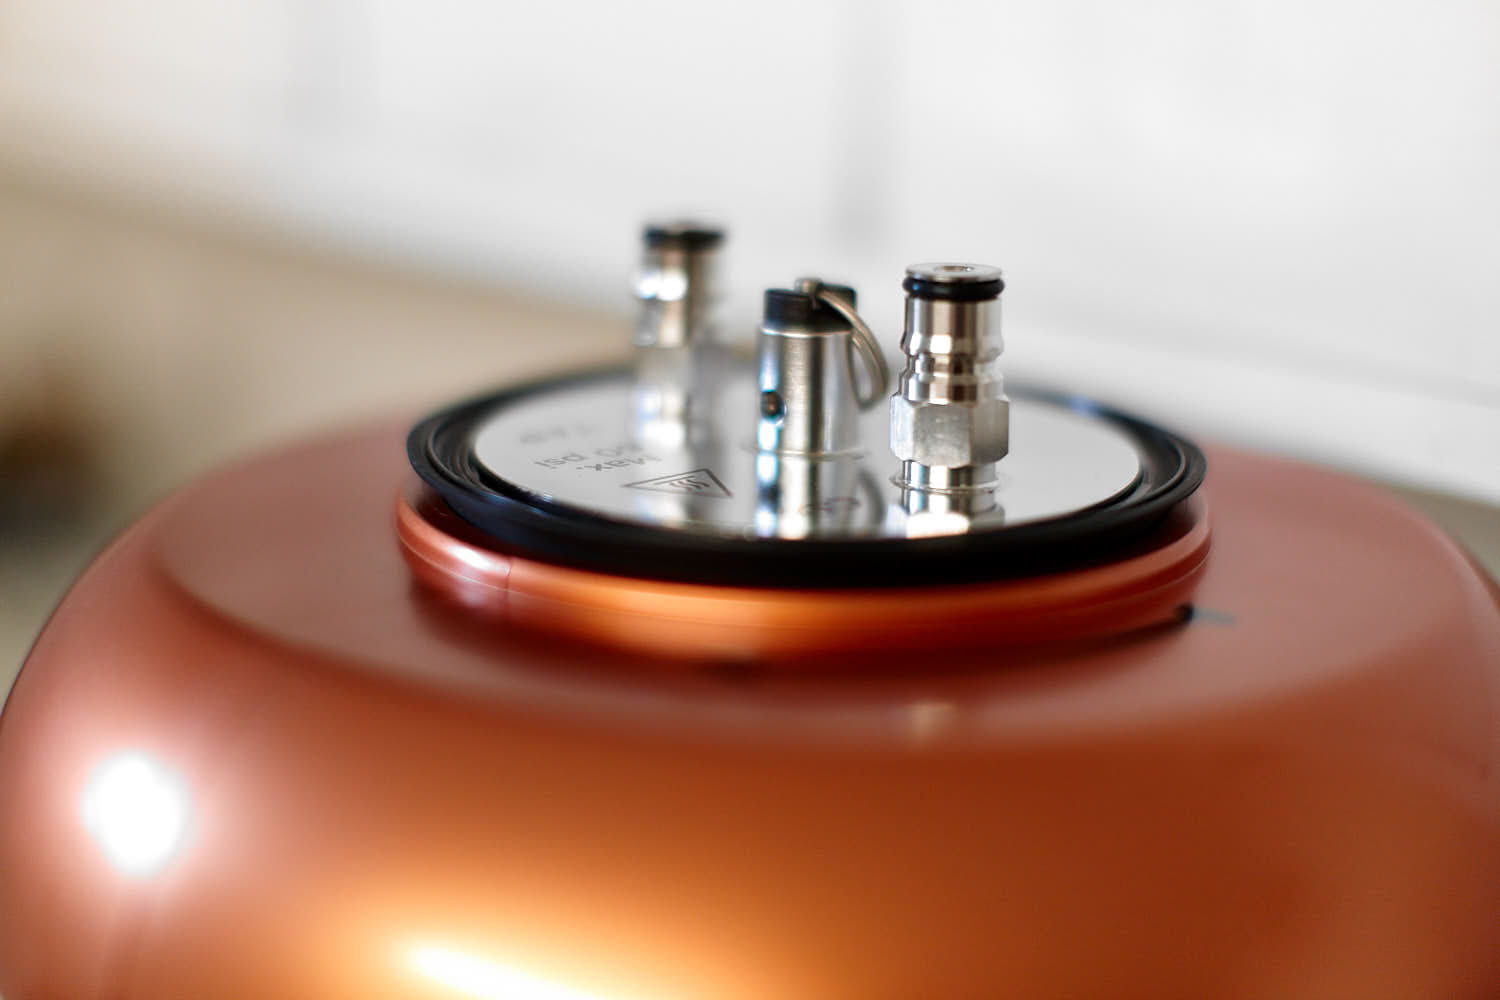
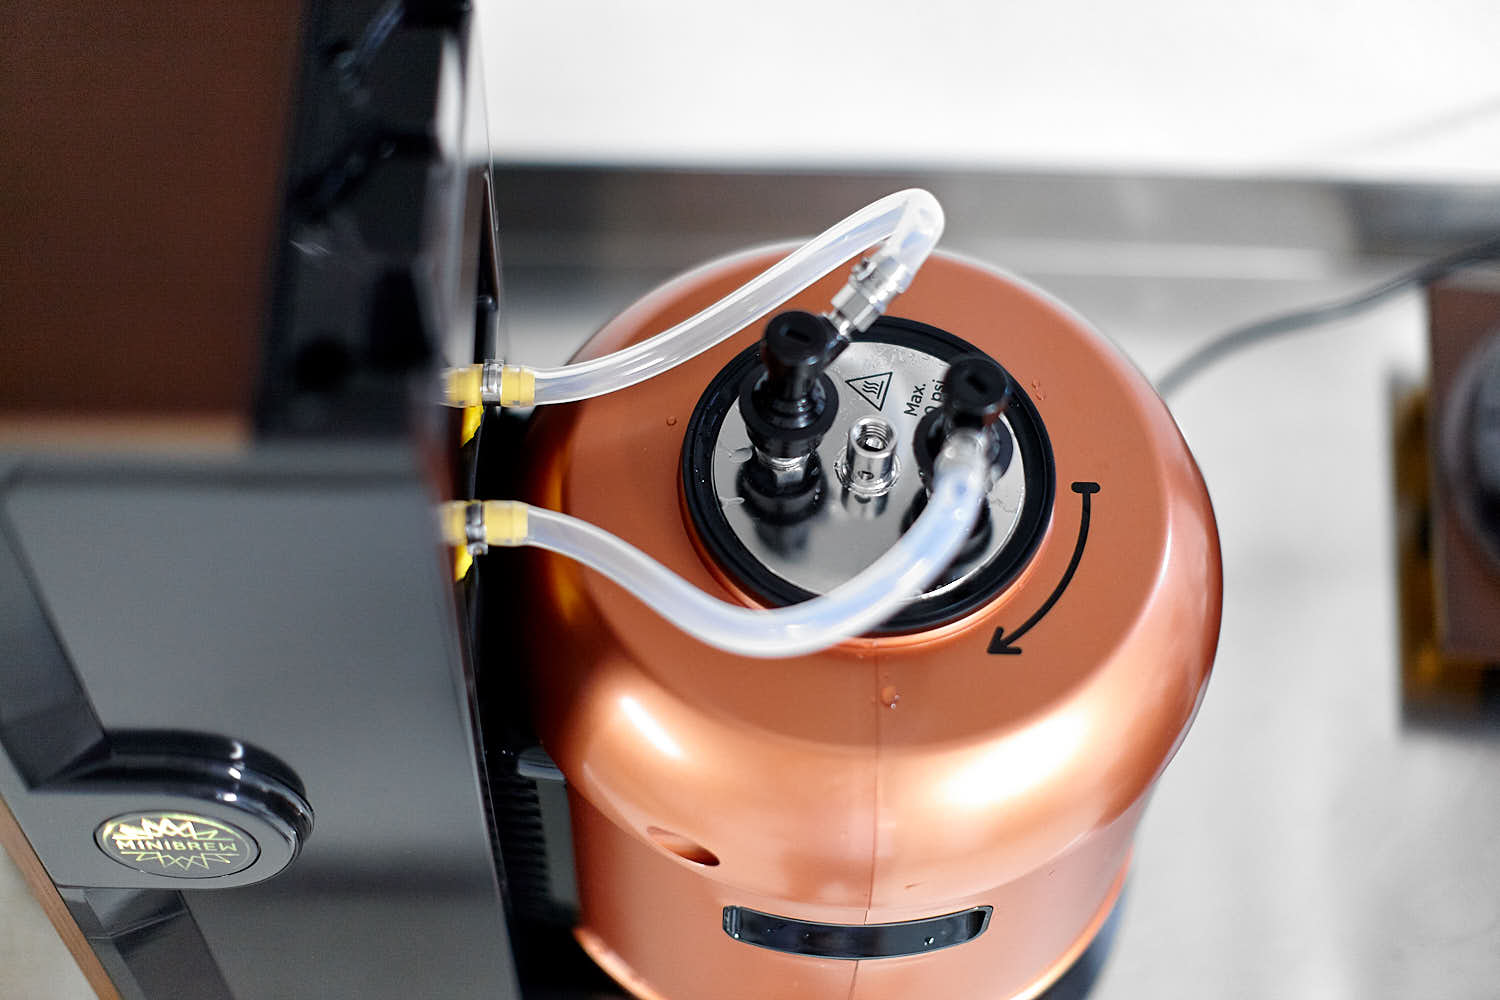
 This is upper the inlet and outlet of the base station. The left one is still filled with water from the rinsing.
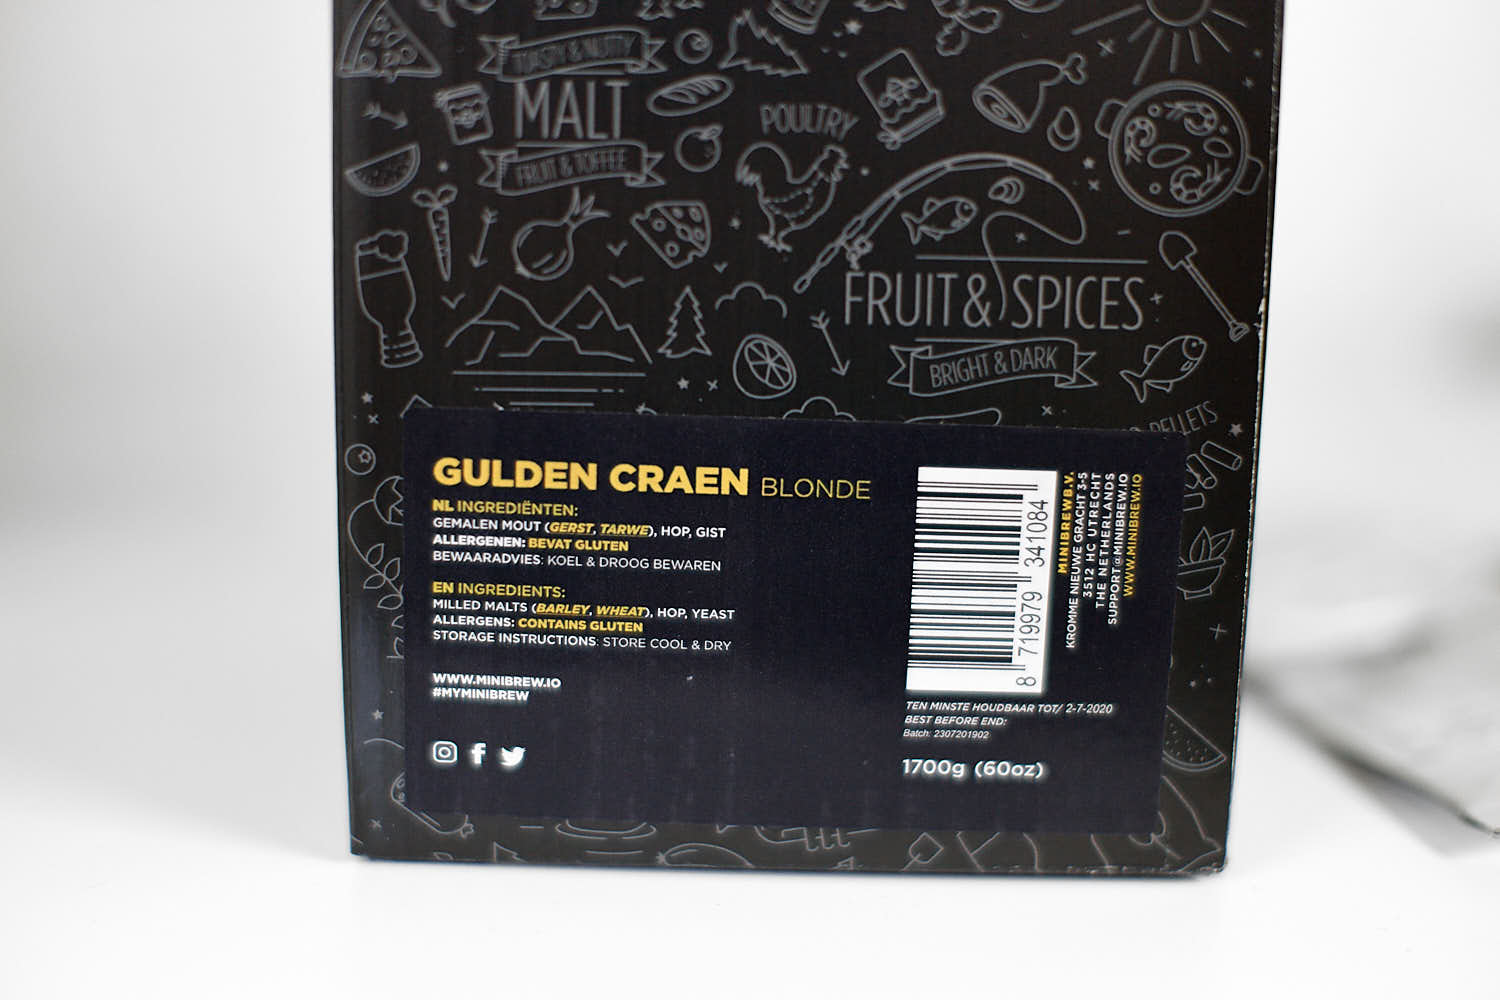
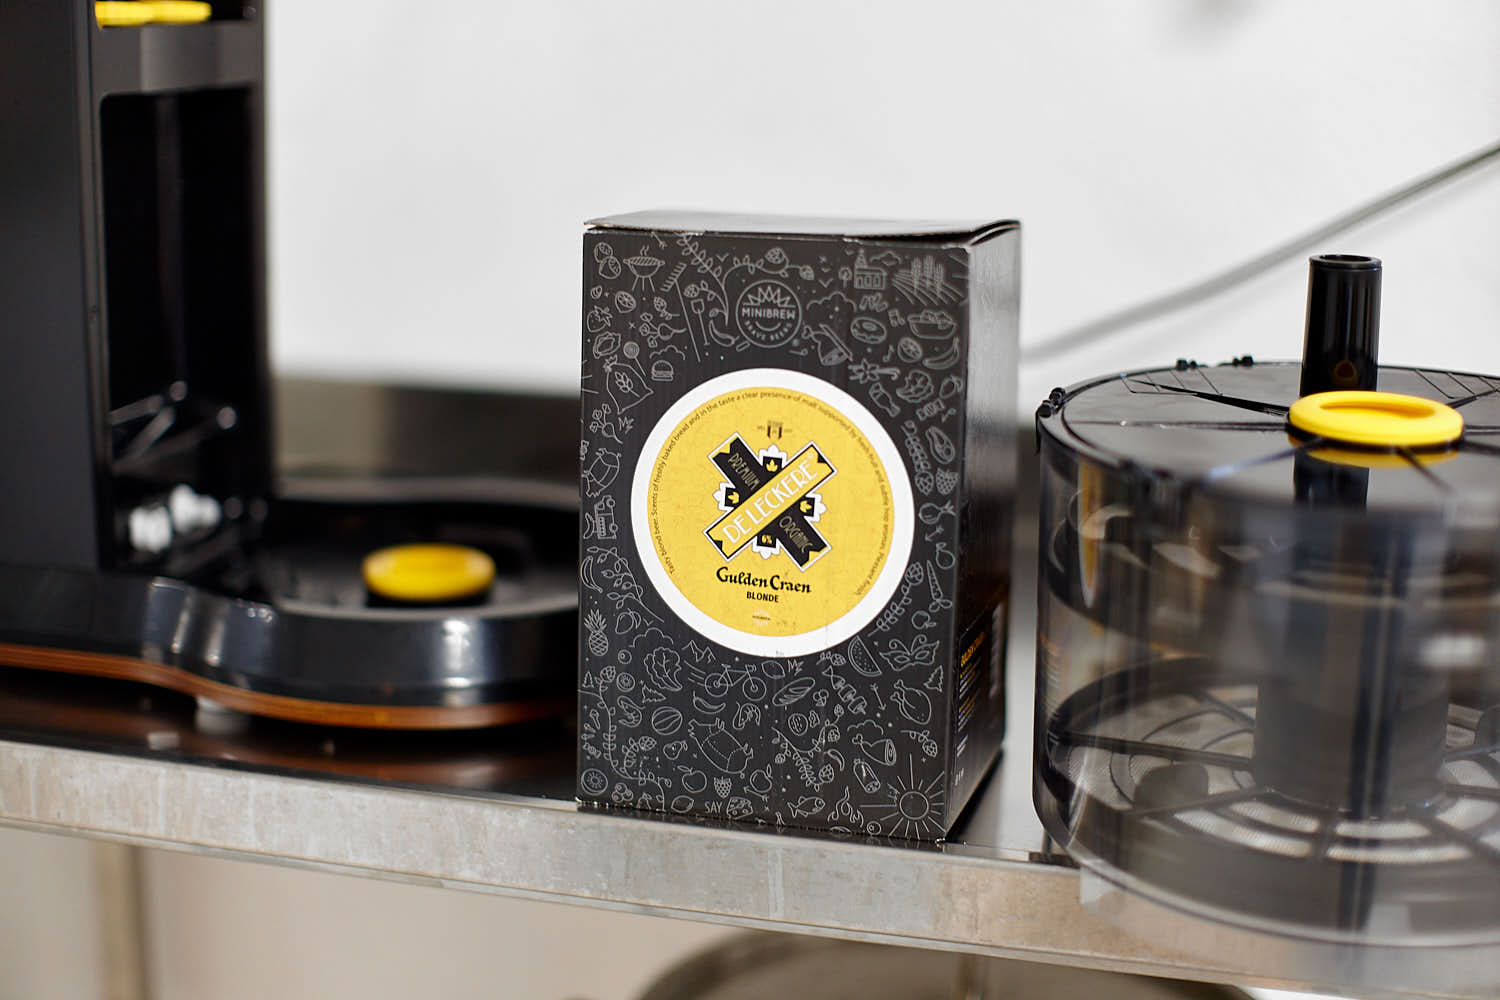 BrewPack of the day, the ”Gulden Craen” blonde.
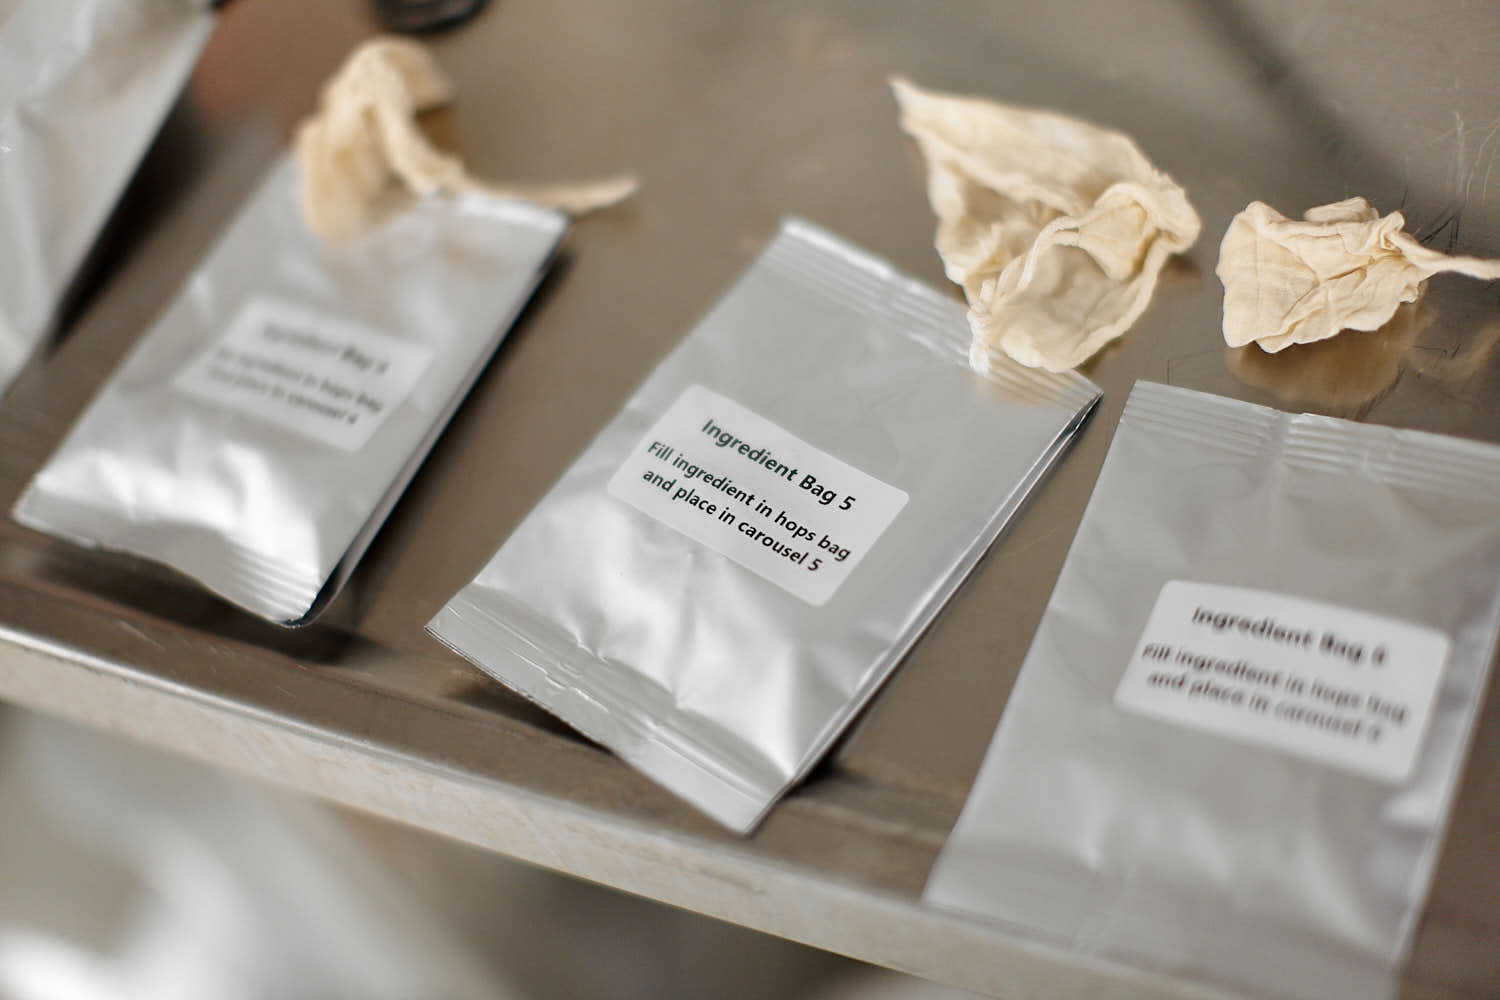
 Supplied ingredients in the box; maltbag, 6 hopadditions and one bag of US05 dry yeast.
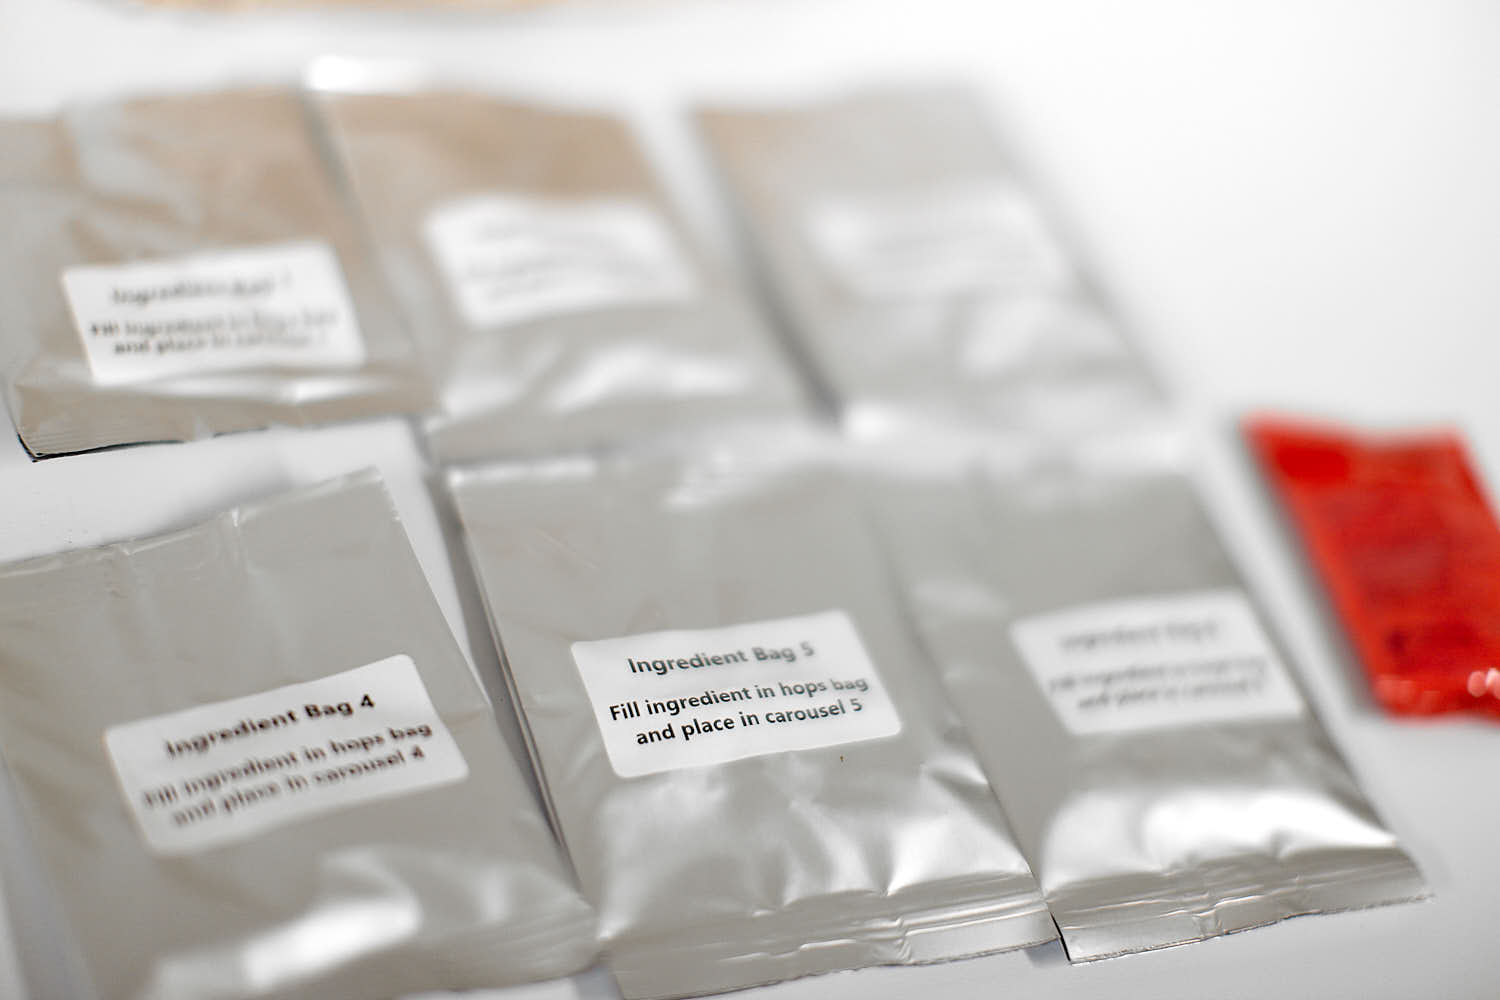 The bags are all numbered so that the right hop goes into the right compartment in the hop carousel.
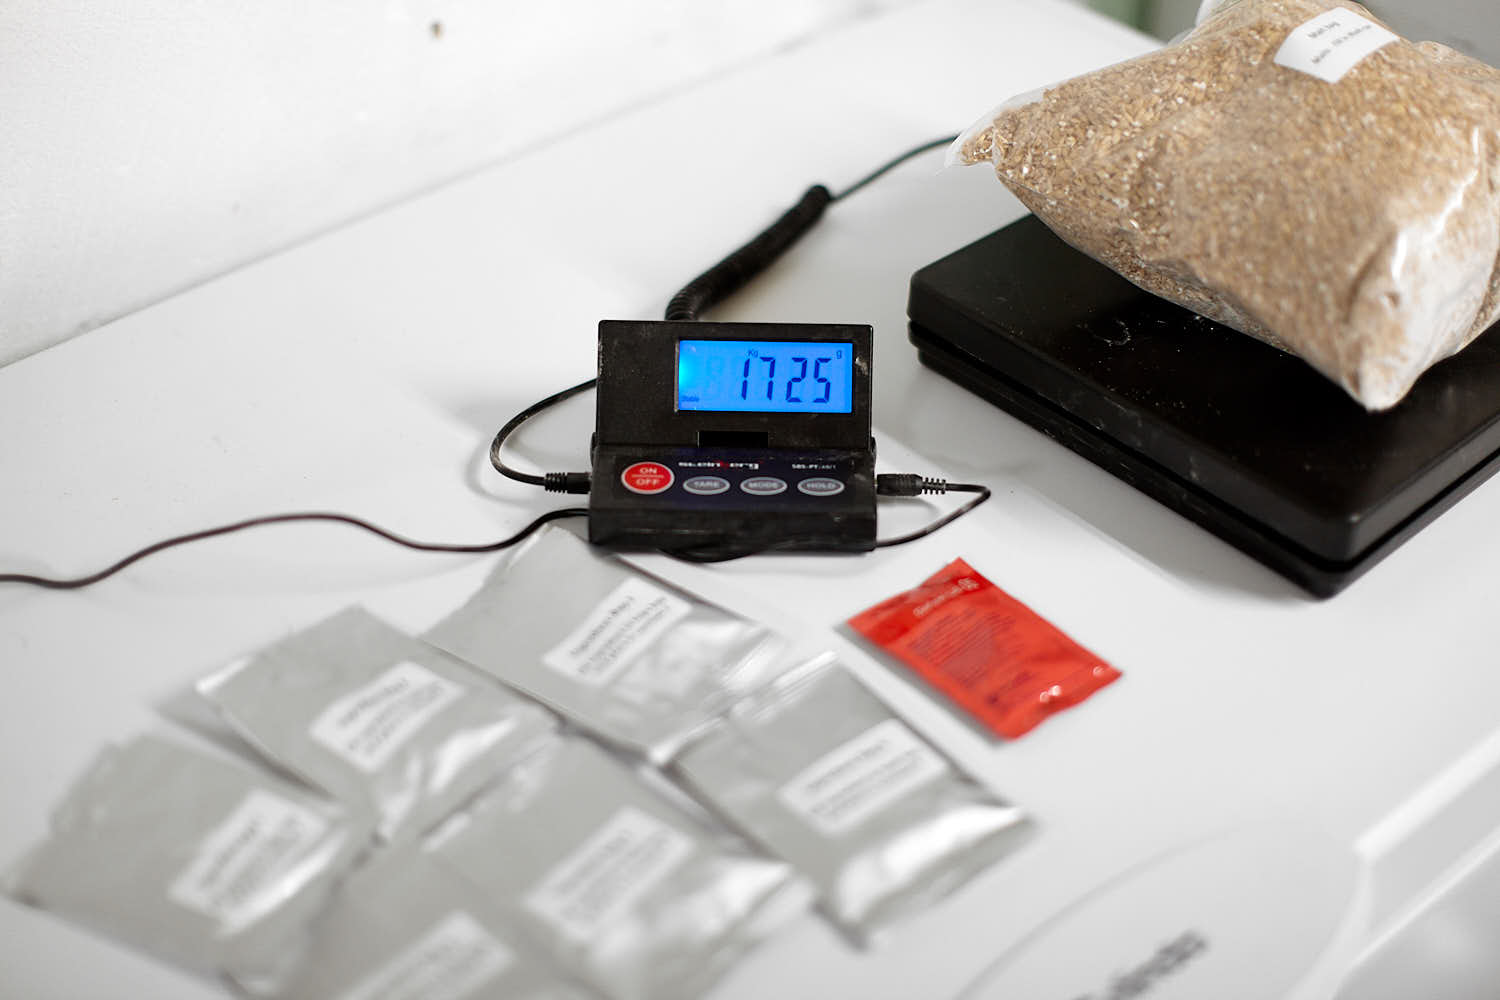 1,725 kg of malt.
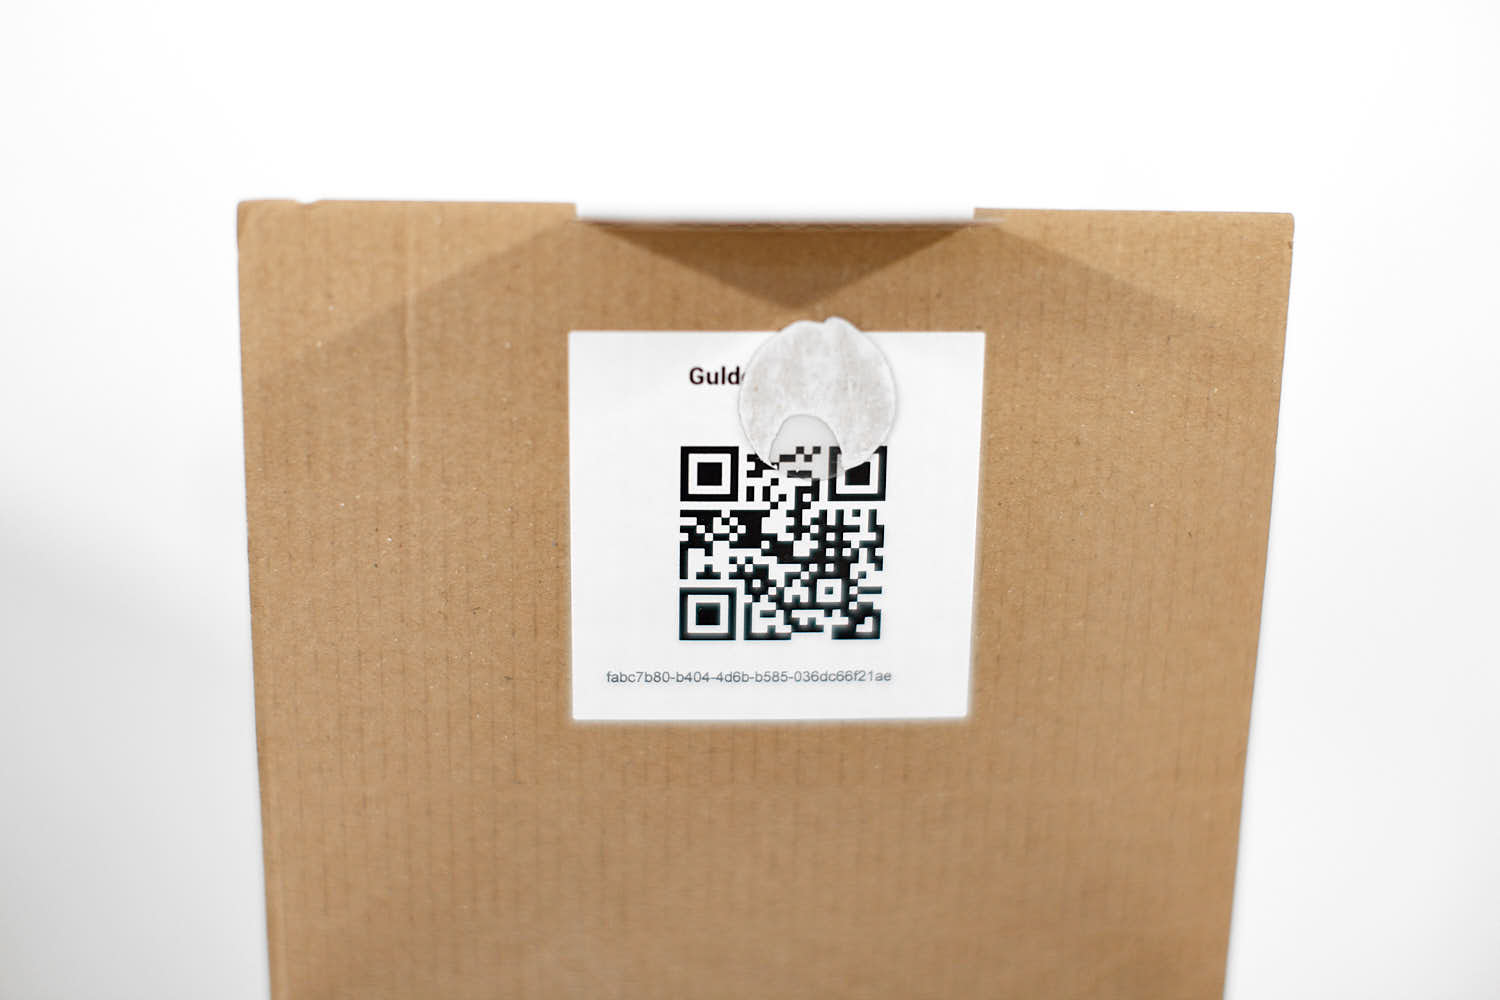 This is my onetime QR code with the glue on it. Not a big problem this time but if the print would have come off, there would be a big problem since there is no other way to execute the brew.
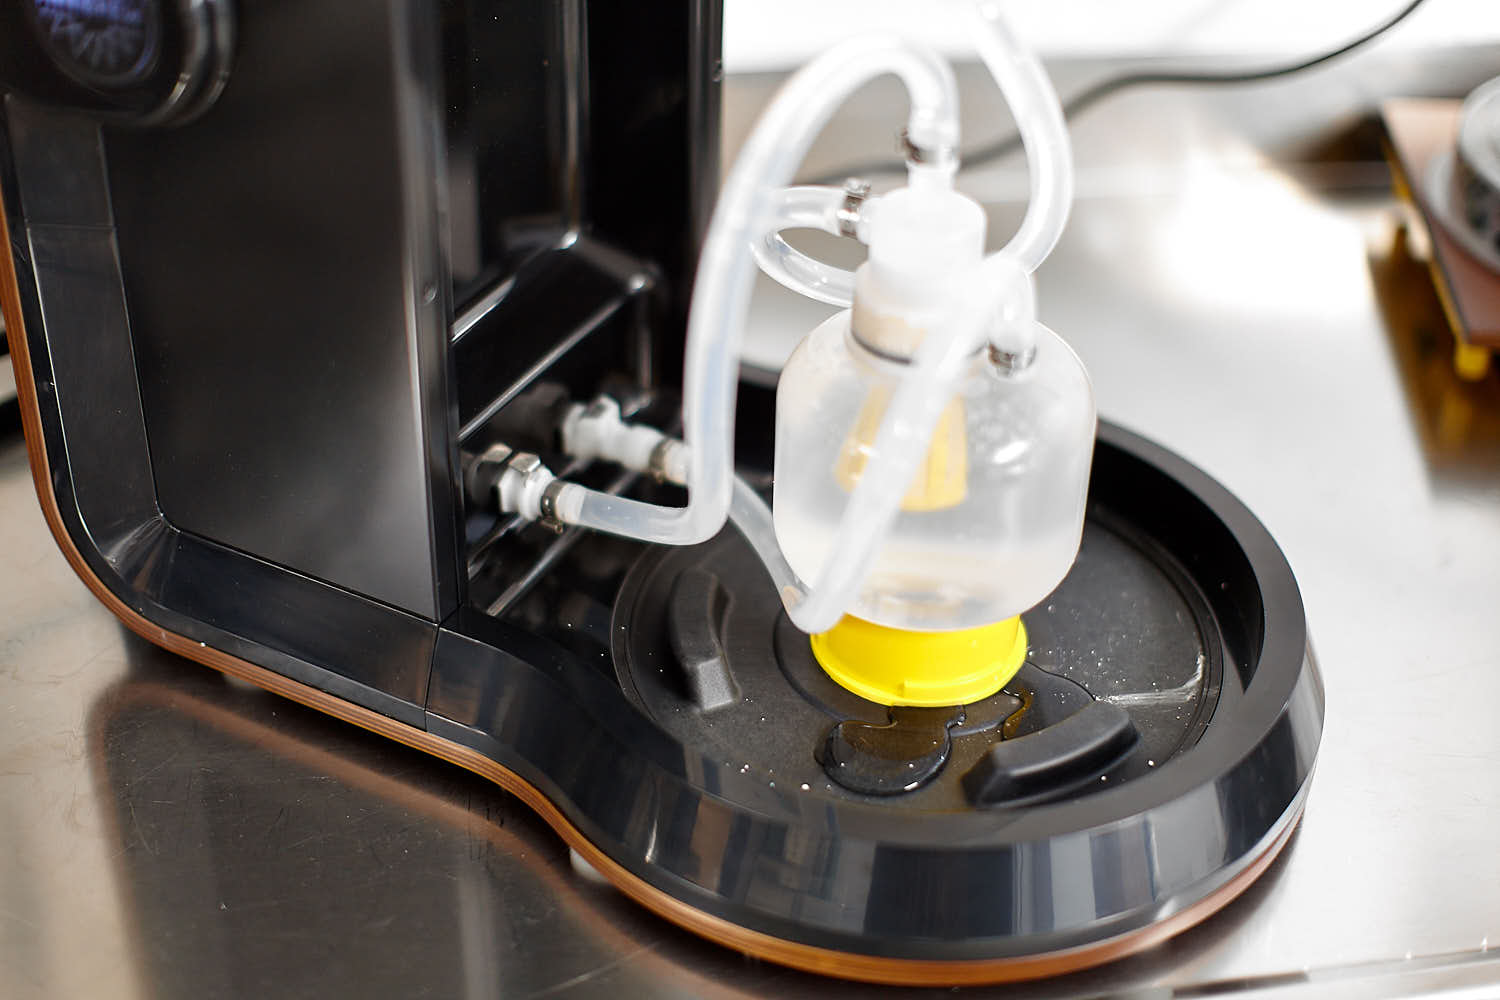
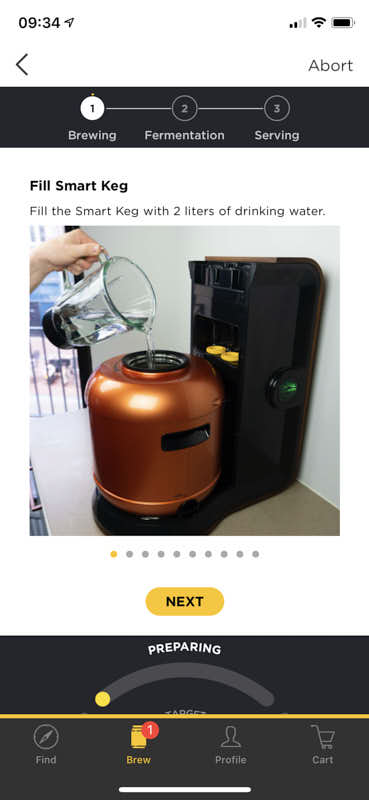
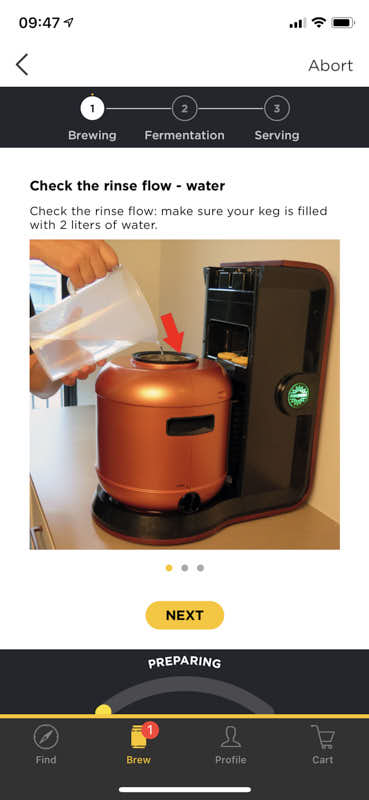
 Water to pre rinse the SmartKeg.
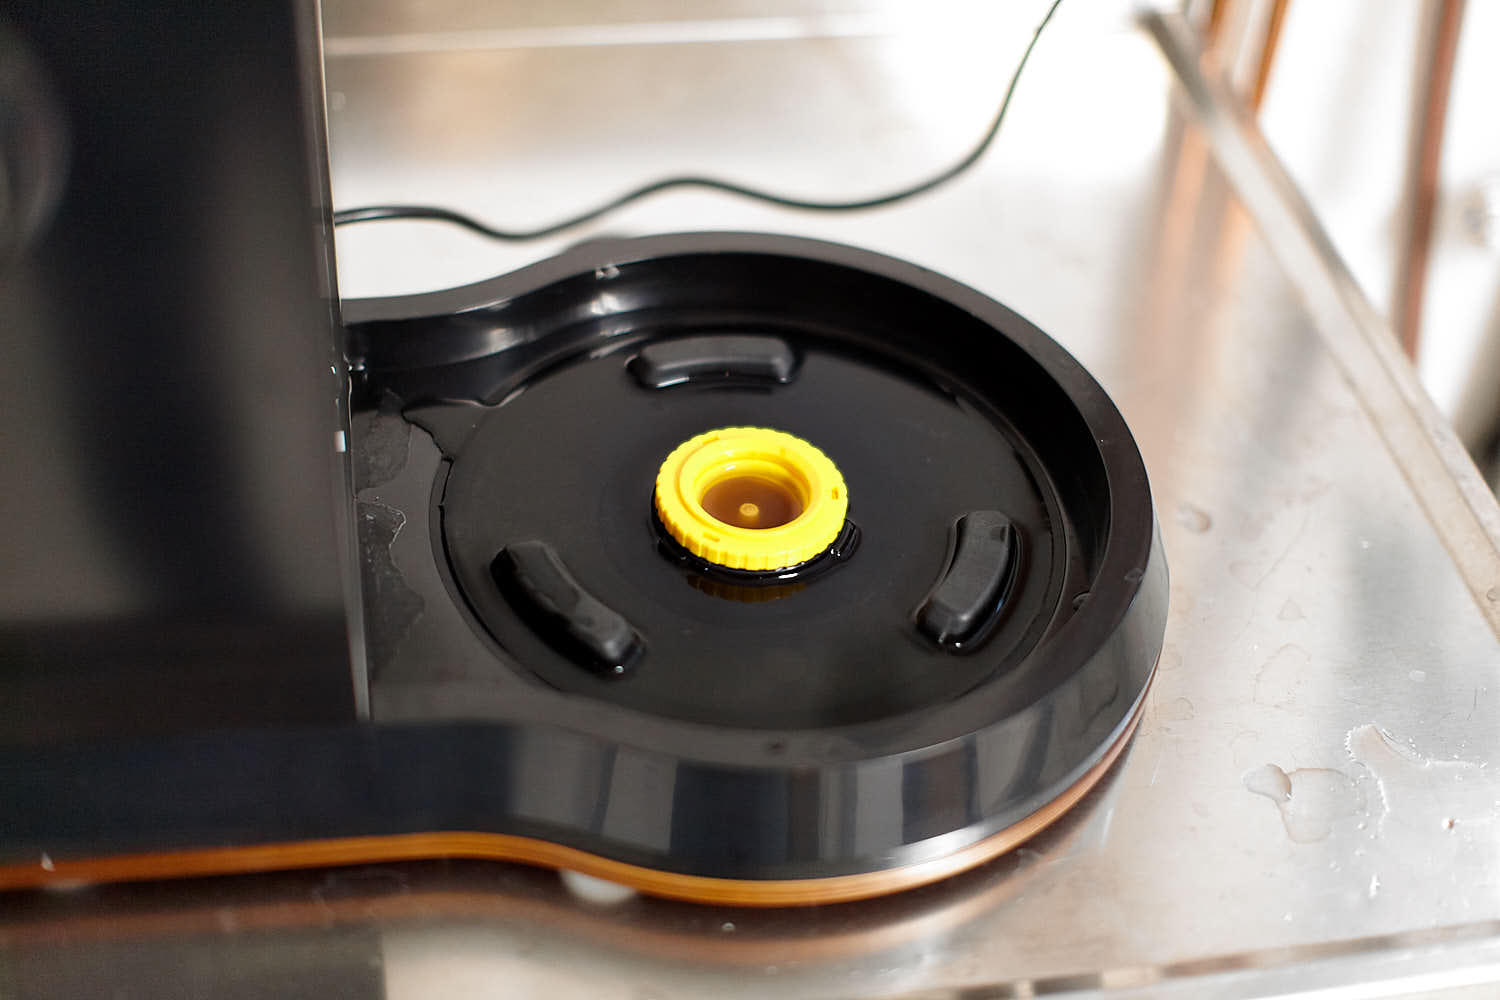
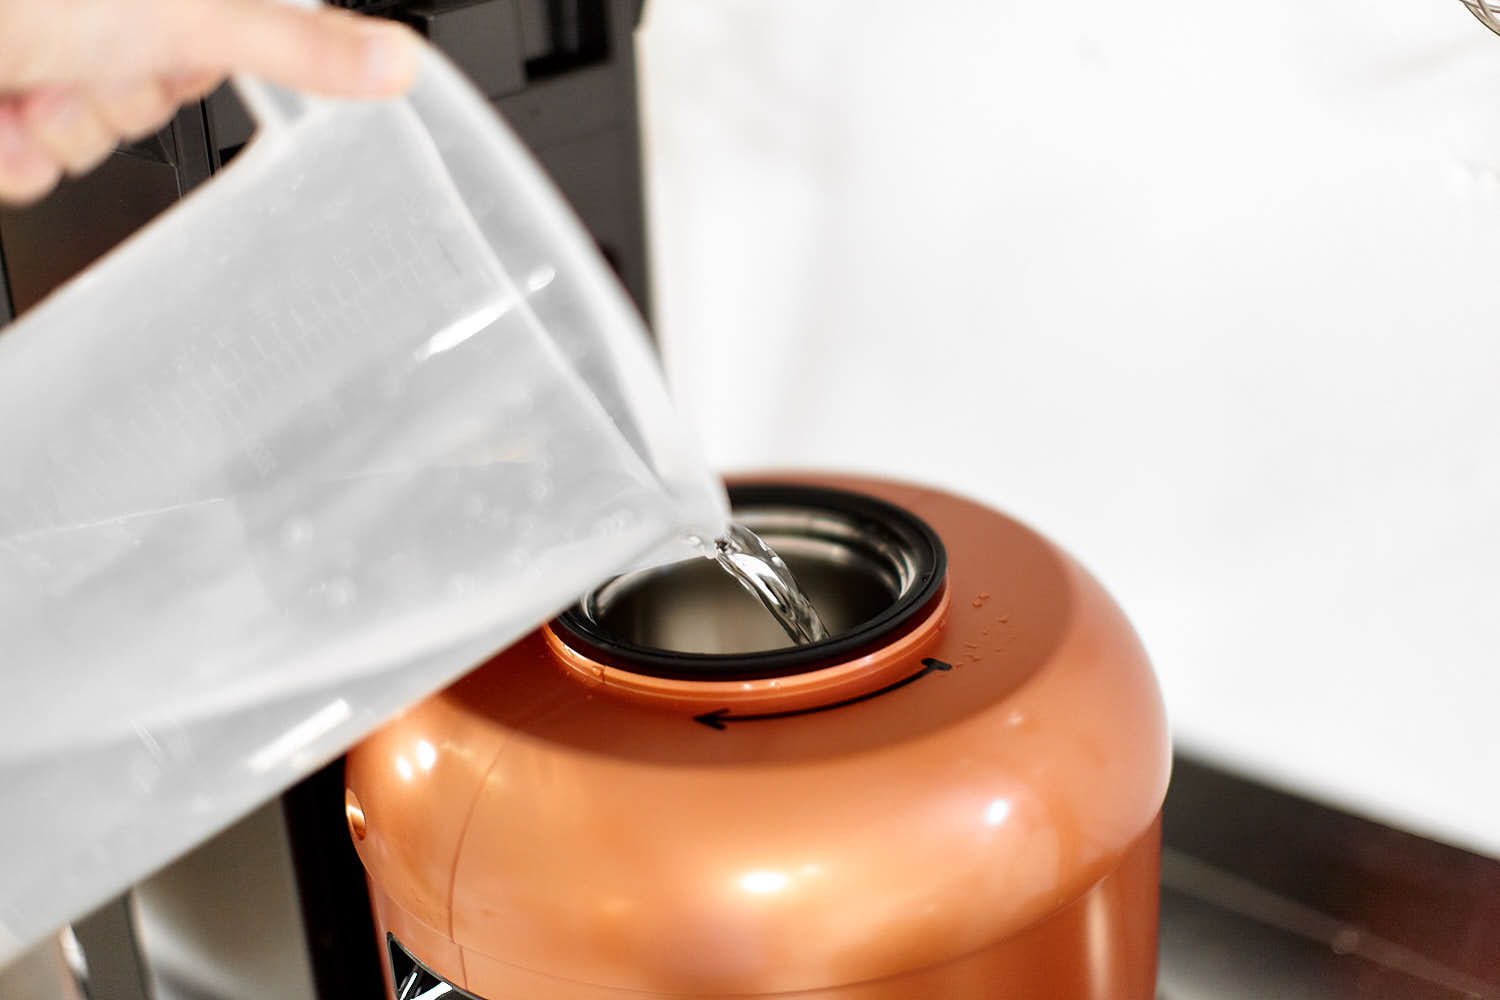 This process is manual for some reason. I guess the machine canät really tell how much water that goes into the SmartKeg for the cleaning cycle.
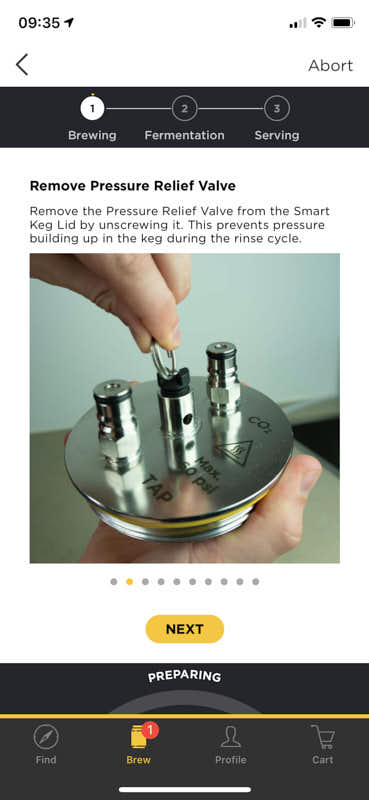
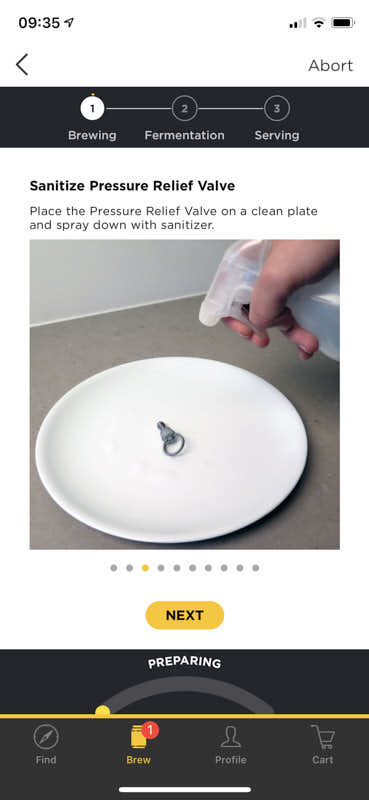
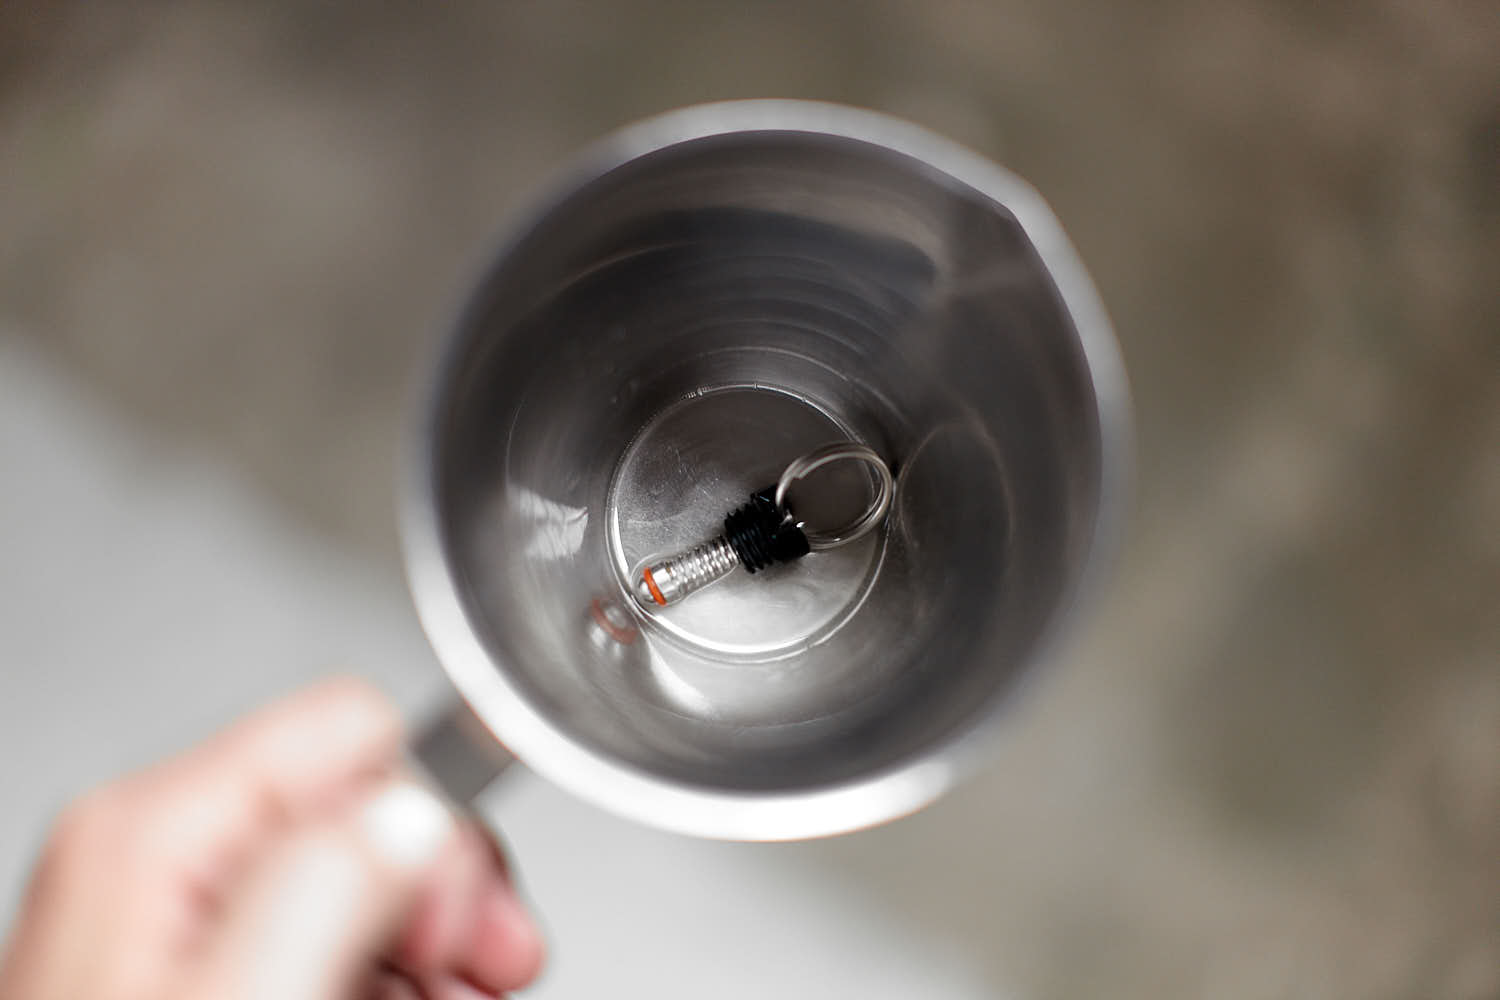 Pressure release valve is placed in sanitiser to be used again i over two weeks.
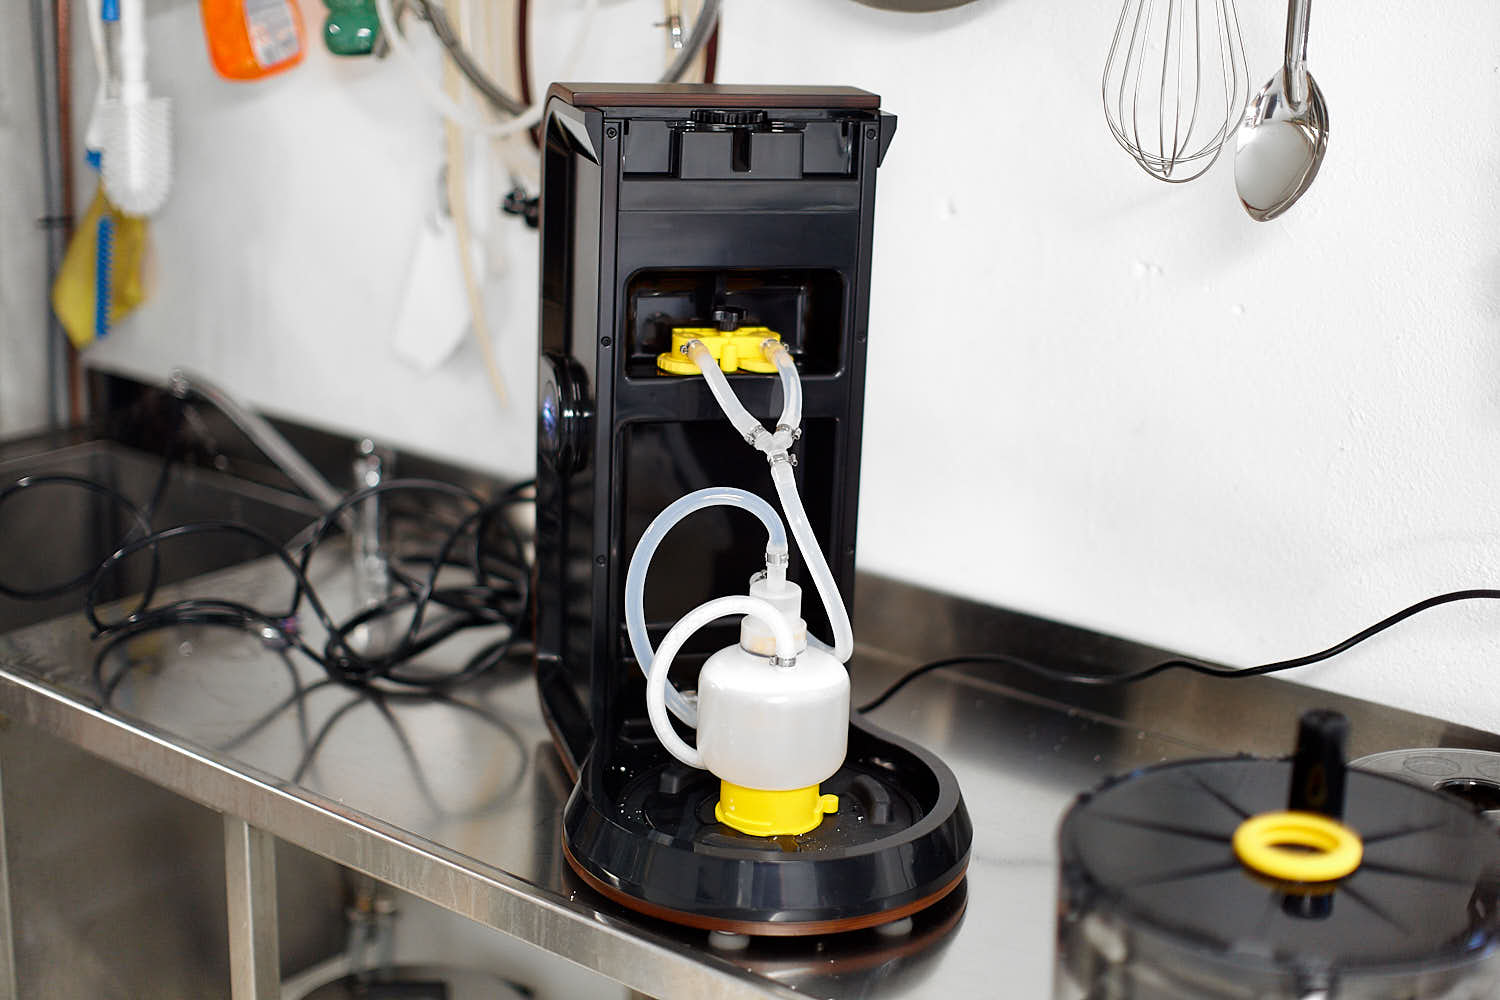
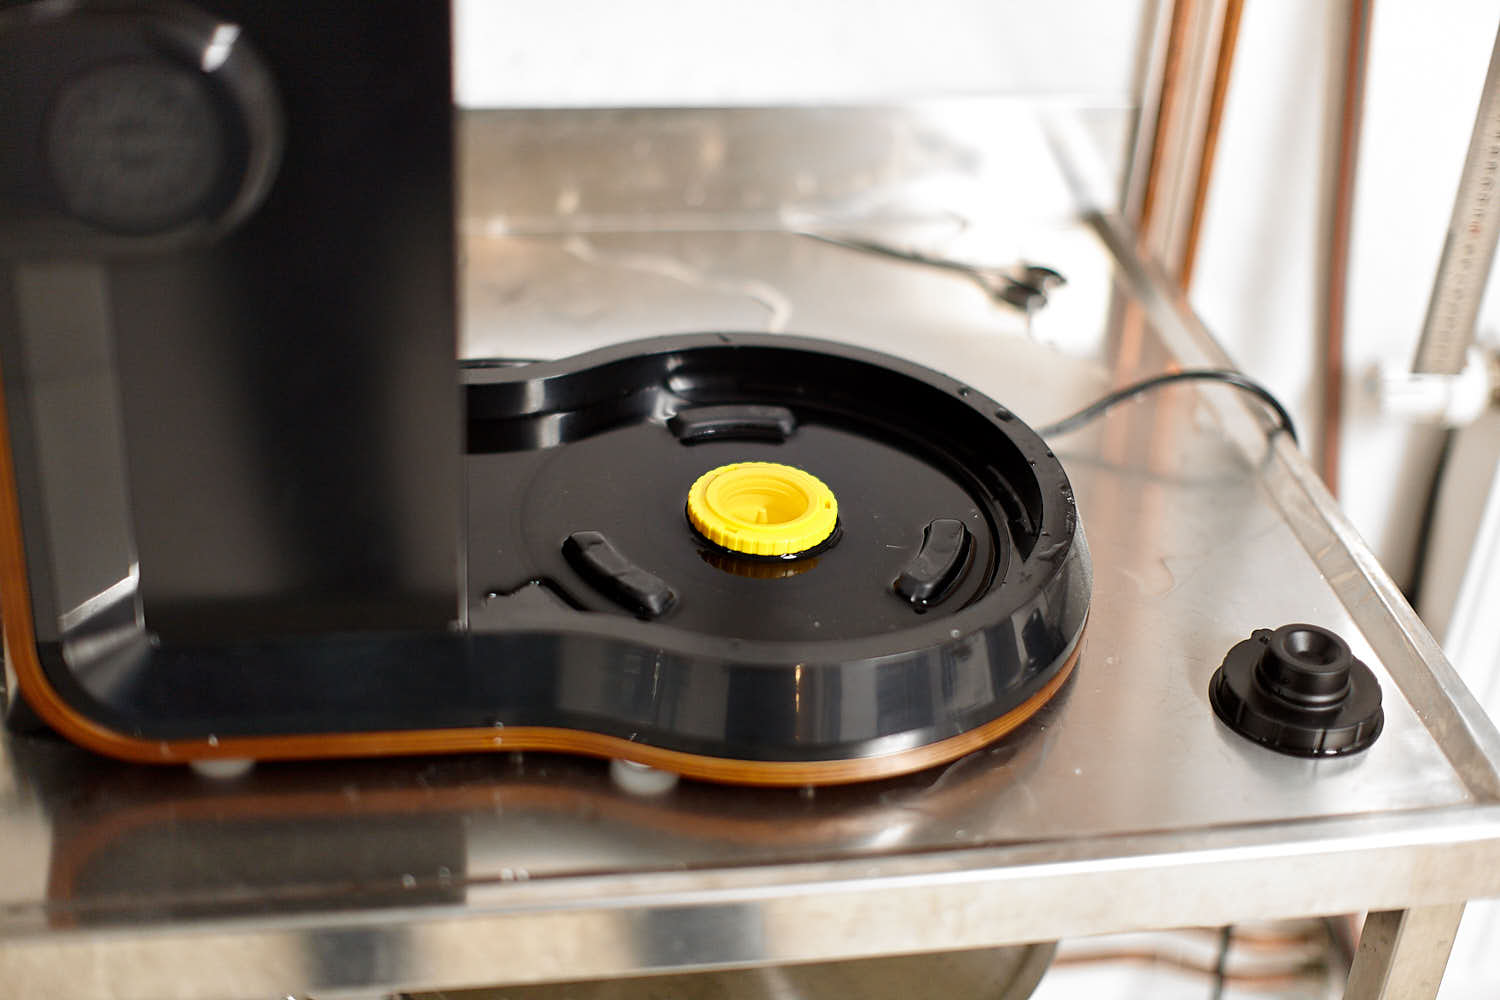
 Place the lid back on the SmartKeg for cleaning.
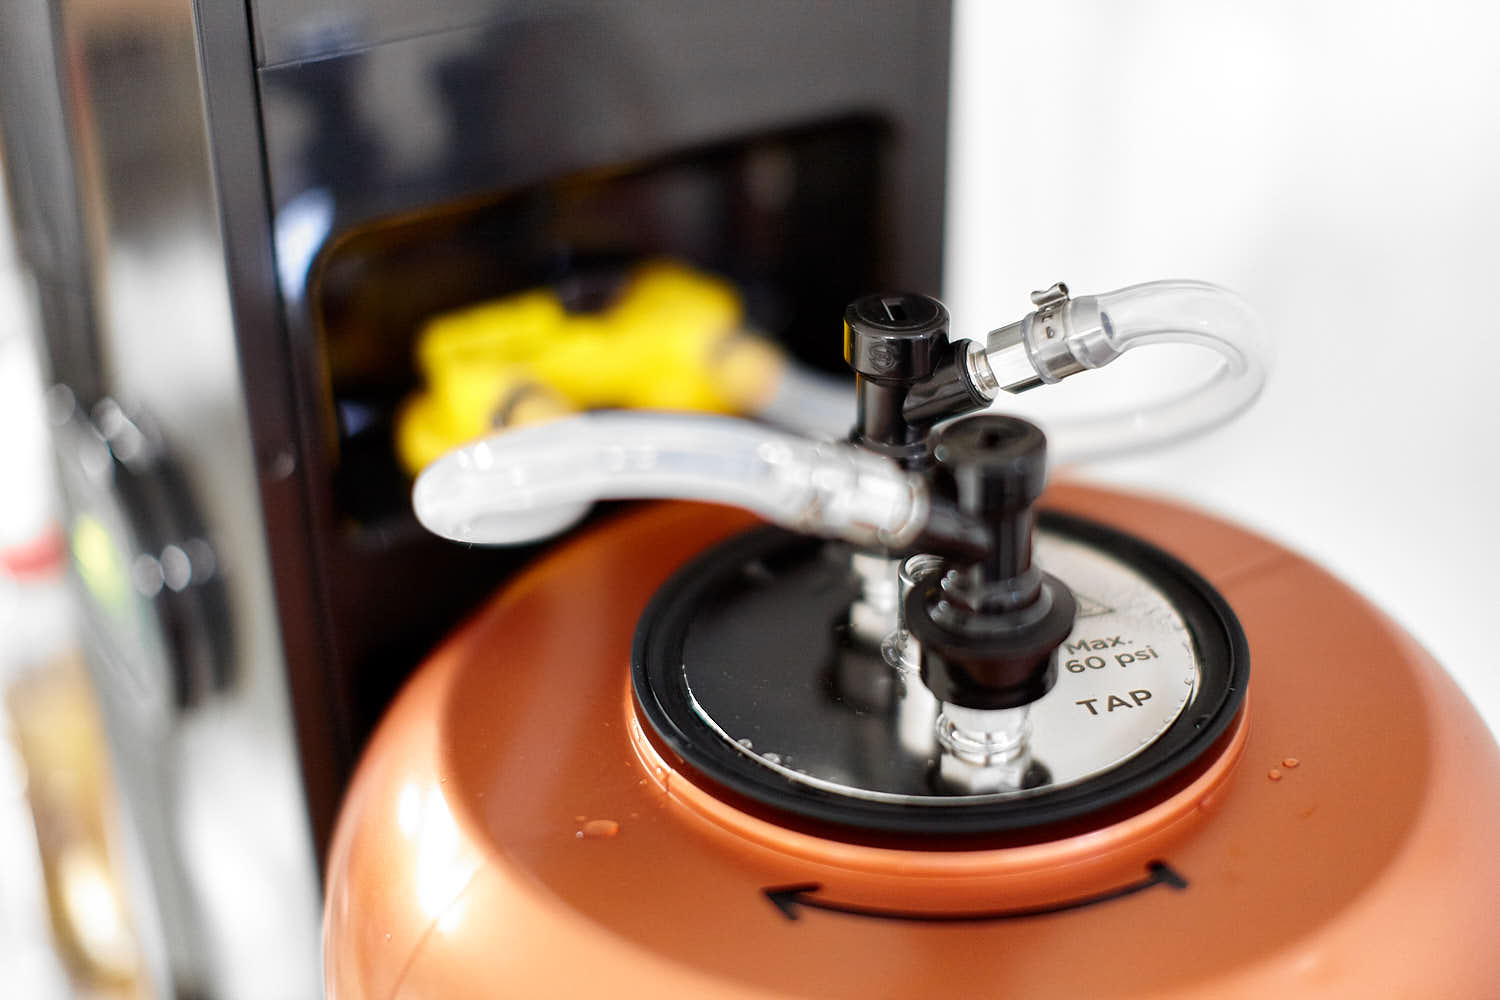
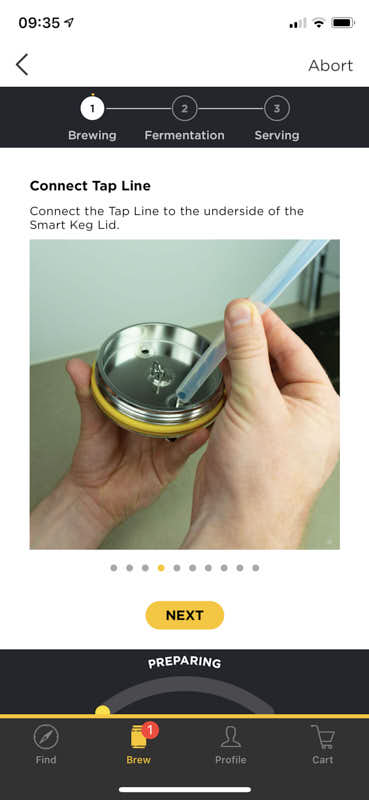
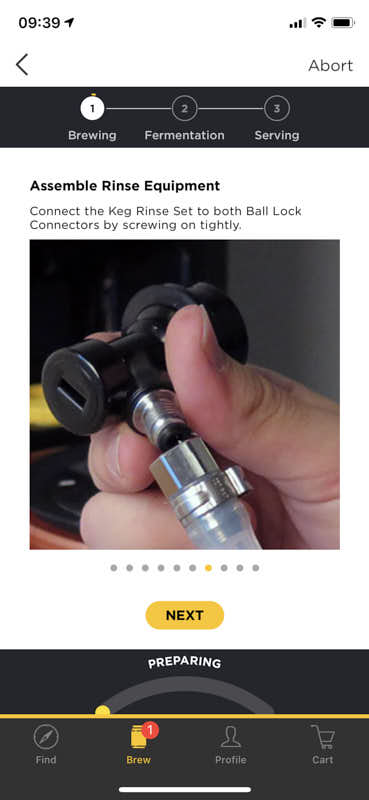
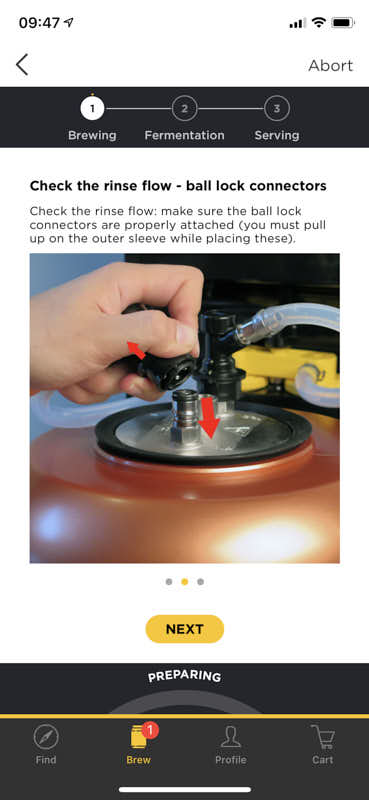
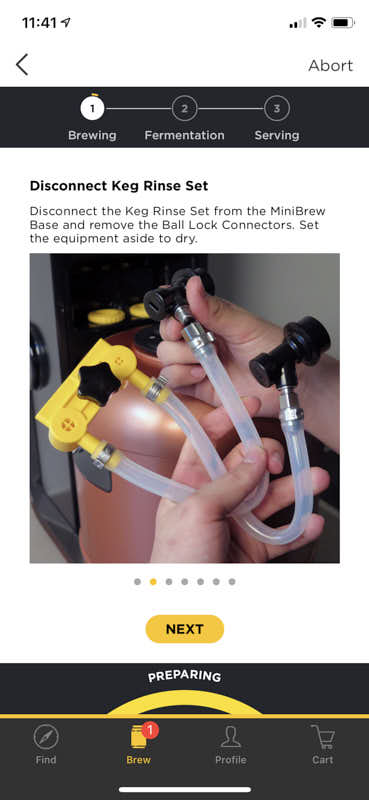
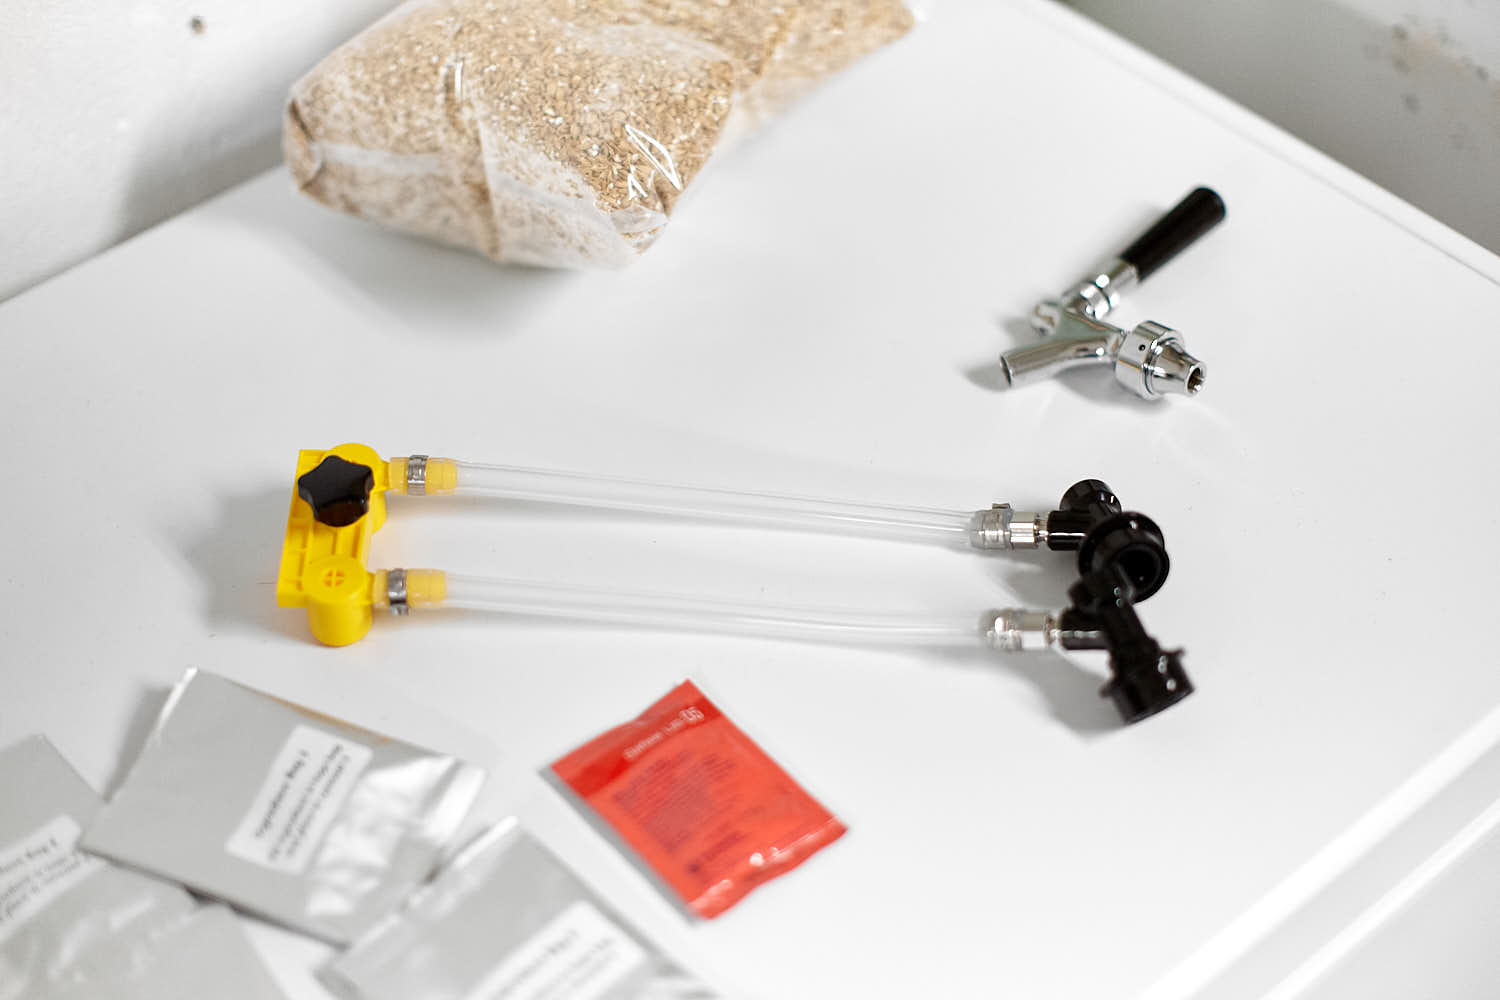 The yellow plastic part with the two regular Cornelius ballvalve connectors are used for the keg rinsning. In the background you see the tap handle that connects directly to the black ball valve 1/4″ flare connector.
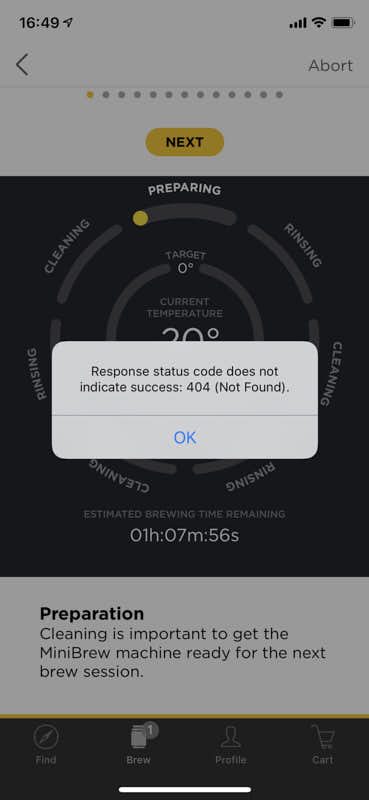
 Because of some air trapped in the base station, I had to cancel the brew and start over. Unfortunately I couldn’t skip the rinsing cycle so I had to do that twice. This should not happen according to the manufacturer. The second time it worked immediately.
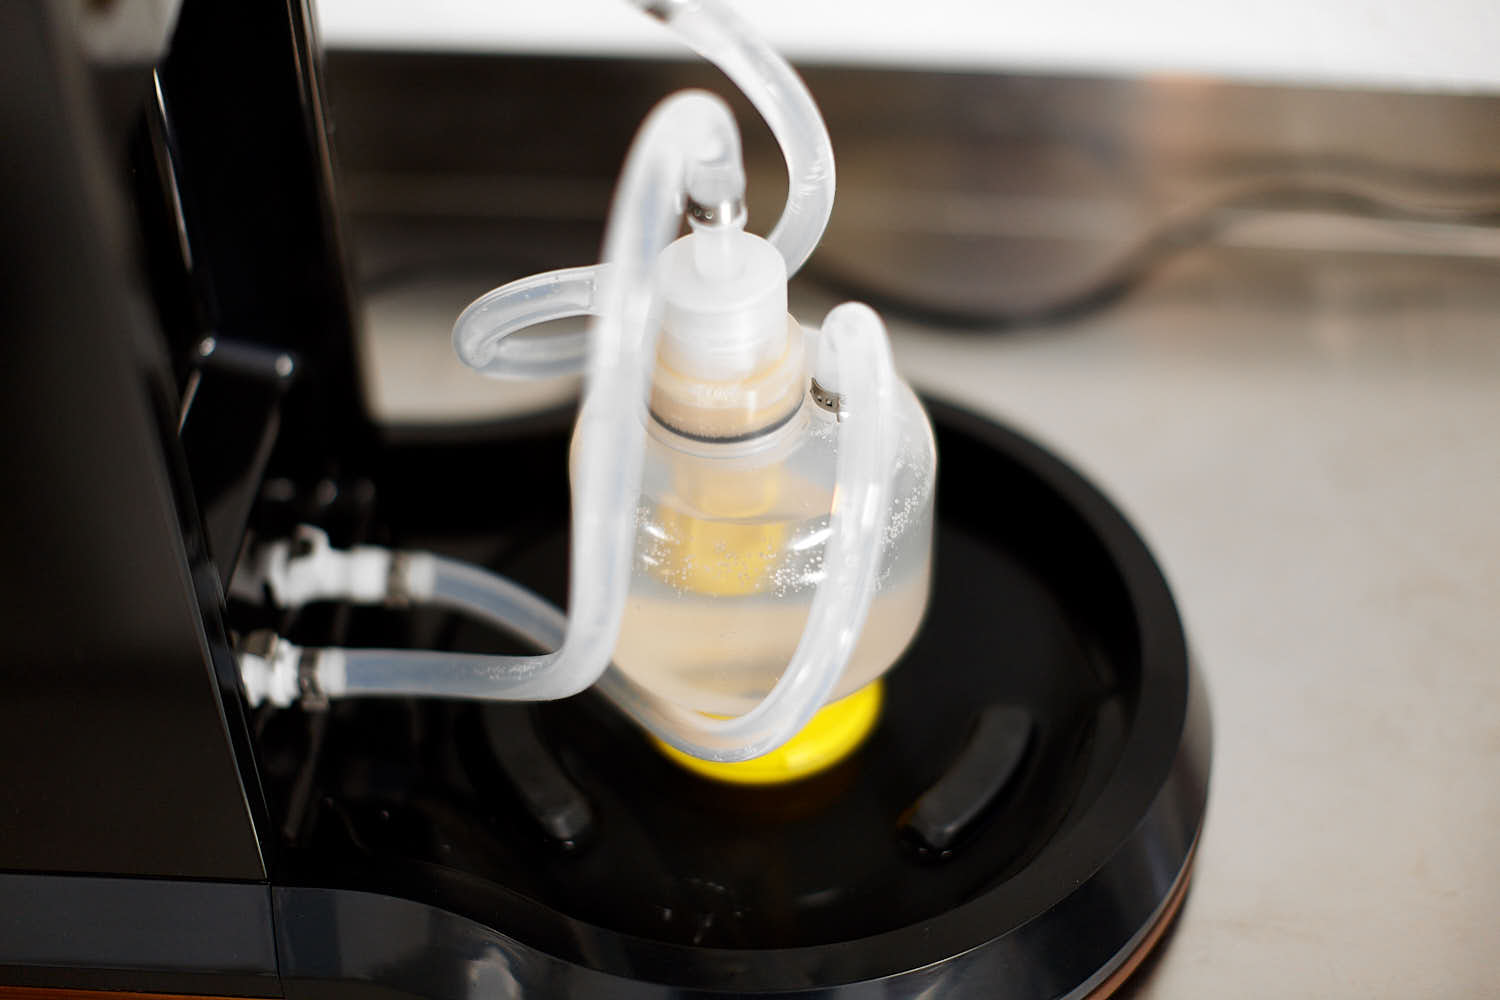
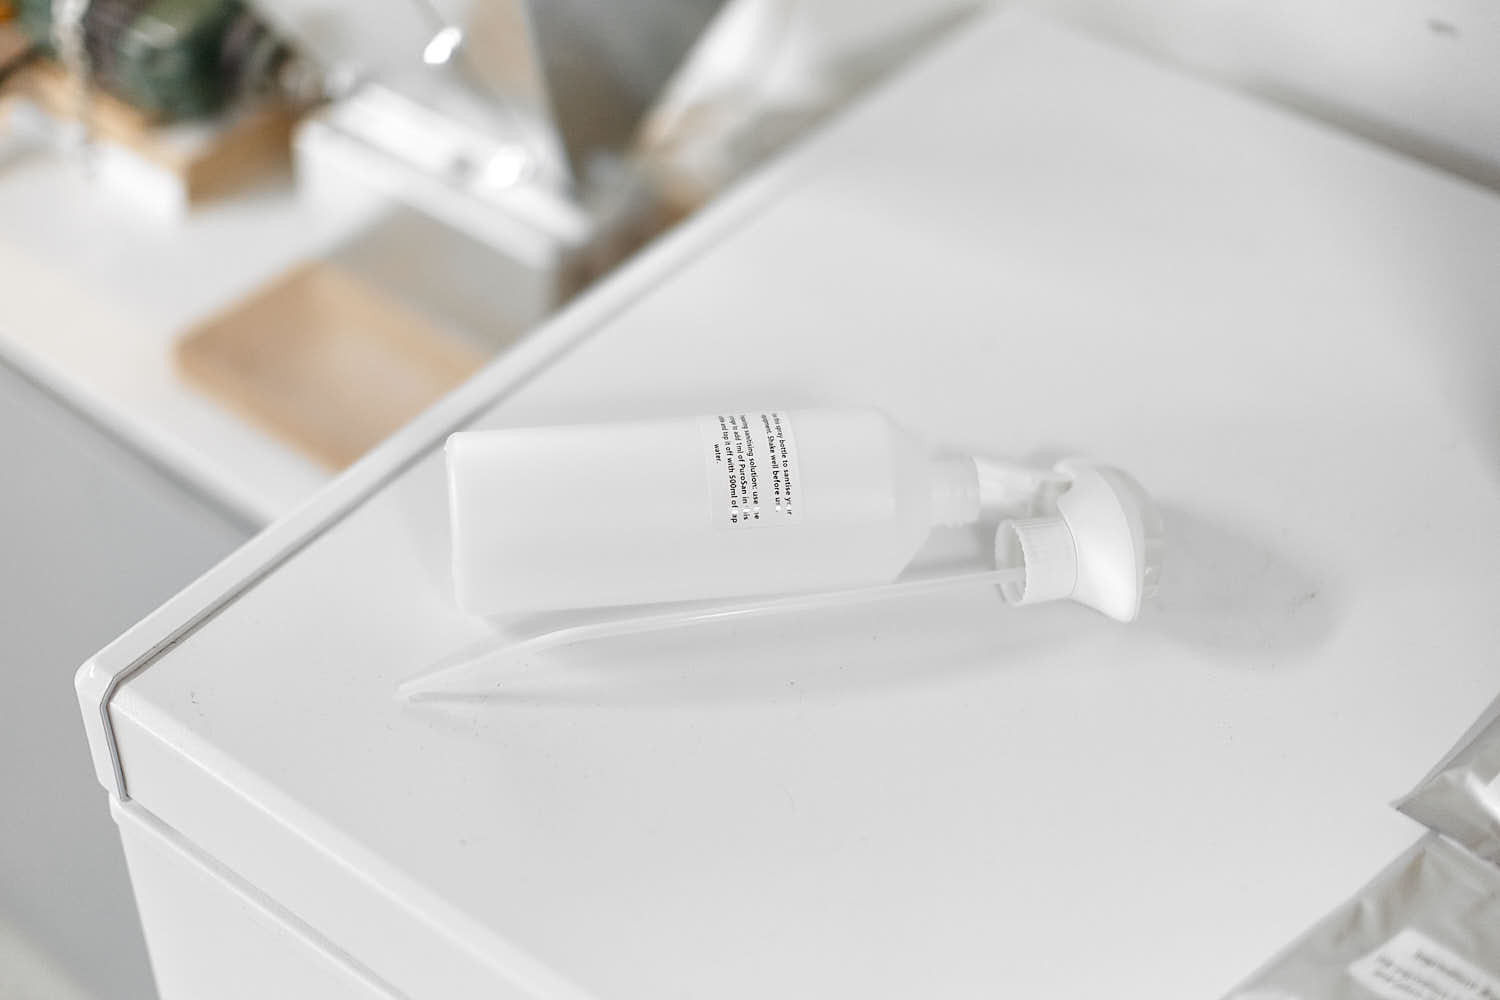 The spray bottle with sanitizer had a very long hose to it.
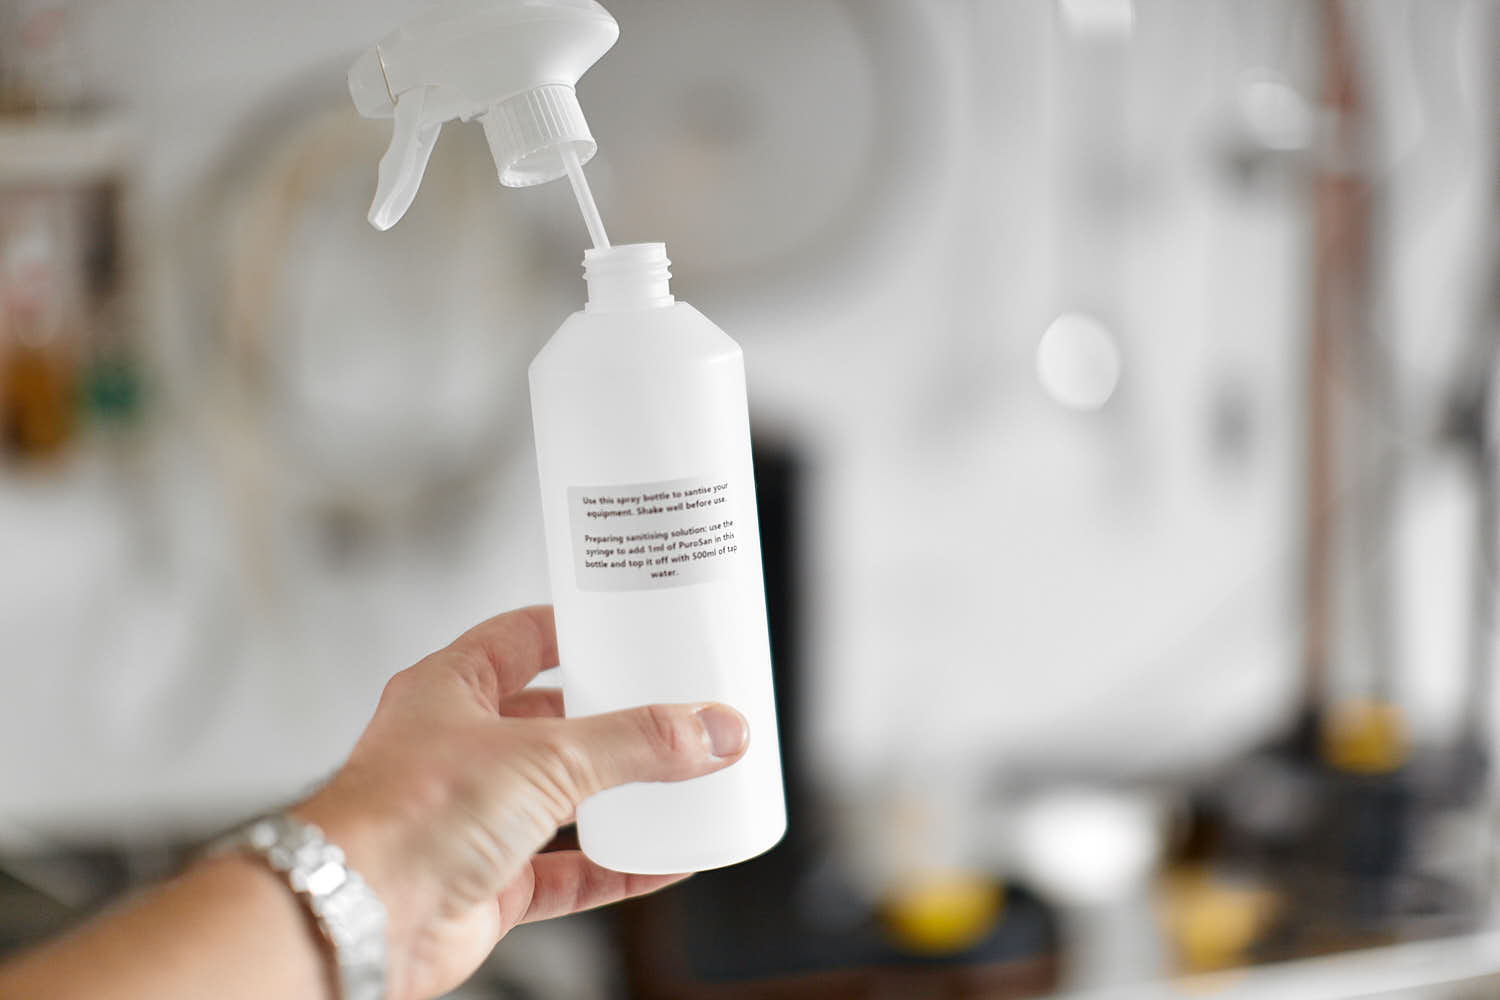 I had to cut off about 5 cm before I could close the hat of the bottle.
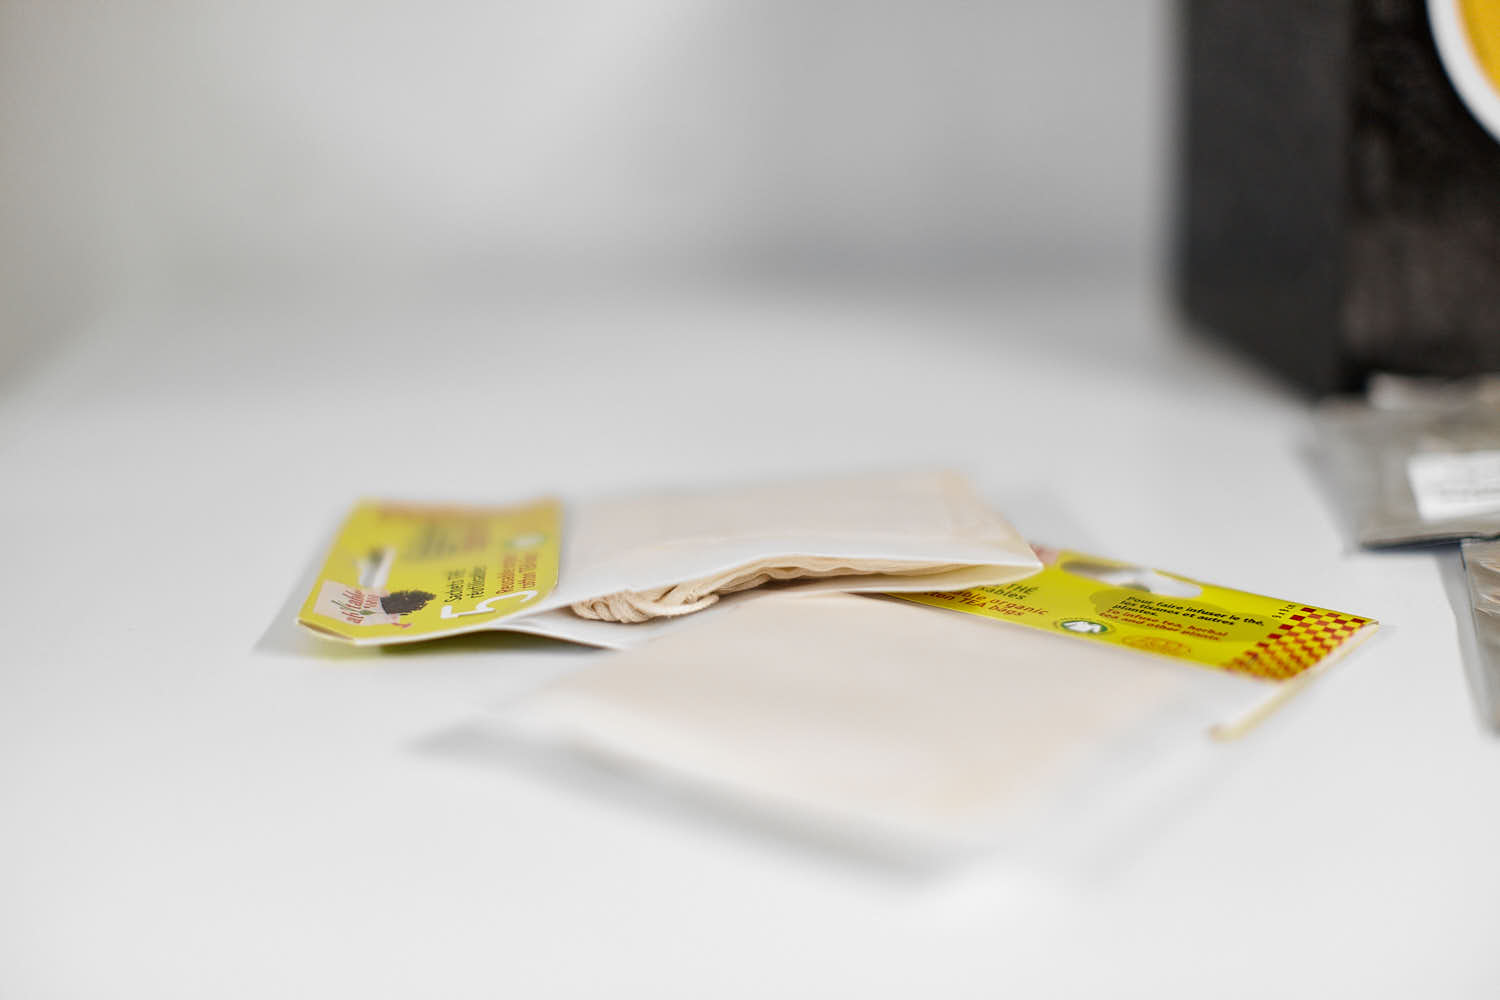
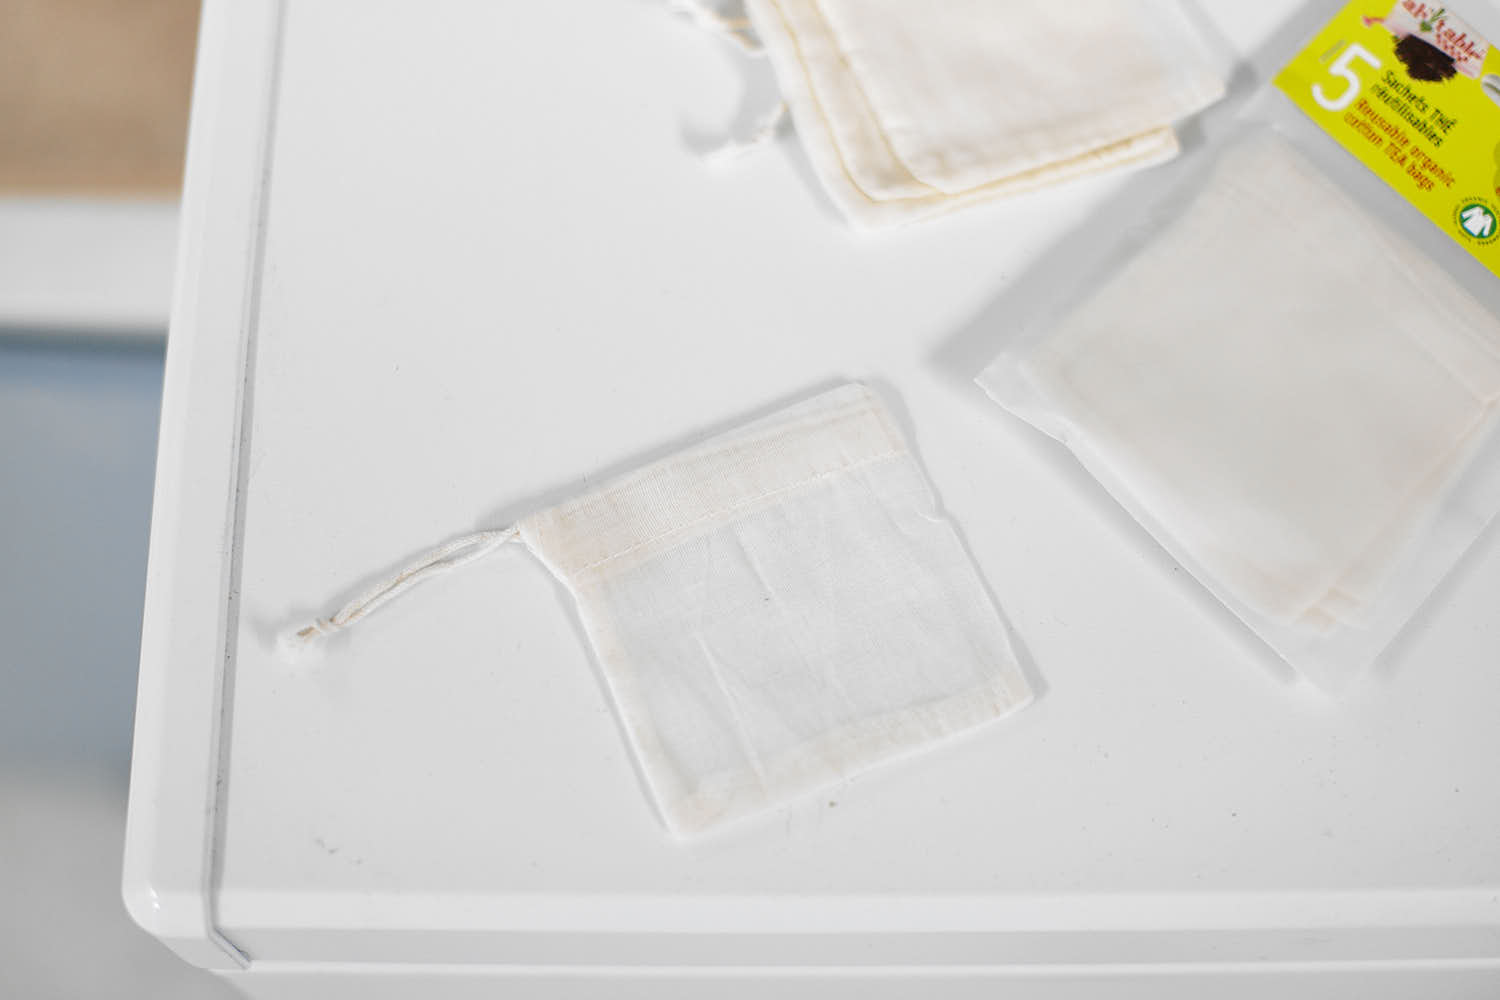
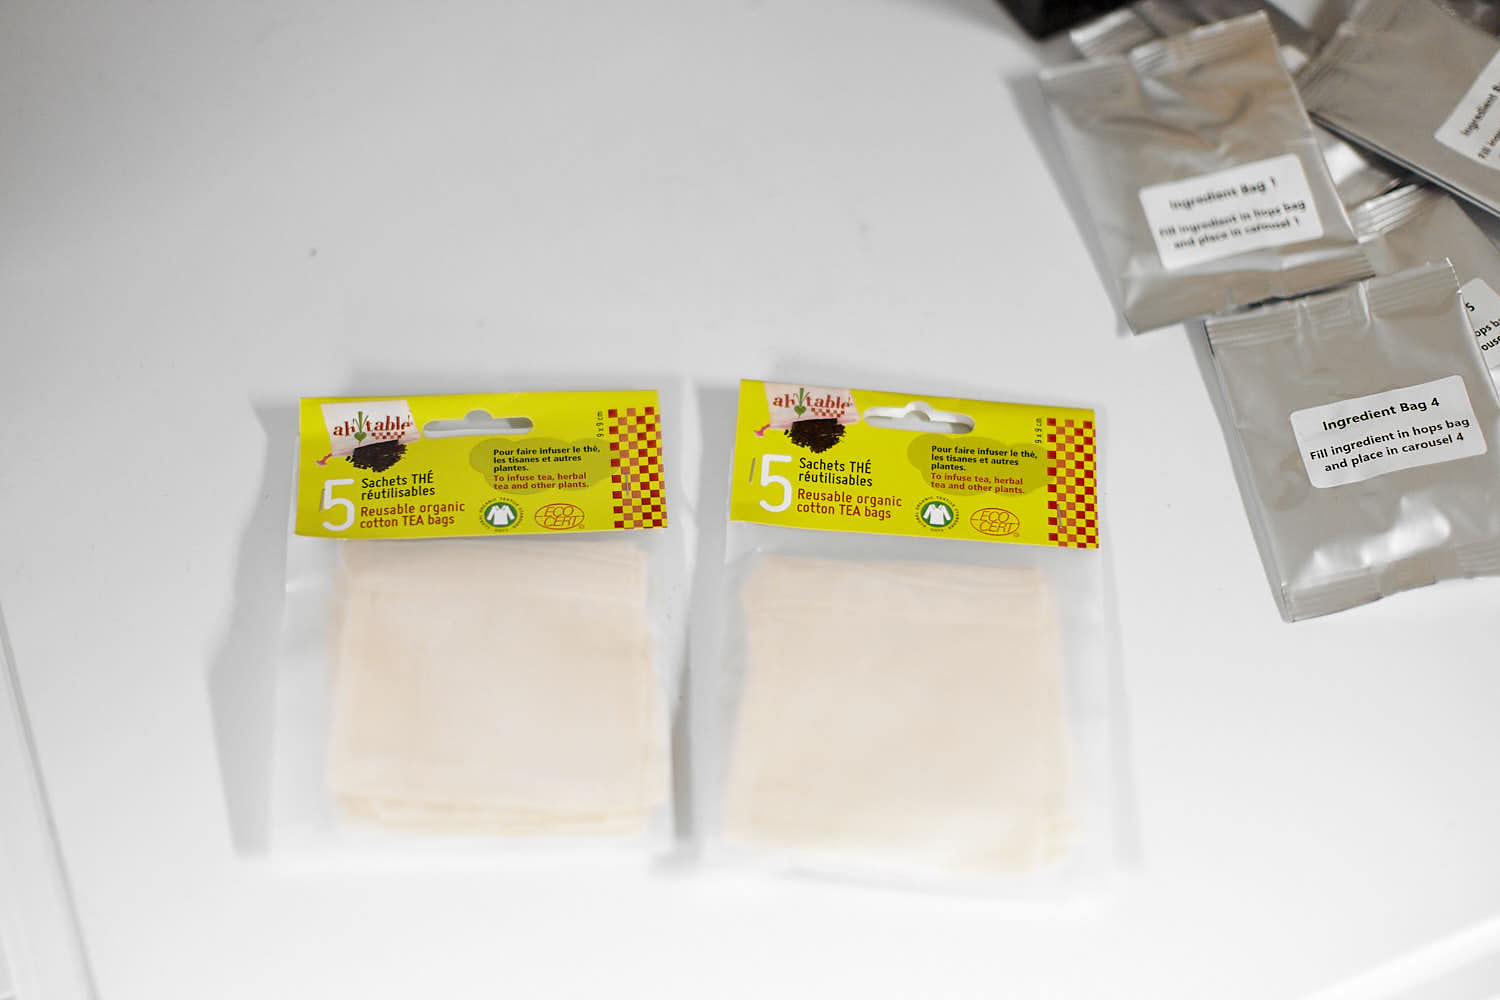 The hop bags are actually reusable cotton TEA-bags.
 One of the bags were open upon arrival.
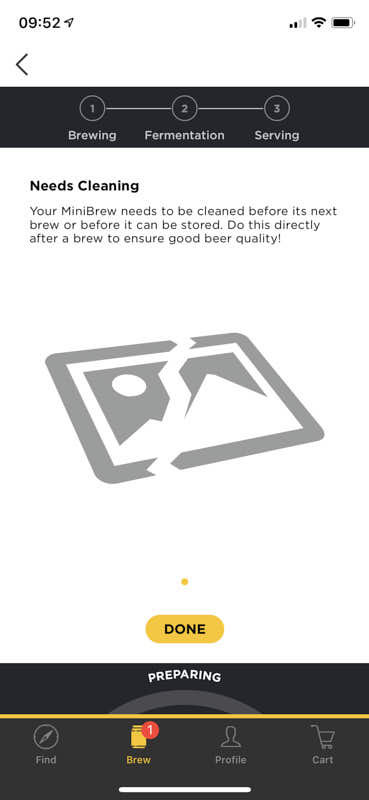
 Second ”unnecessary” cleaning of the SmartKeg.
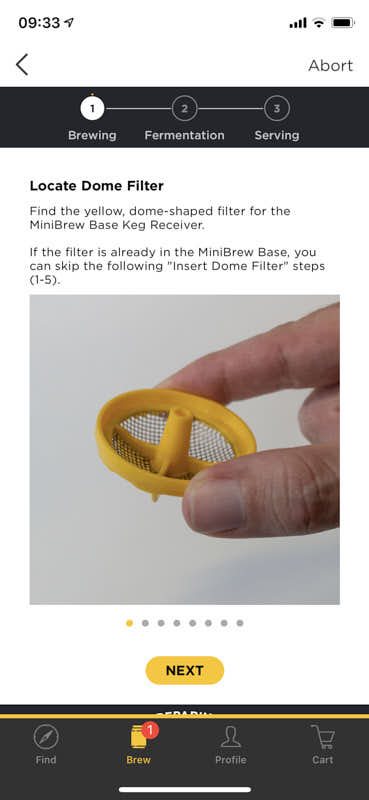
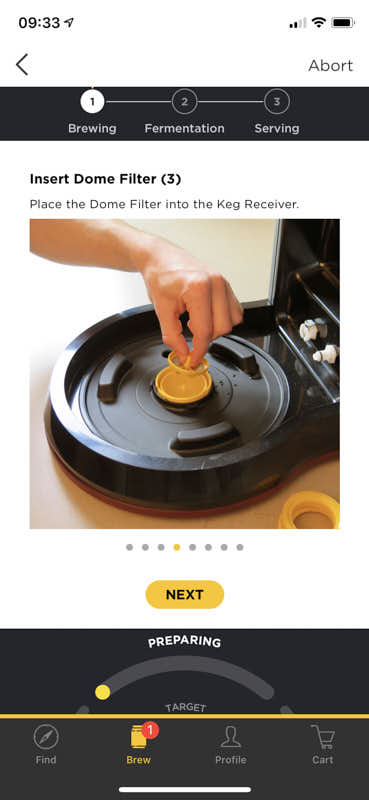
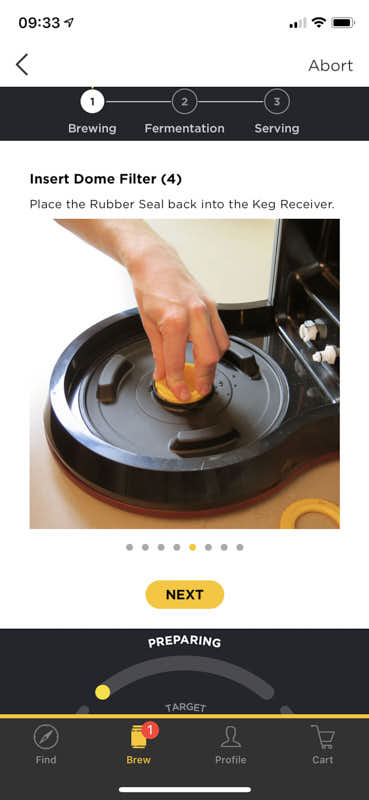
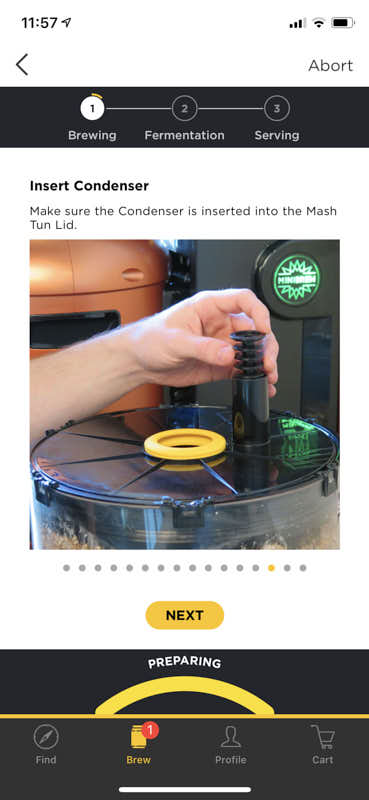
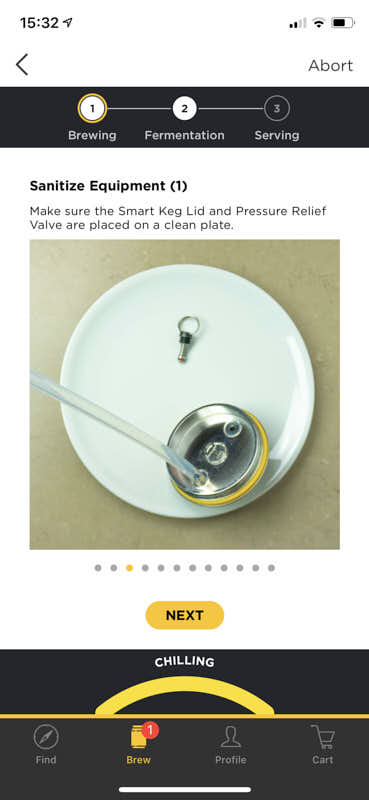
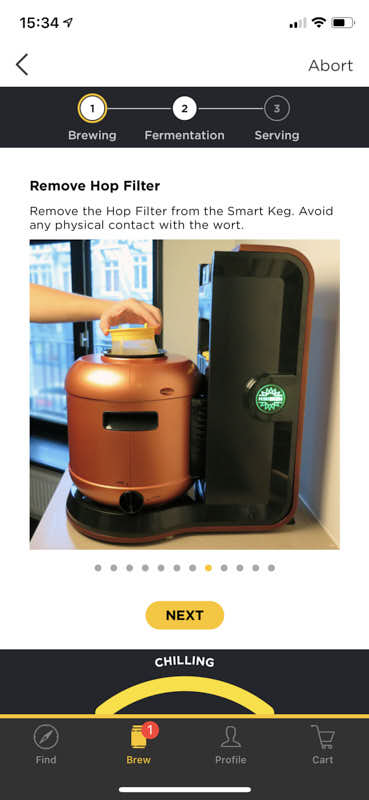
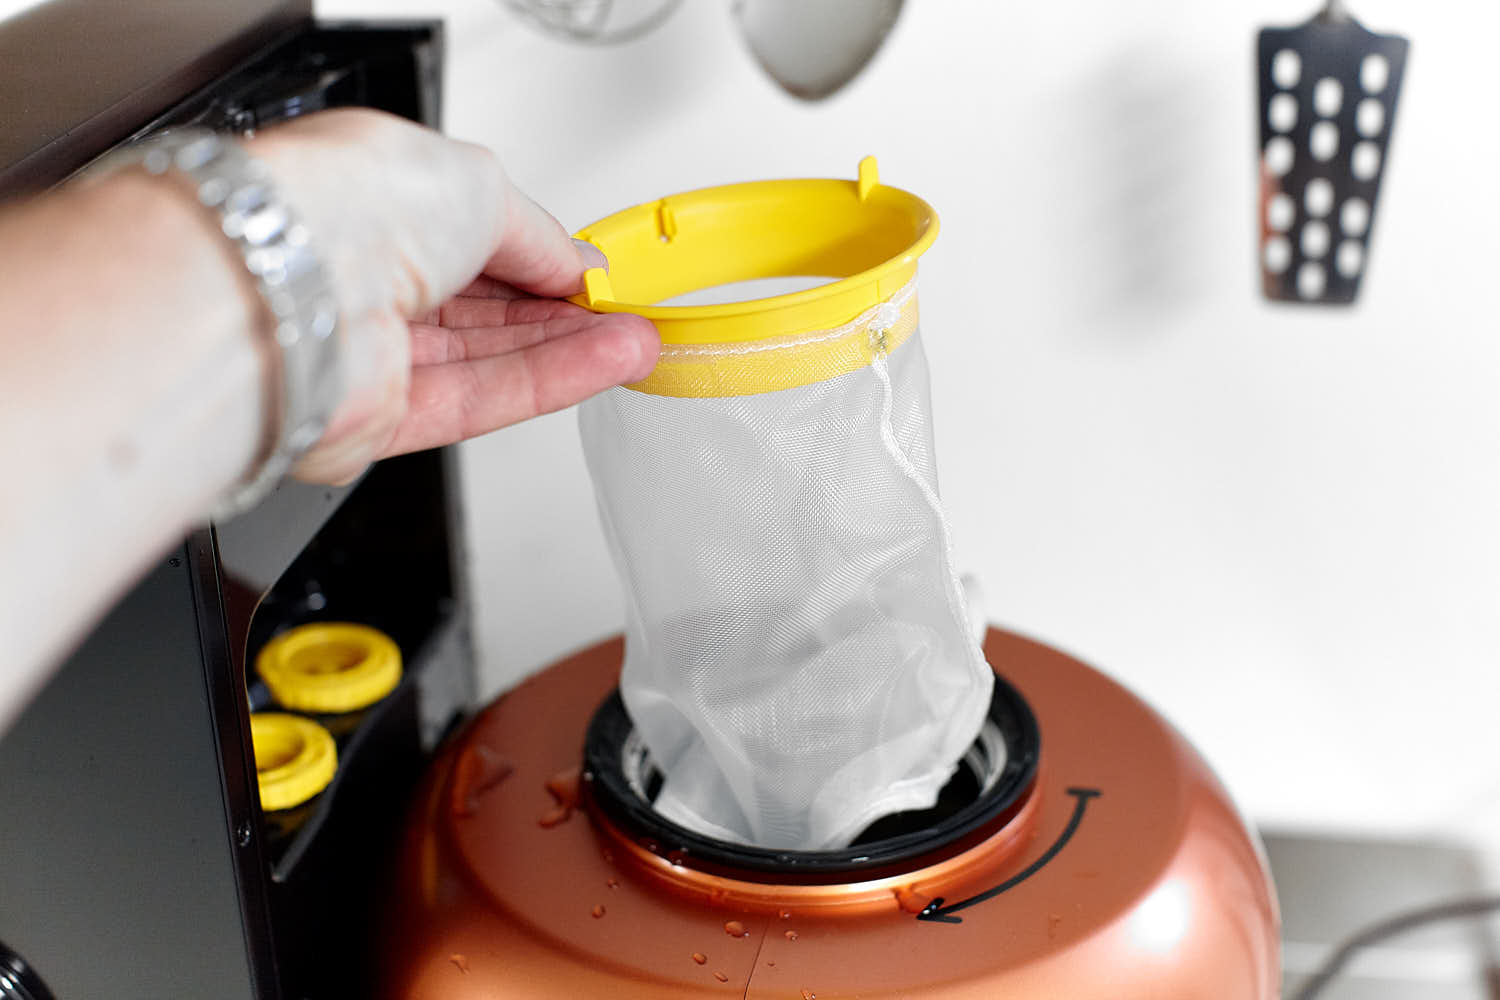 The the hop filter is added to the SmartKeg. This filter will catch both the hop bags and the yellow plastic discs from the hop carousel (more about these later).
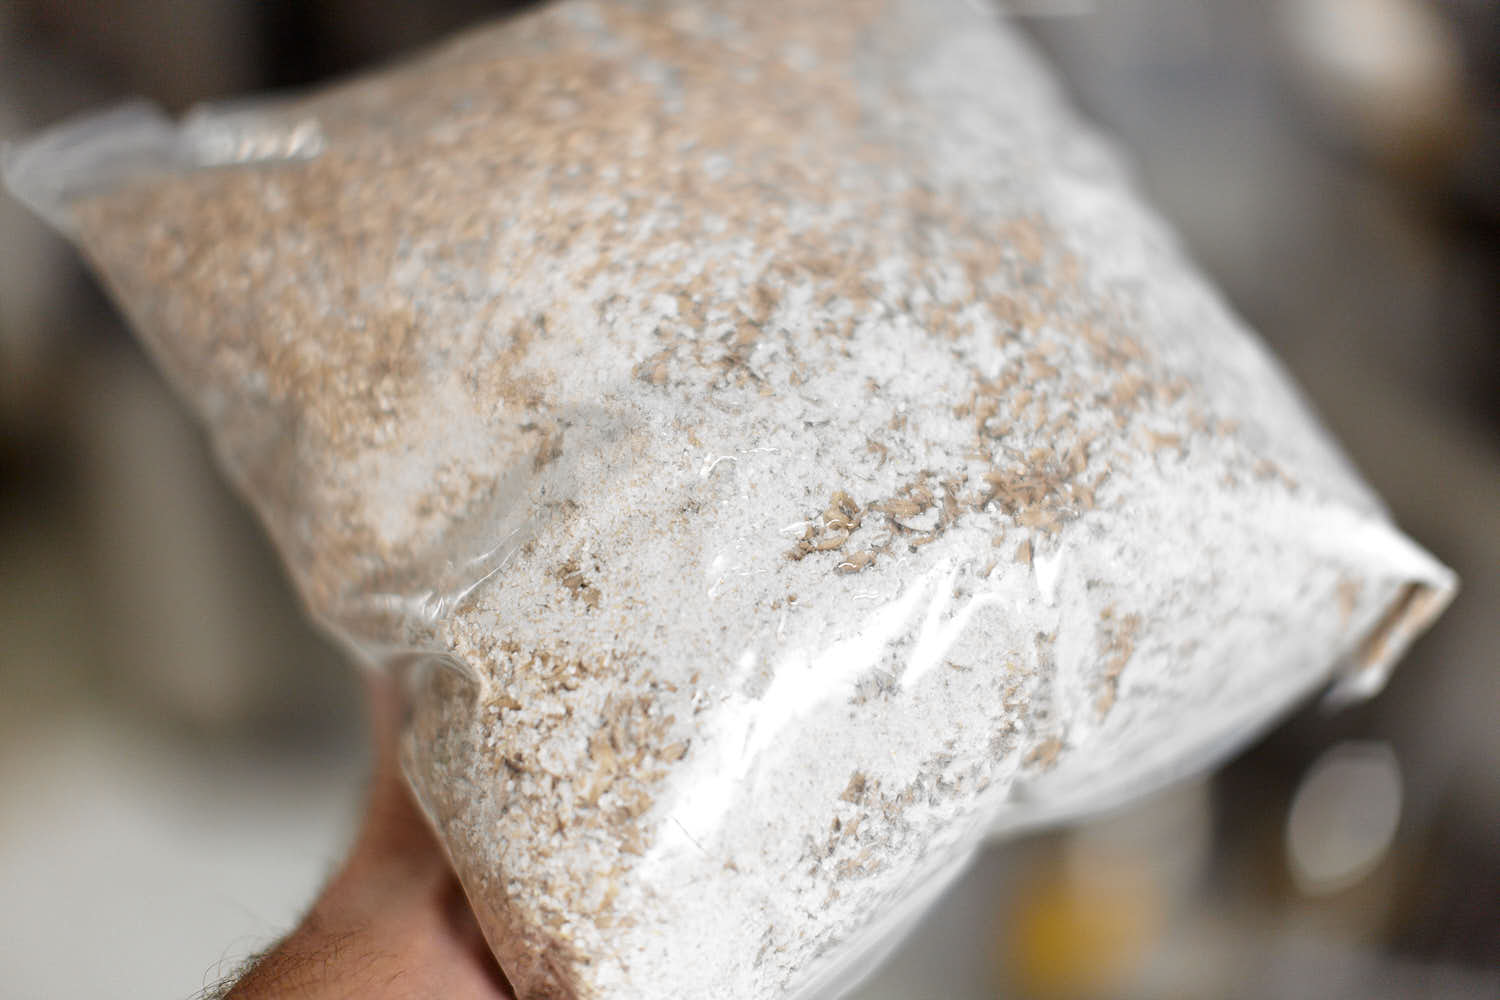 The amount of flour in the malt bag.
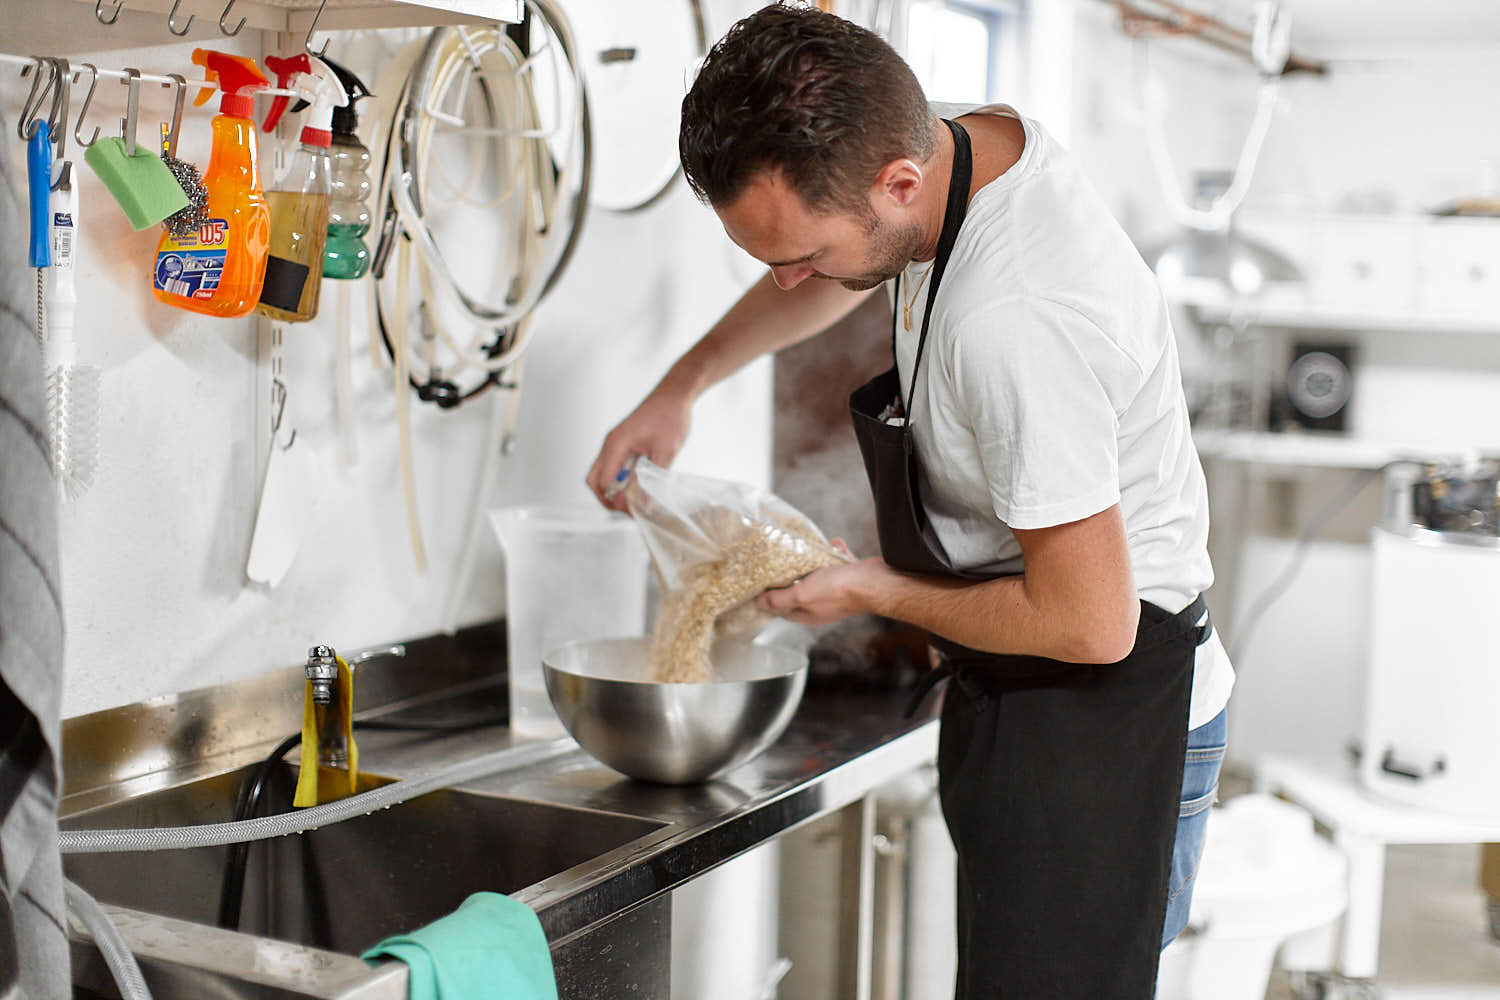 Add malt to a bowl.
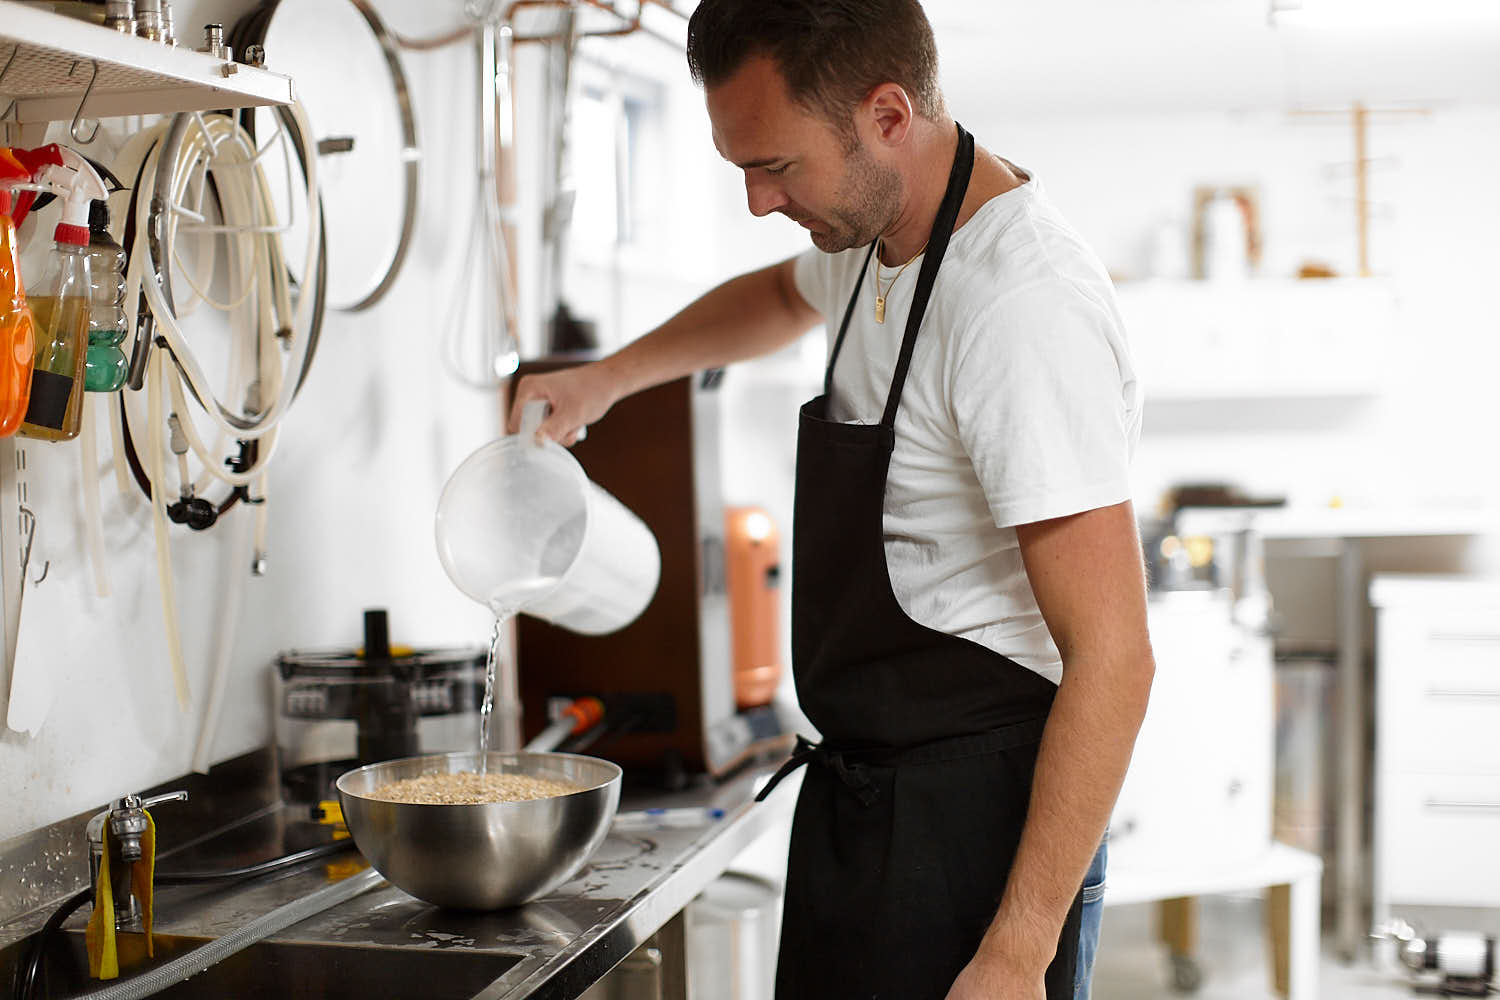 Add some water (amount is specified in the app).
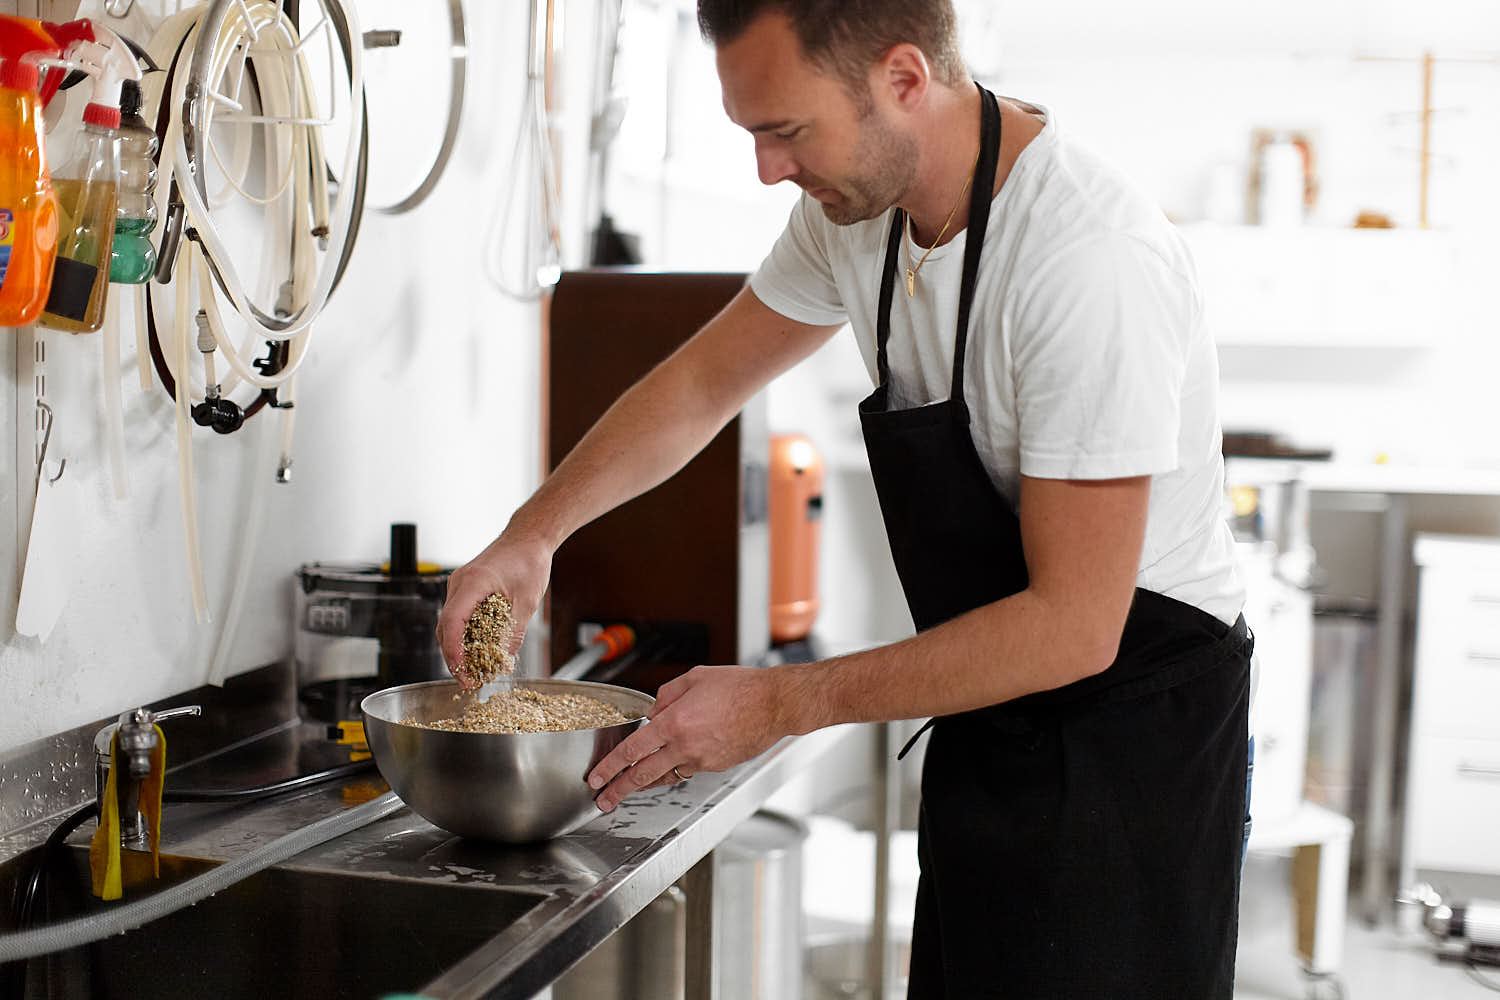 Now get down and dirty!
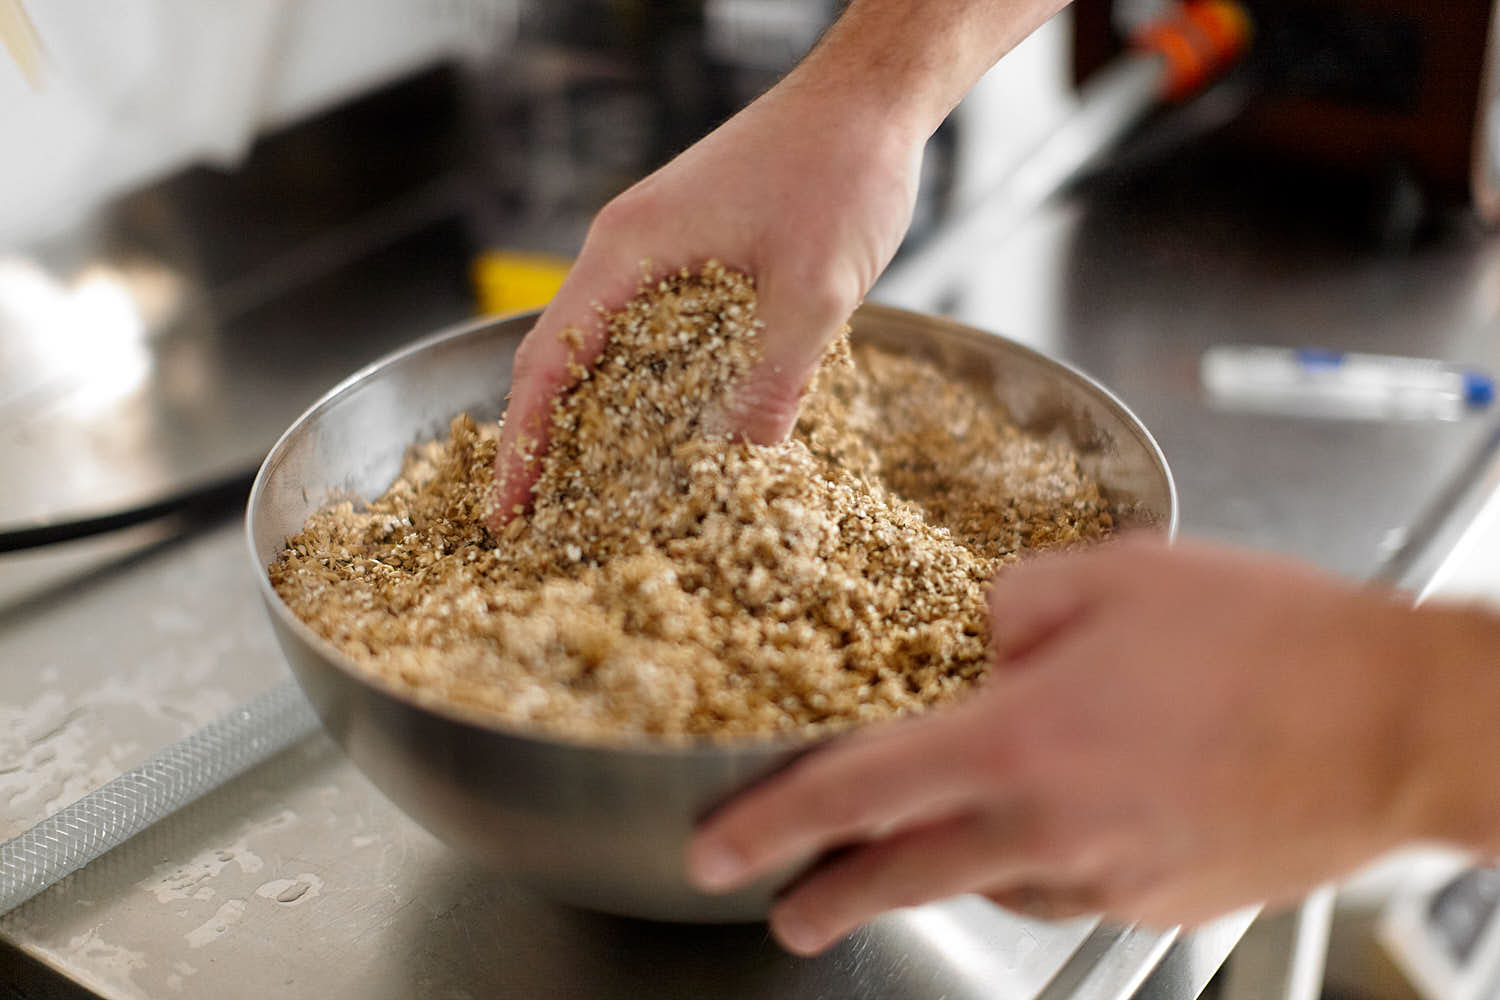
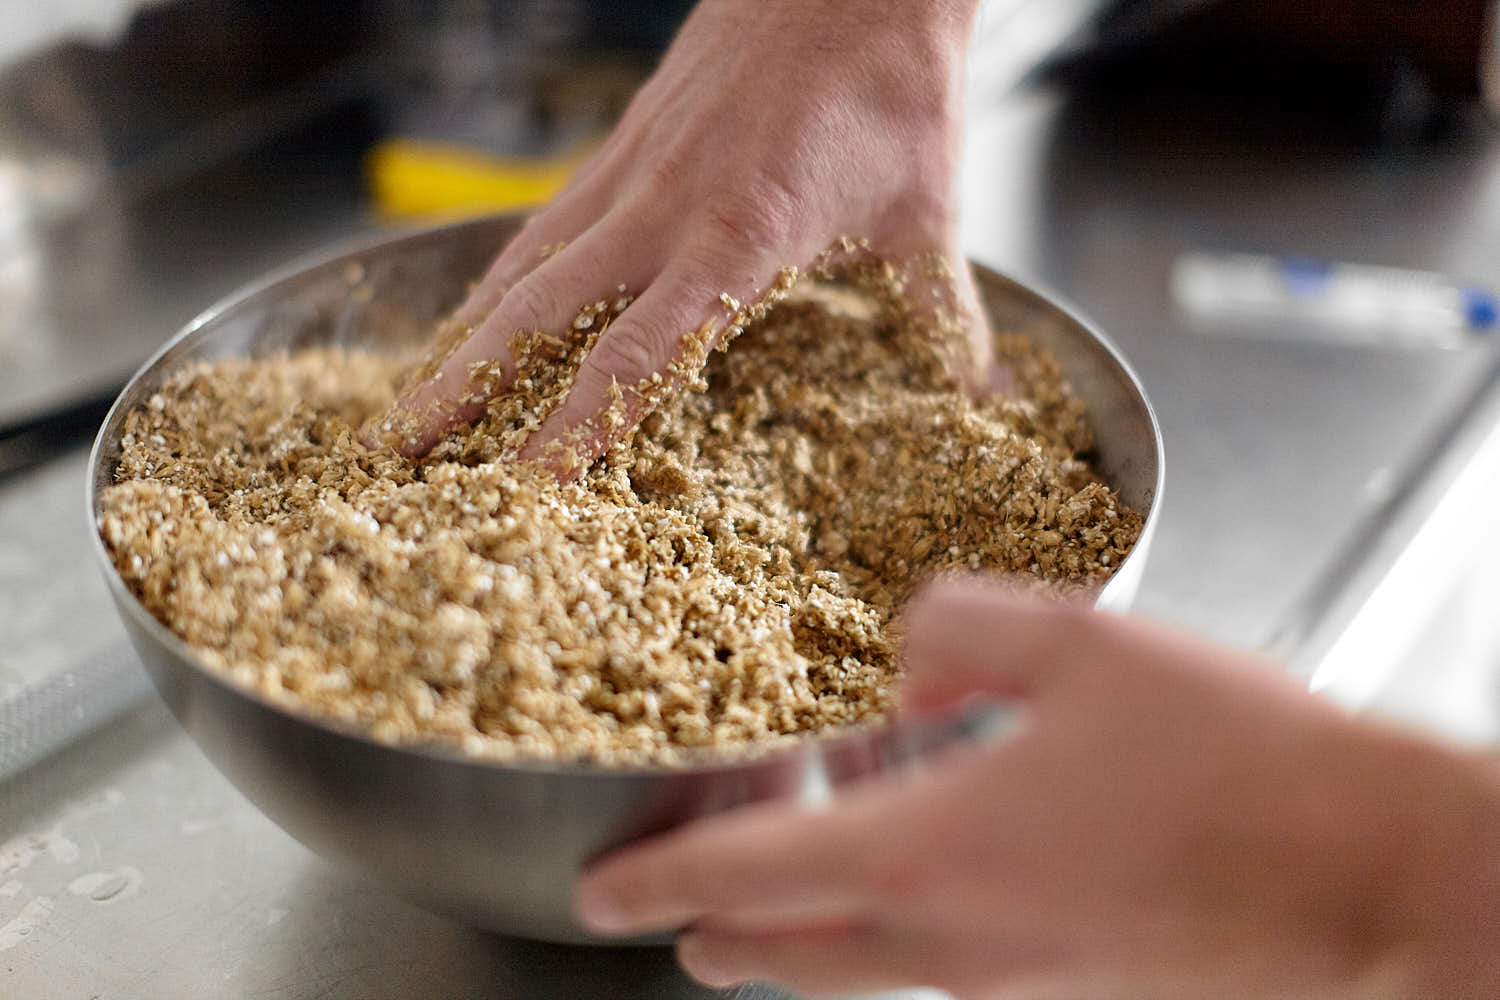 Mix it well!
 And then transfer it to the mash tun. Observe the mess outside of the mashtun. This could certainly be avoided with some care.
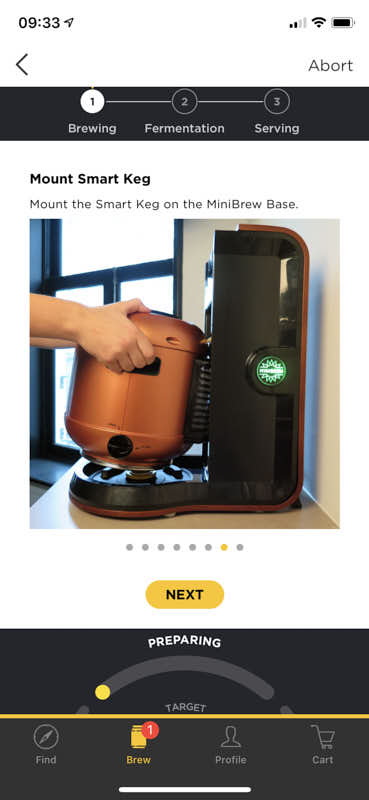
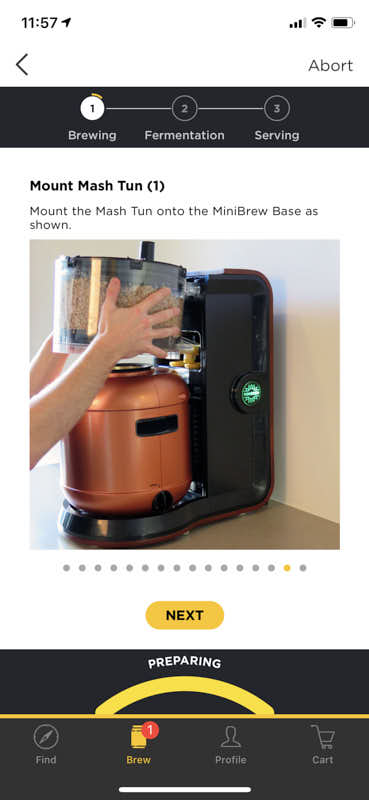
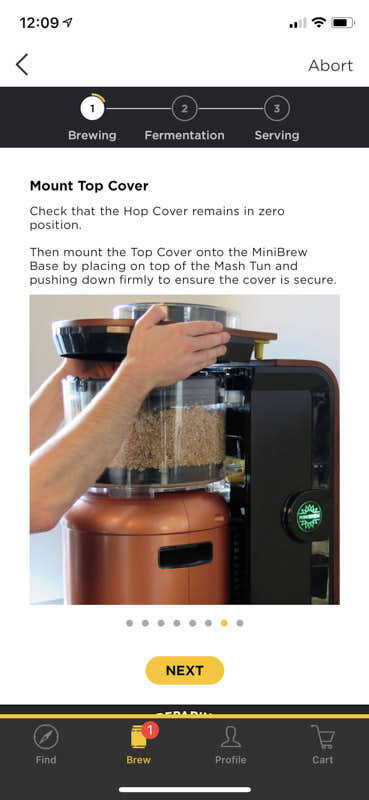
 Mashtun is connected above the SmartKeg.
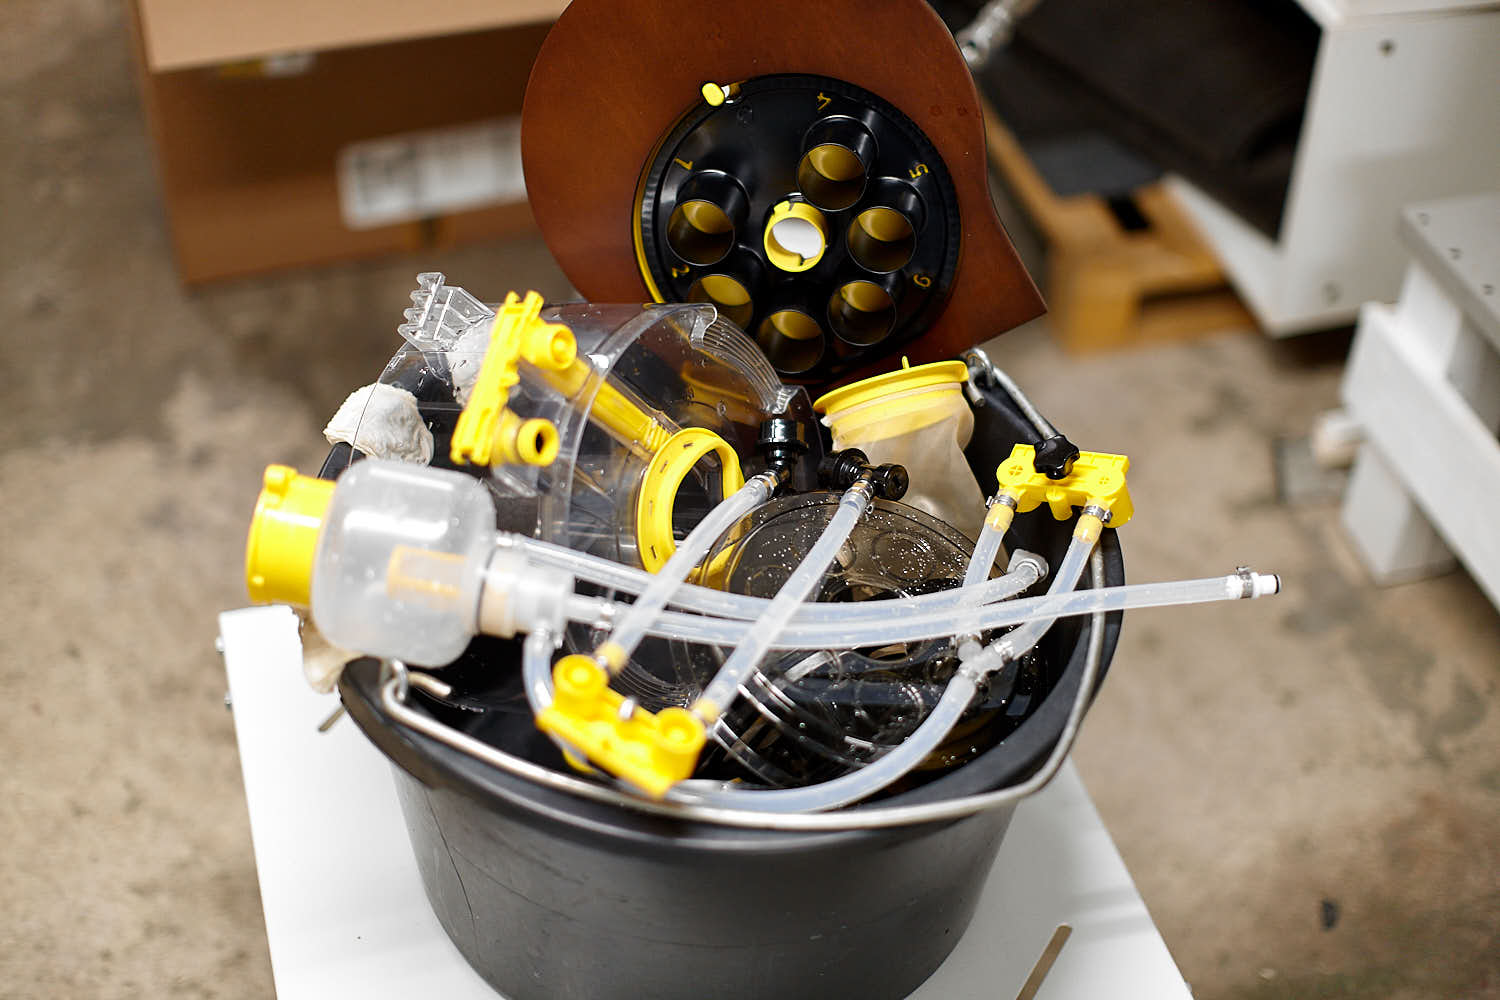
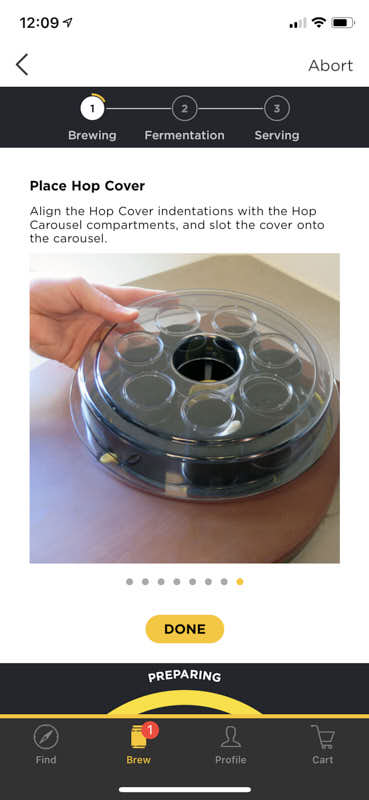
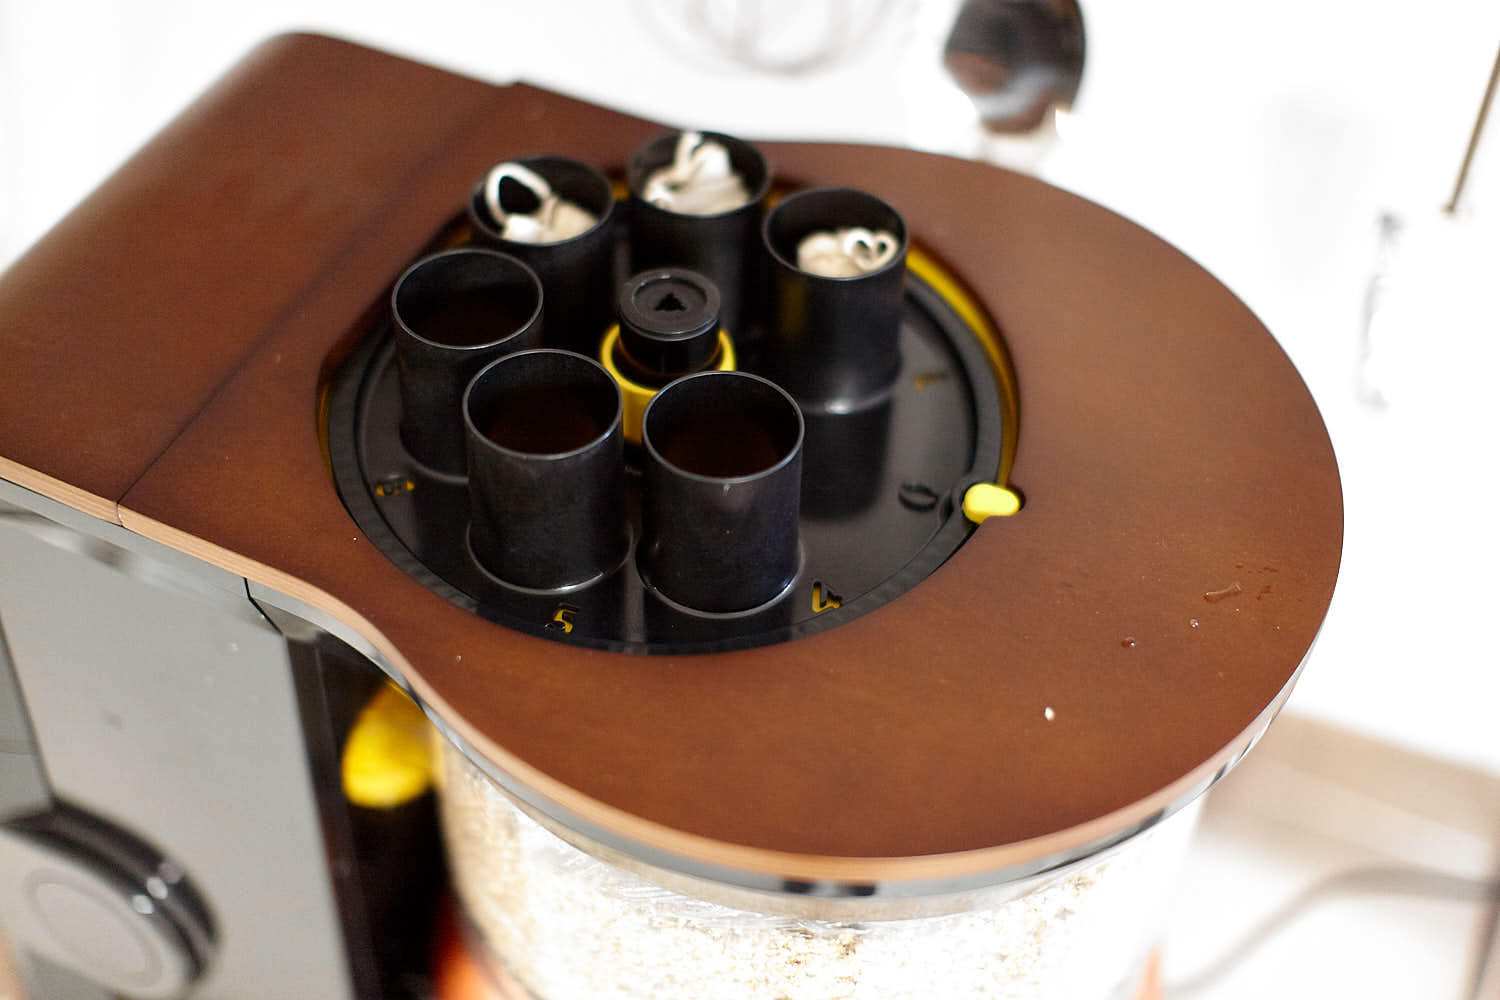 Hop carousel with half of the hop bags added.
 The hop bags are washed in water to add some weight to them.
 Mash cycle begins.
 All you have to do now is to wait.
 The mash is done and the wort is moved to the SmartKeg below the mash tun.
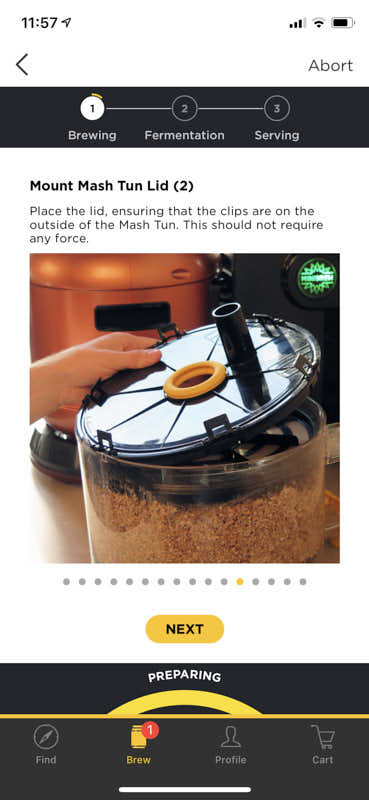
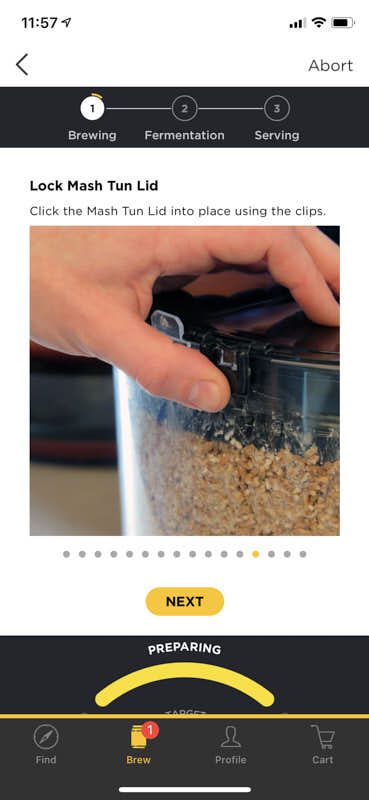
 The lid isn’t a very tight fit in the beginning but I guess that the gaskets holding the mash tun in place will wear after a while.
 I had some wort on the base after the SmartKeg was removed. I think the gasket was a bit too new or something like that.
 The yeast is still not added since the wort is still a bit too warm. The black part of the SmartKeg is the fan and it is continuing the cooling of the wort.
 Time to CIP the base station.
 Yes it got a bit messy there for a while.
 As I mentioned, I got a new CIP unit so this shouldn’t happen again. After the cleaning, the black lid to the right is placed on the yellow connector because of the water left in the MiniBrew base station.
 These are all the spare parts that needs to dry after the brewday. Yes it’s a lot of stuff!
Screenshots
Here are a lot of screenshots from the MiniBrew app during the brewday and the fermentation. I tried to capture them all but I have probably missed a few of them due to the massive amount!

 This was no good!


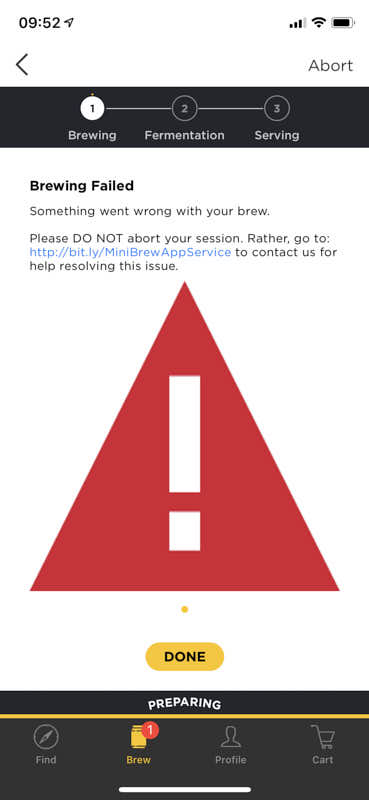 This is what happened when I had air in the system. The MiniBrew tried to resolve the problems a couple of times before it aborted and I had to start all over. This added quite some time to my brewday.
 I wish I could have skipped this step since the machine was already cleaned just a few minutes before!
 This happened a few times during the day. I think it was mainly because of my internet connection.
 Here they actually use a spoon but in the instruction films on Youtube you are supposed to use your hands. Either way, the bowl in the picture above is too small!


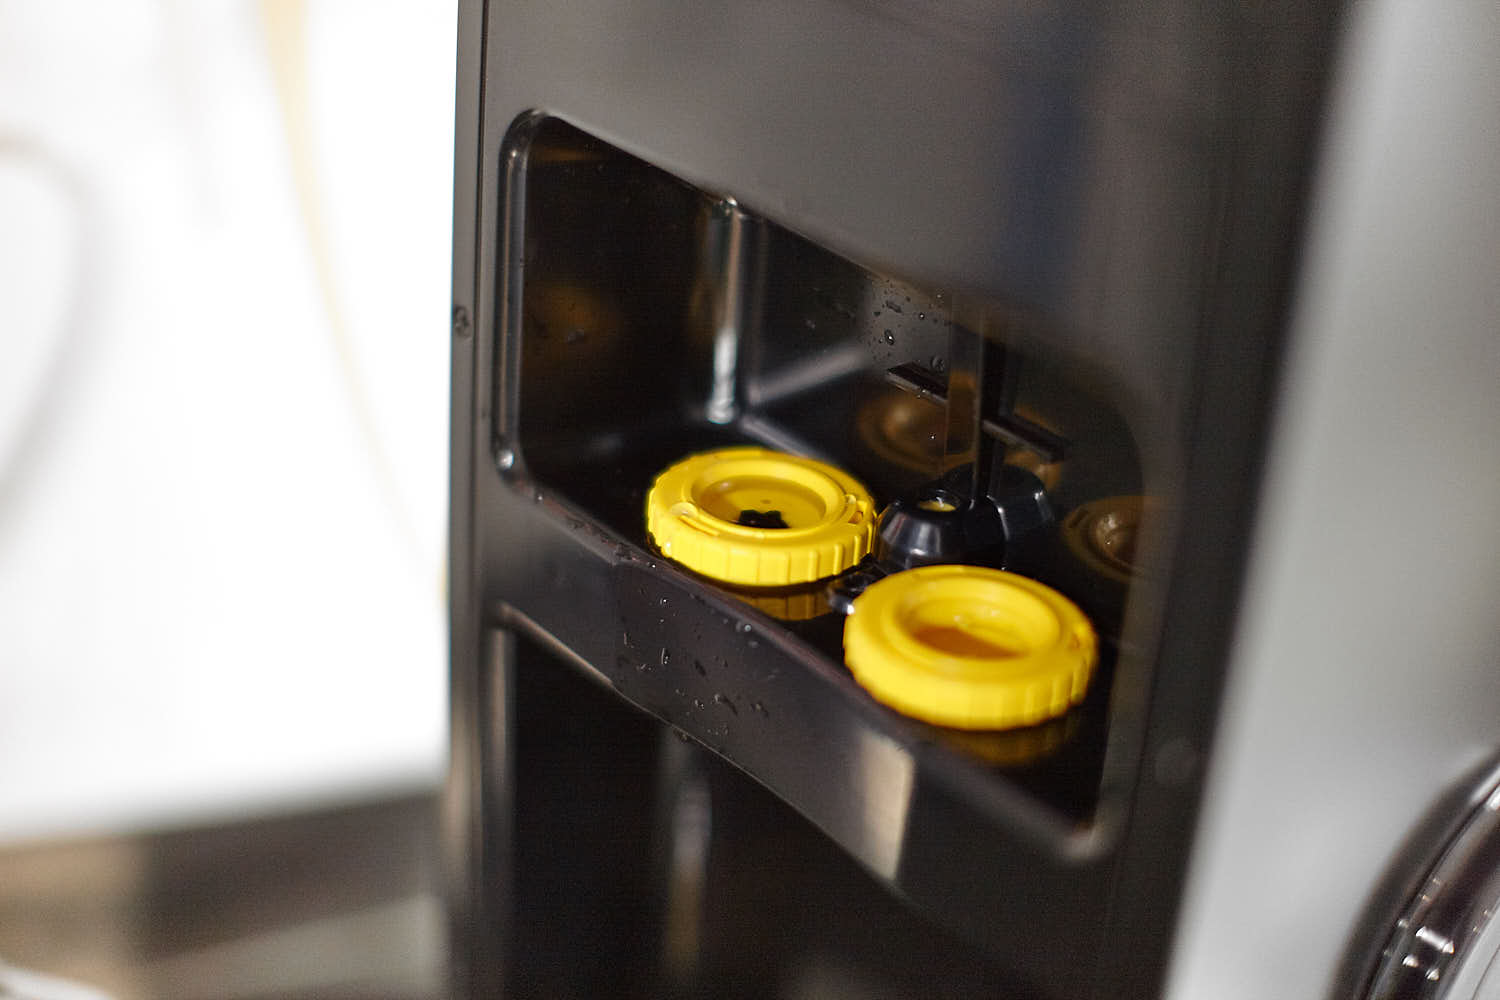
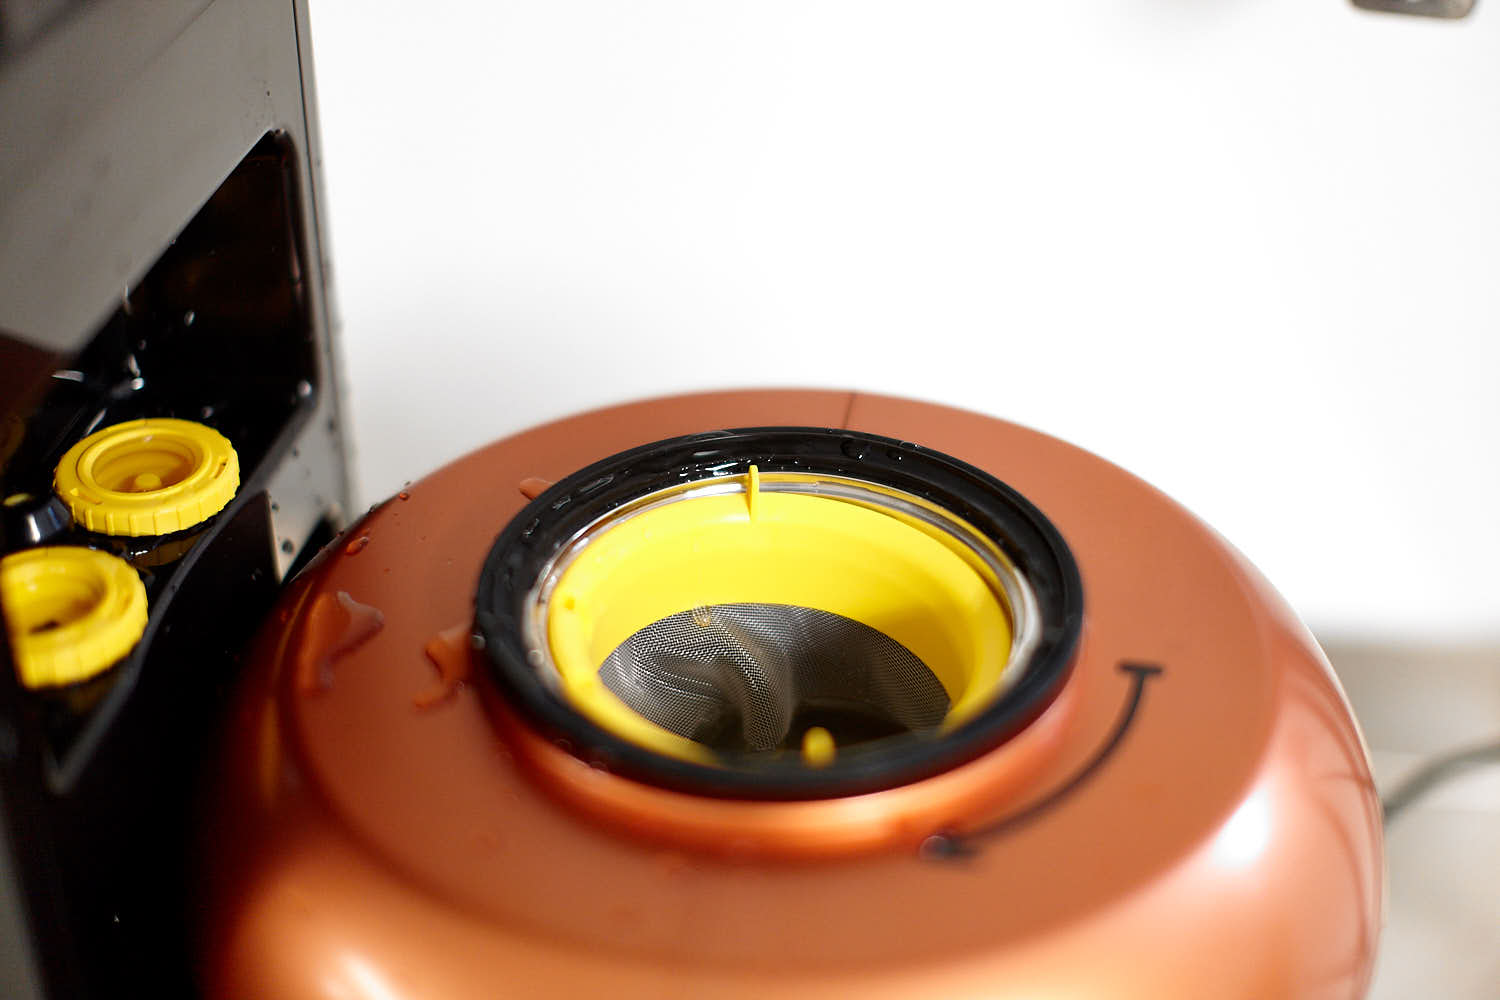
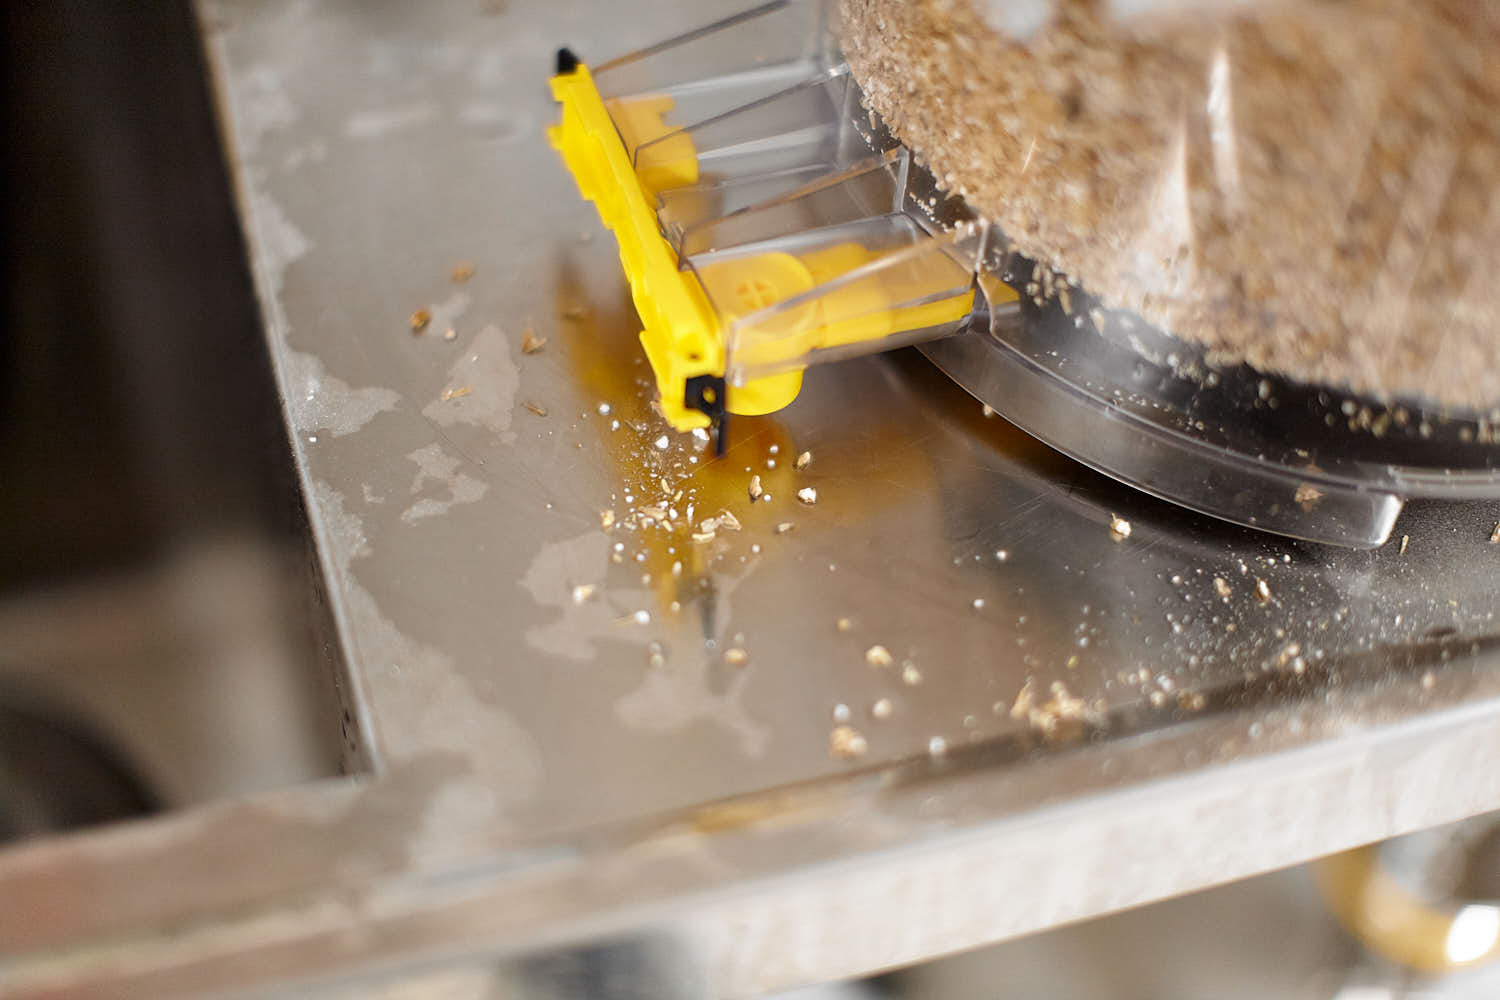
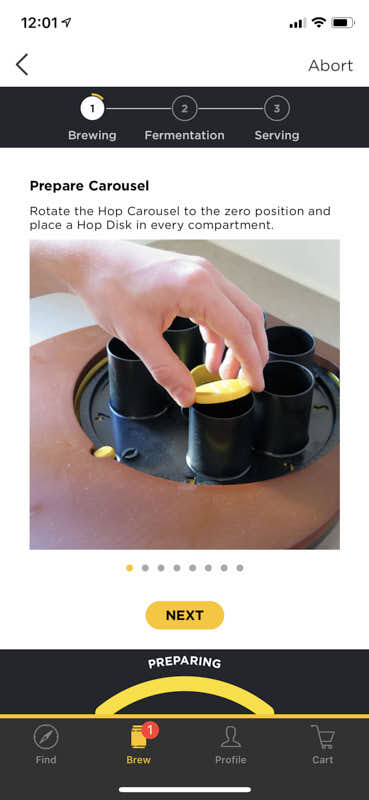 These are the ”yellow coin-like discs” that is helping the hopbags to drop.


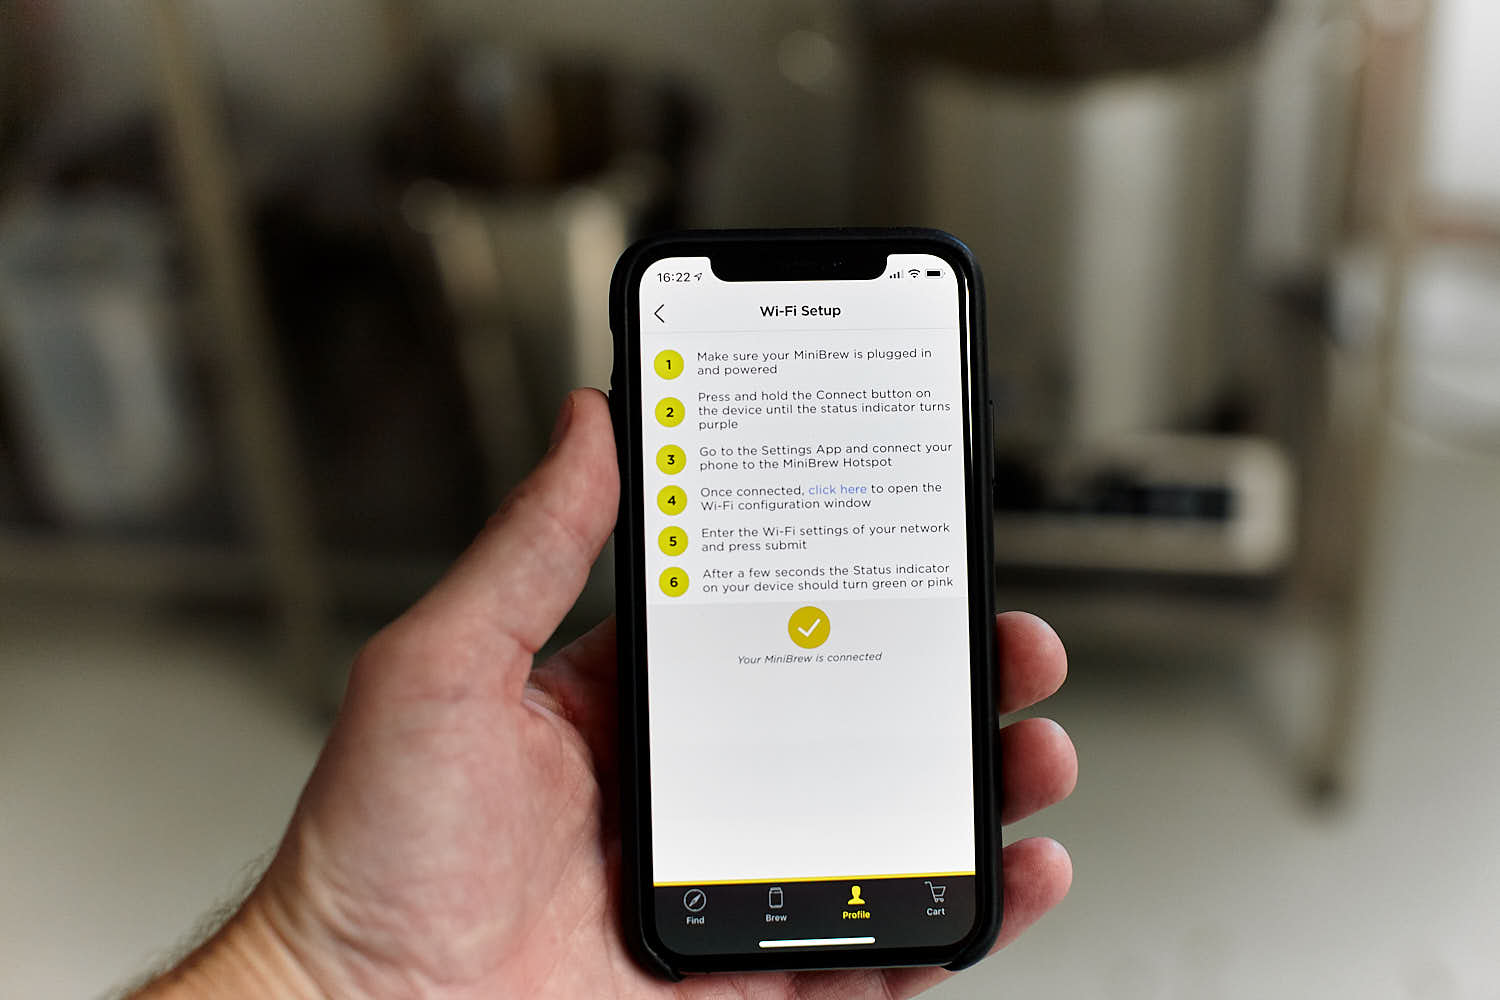
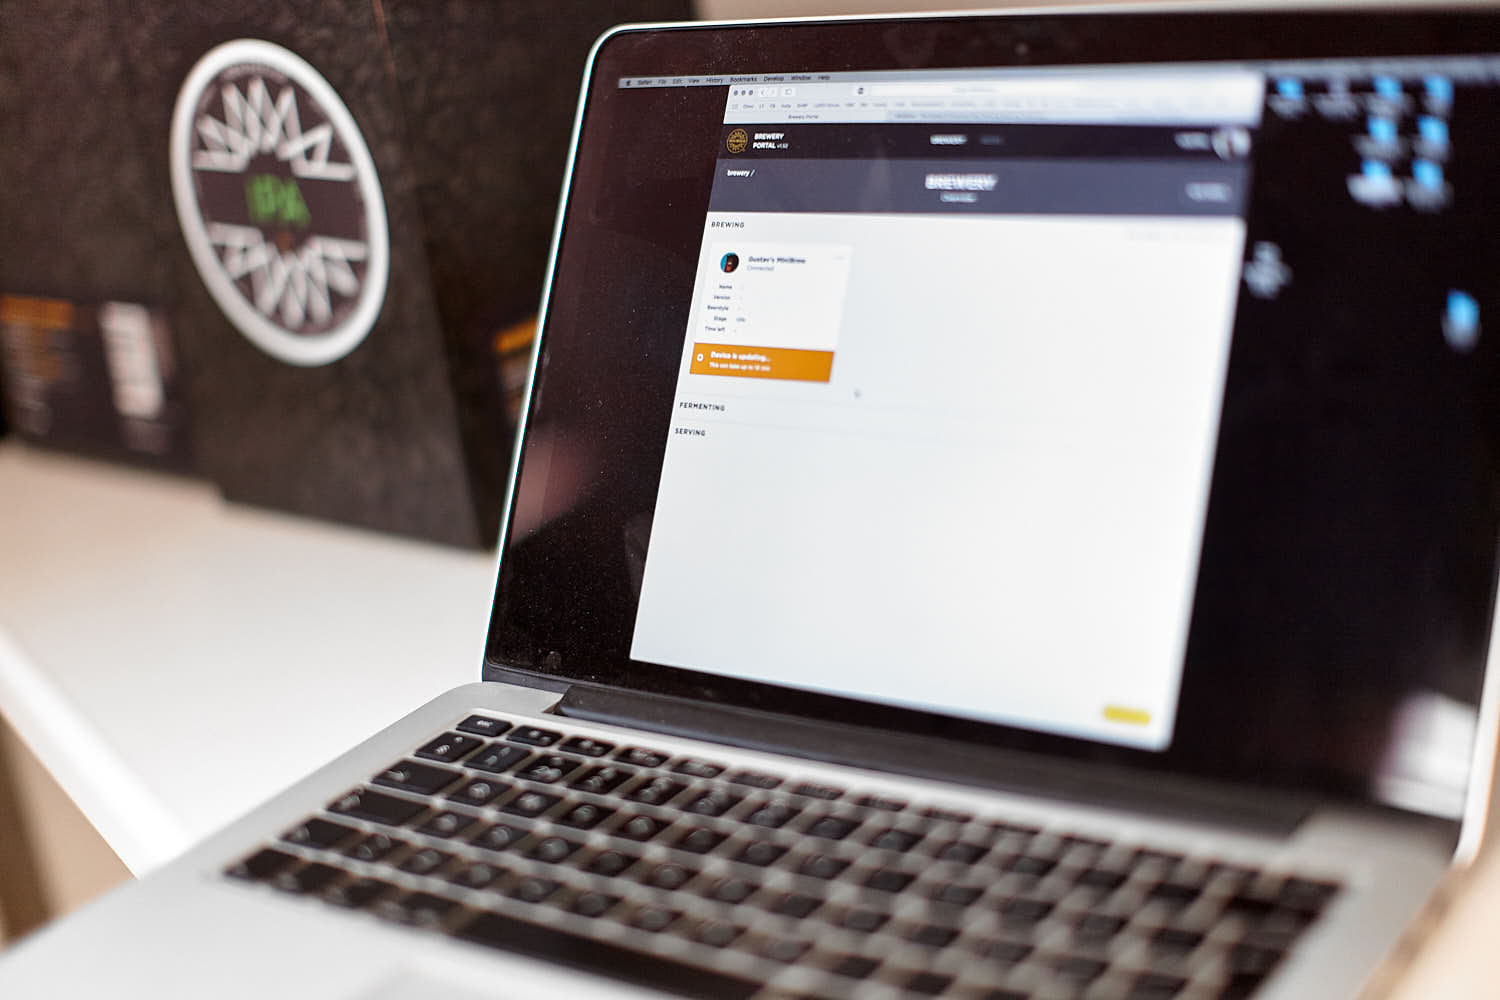
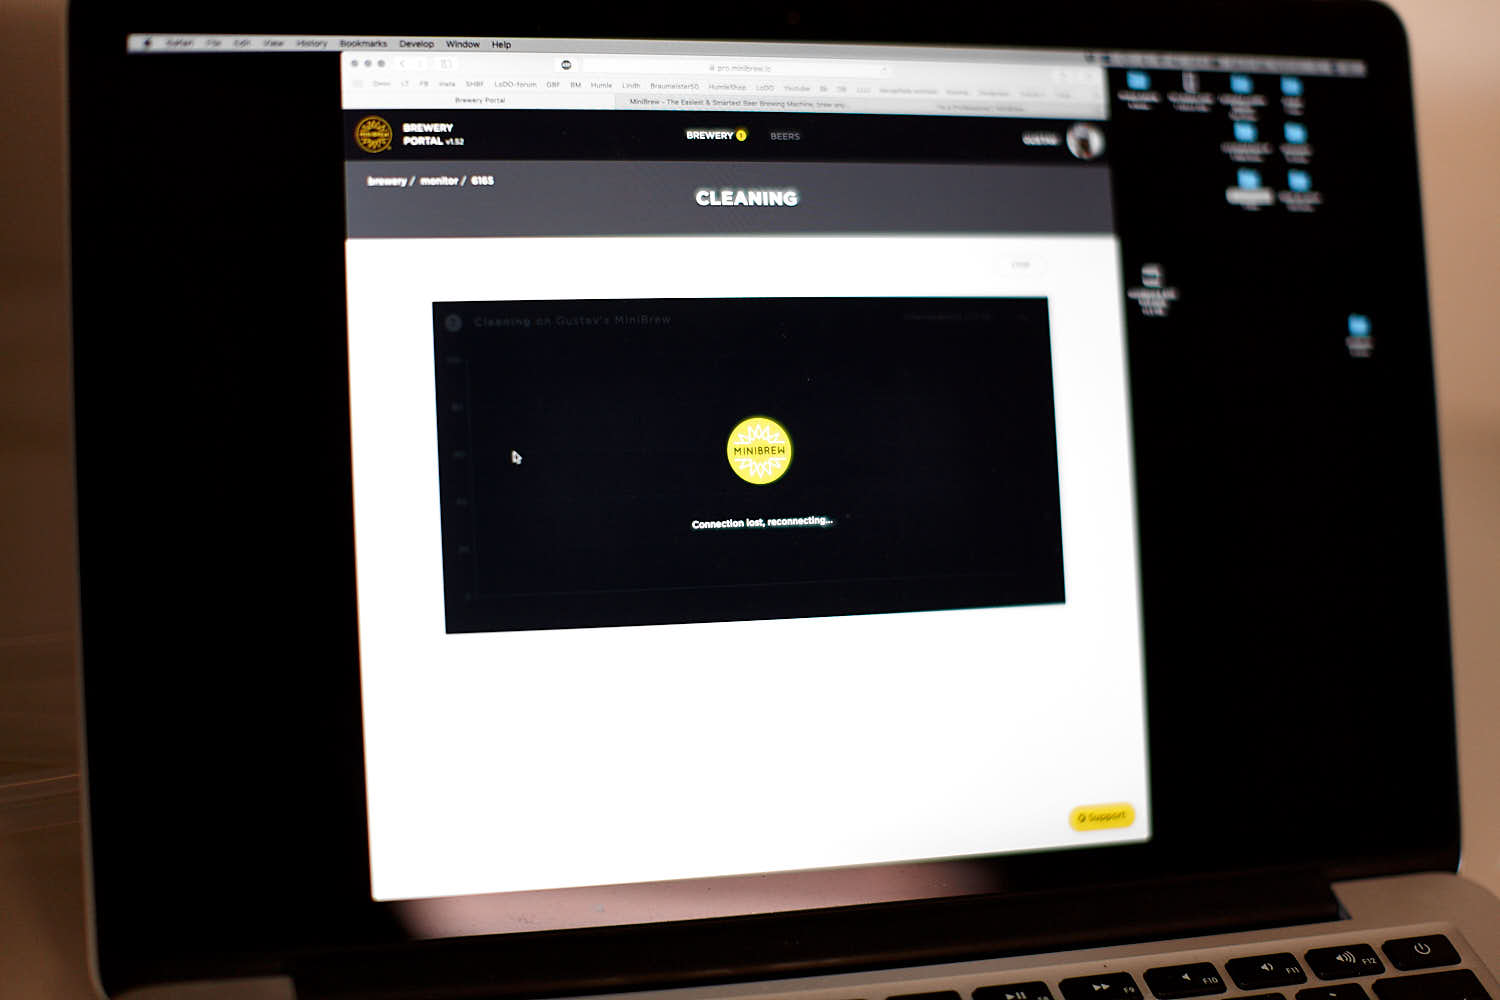
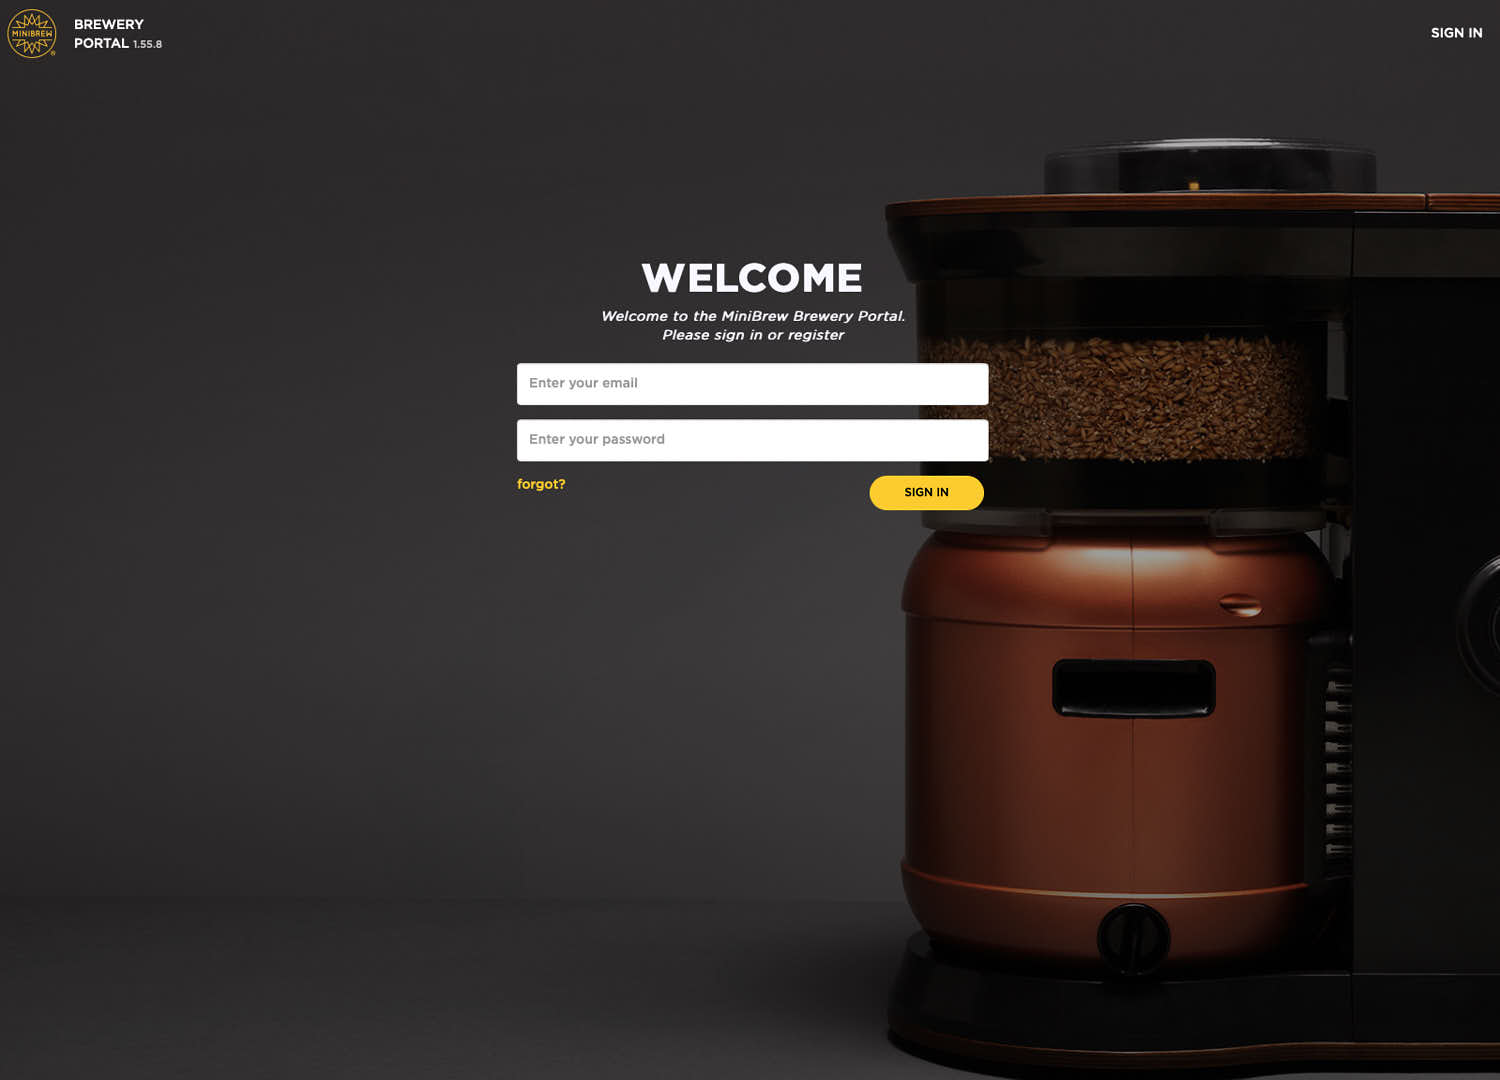
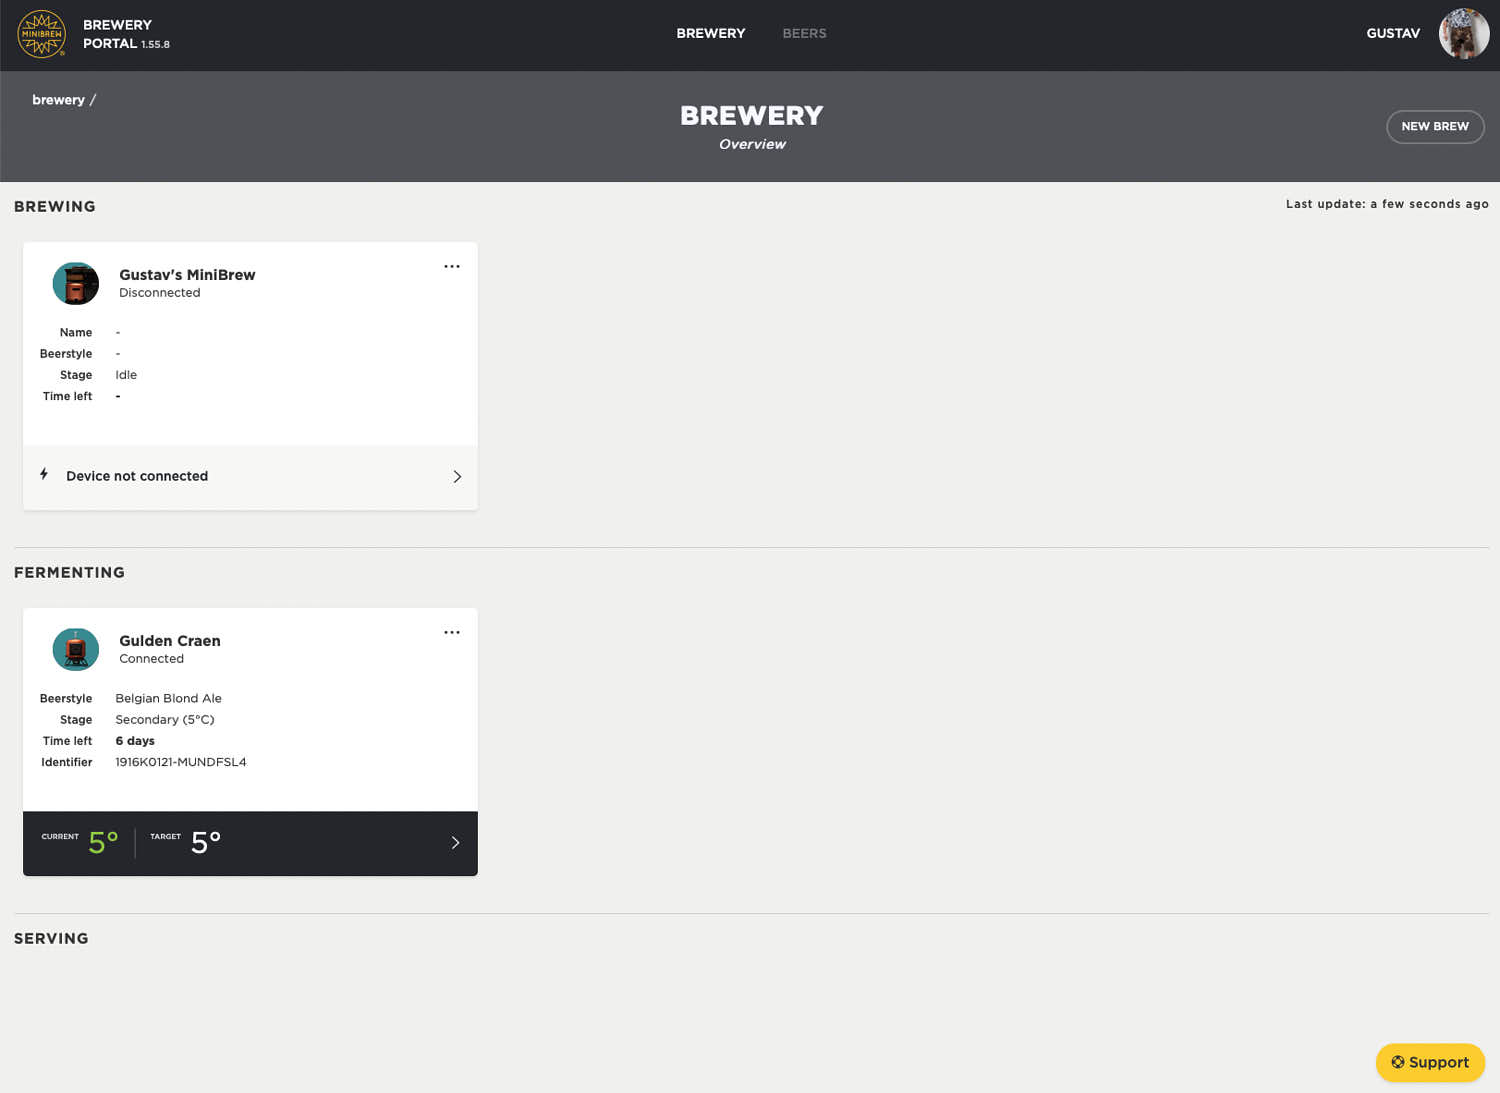
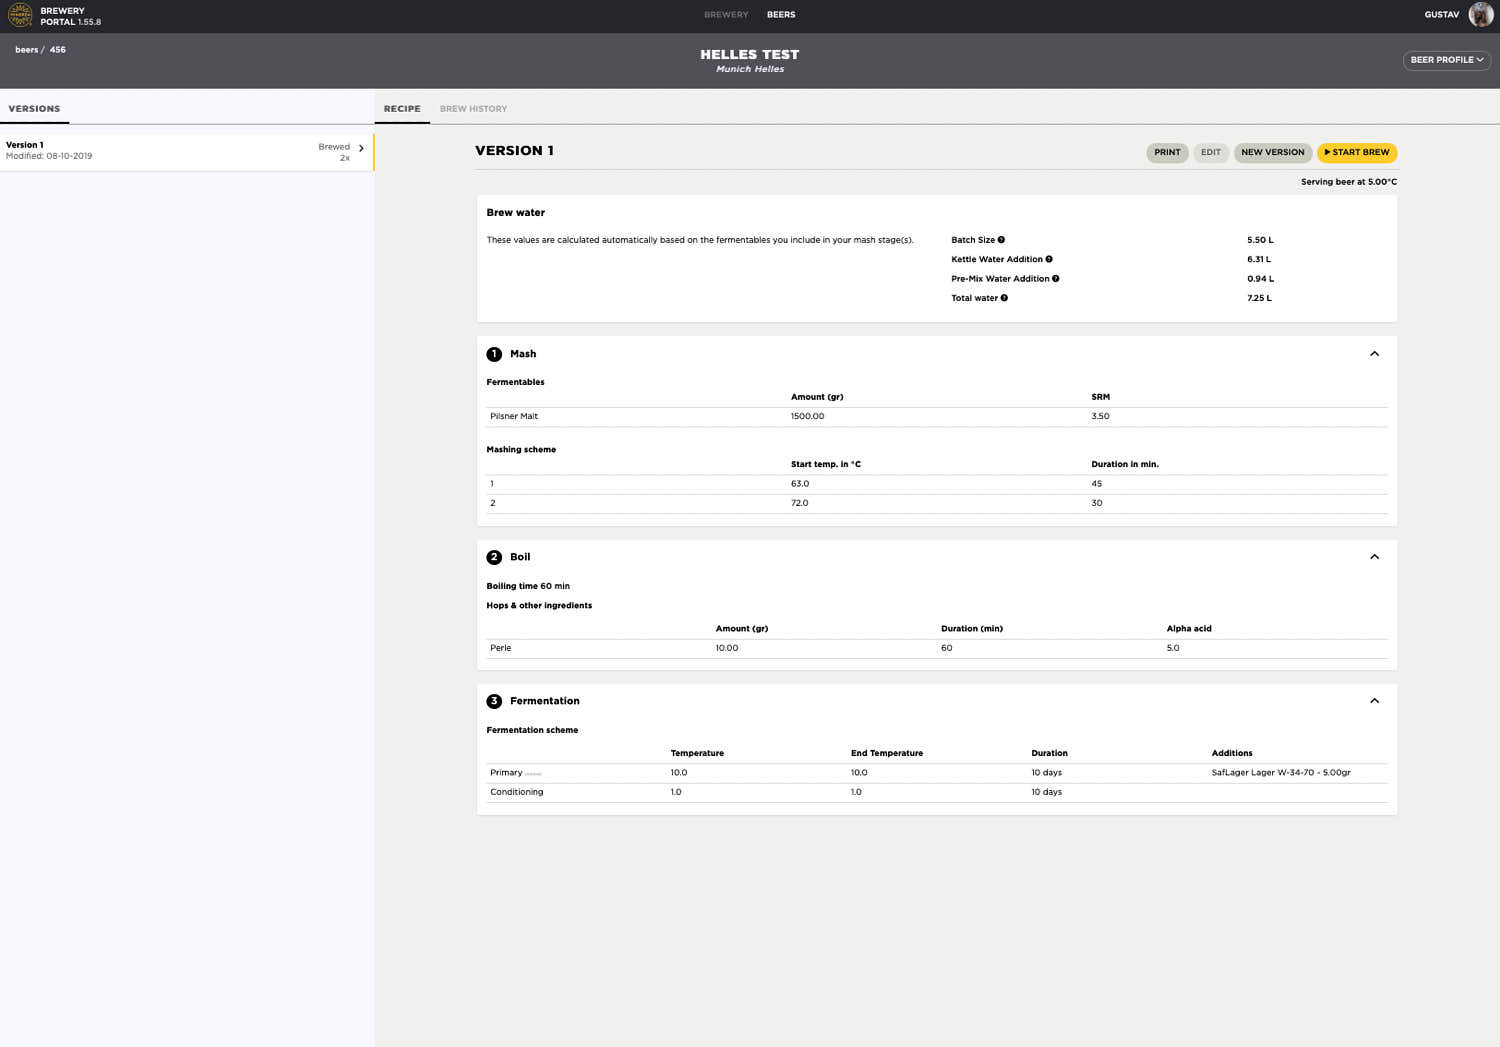
This is how the Brewery Portal looks like:
 Du har väl inte missat min bok om ölbryggning? Köp den hos Humlegården!

Grymt detaljerat. Några frågor från någon som inte kan något om hembryggning har jag.
1 – är det möjligt att tappa av på flaska från dessa fat efter lagring?
2 – temperatur vid jäsning av lager har jag hört ska vara ganska låg, klarar en sådan här maskin av det?
3 – såg på humlegårdens sida att de inte har en Android app än, går det att styra hela processen från brewery portalen i stället?
Återigen grymt inlägg! Med vänlig hälsning Niklas
Tack!
1- ja det går enkelt att tappa på flaska med billiga tillbehör men lite så att just denna maskin är tvärt emot flaskjäsning. Minifaten är riktigt nice att servera ur.
2-maskinen klarar lagertemperaturer utan problem. Ölet lgras och serveras runt 6-7c och lager jäses oftast runt 9-10c. Så inga problem alls.
3-det är en Androidapp påväg och tillverkaren säger att det ska gå med enbart portalen så då ska det väl det. Jag behövde telefonen för att få allt att fungera.
Hi,
Thanks for the review. I bought a minibrew and will brew my first beer.
Could you send me the PDF file that you mentioned (…manuscript for the app).
Thanks,
Joao
Hej
Kan man läsa någonstans hur du tyckte öl bryggda i din minibrew smakade?
Mvh Joel
Ja den här är ganska detaljerad över tre öl bryggda med Minibrew: https://www.lindhcraftbeer.com/2020/04/gustator-doppelbock-provsmakning/
Thanks for the review, its very helpful. I am curious about the wort efficiency though.
Efficiency is calculted in the software and is recipe depended. 63-75% brewhouse is where I’ve seen it. That makes mash efficiency a bit higher but overall I would say it is not a very efficient brewer since there is no sparging.
Great Review
I thought too that this system didnt have a sparge, but look at the app images, there are 2 photos of a yellow sparge plate, that seems to be to upper lid (below the revolver) isnt it for sparging water
This is 100% a no sparge system. It’s called a sparge plate but there is no sparging involved in the process.
Do you think the MiniBrew would be able to cope with a power outage during the brew day? I.e. is there some possibility of recovery and restarting the process roughly where it left off or would you have to start over from scratch? (Possibly even ruining the batch depending on the exact moment the power went.) I live in a rural area where power outages aren’t uncommon so this is somewhat of a concern.
How dependent is the process on a working Internet connection? Is a working local WiFi connection sufficient or do you actually need Internet access during the whole brew day?
I have no idea about power outage. Ask Minibrew directly.
Internet connection is required to be able to proceed to next step. Just wifi will not be sufficiant since the app loads instructions from the Minibrew server.
Adding answer received from MiniBrew support, in case anyone else is wondering…
The MiniBrew base station and keg are both capable of brewing when a power outtage has taken place. Both devices should keep their state when they come back online. However during brewing, a long power outtage may cause the base to end up in an error state, due to the long waiting time and the susceptibillity of the wort to infection. Then again, during the weekdays there is always support available between 9am – 5pm European time, to help the customers out when they experience issues like this.
Hello,
Ok after You bought it, do You use it and are You happy of the resoults ? taste ?
The beers turned out good but the batch size is way too small for my use.